Update the push trigger with the branch which should deploy the docs,
also bring over the updates to the workflow from the v2.3 branch and:
- remove main and development branch from trigger
- they would fail without the updated toml
- cache pip environment
- update install method (`pip install ".[docs]"`)
hi there, love the project! i noticed a small typo when going over the
install process.
when copying the automated install instructions from the docs into a
terminal, the line to install the python packages failed as it was
missing the `-y` flag.
when copying the automated install instructions from the docs into a terminal, the line to install the python packages failed as it was missing the `-y` flag.
Seems like this is the only change needed for the existing inpaint code
to work as a node. Kyle said on Discord that inpaint shouldn't be a
node, so feel free to just reject this if this code is going to be gone
soon.
# Intro
This commit adds invokeai.backend.util.logging, which provides support
for formatted console and logfile messages that follow the status
reporting conventions of earlier InvokeAI versions:
```
### A critical error
*** A non-fatal error
** A warning
>> Informational message
| Debugging message
```
Internally, the invokeai logging module creates a new default logger
named "invokeai" so that its logging does not interfere with other
module's use of the vanilla logging module. So `logging.error("foo")`
will go through the regular logging path and not add InvokeAI's
informational message decorations, while `ialog.error("foo")` will add
the decorations.
# Usage:
This is a thin wrapper around the standard Python logging module. It can
be used in several ways:
## Module-level logging style
This style logs everything through a single default logging object and
is identical to using Python's `logging` module. The commonly-used
module-level logging functions are implemented as simple pass-thrus to
logging:
```
import invokeai.backend.util.logging as logger
logger.debug('this is a debugging message')
logger.info('this is a informational message')
logger.log(level=logging.CRITICAL, 'get out of dodge')
logger.disable(level=logging.INFO)
logger.basicConfig(filename='/var/log/invokeai.log')
logger.error('this will be logged to console and to invokeai.log')
```
Internally these functions all go through a custom logging object named
"invokeai". You can access it to perform additional customization in
either of these ways:
```
logger = logger.getLogger()
logger = logger.getLogger('invokeai')
```
## Object-oriented style
For more control, the logging module's object-oriented logging style is
also supported. The API is identical to the vanilla logging usage. In
fact, the only thing that has changed is that the getLogger() method
adds a custom formatter to the log messages.
```
import logging
from invokeai.backend.util.logging import InvokeAILogger
logger = InvokeAILogger.getLogger(__name__)
fh = logging.FileHandler('/var/invokeai.log')
logger.addHandler(fh)
logger.critical('this will be logged to both the console and the log file')
```
## Within the nodes API
From within the nodes API, the logger module is stored in the `logger`
slot of InvocationServices during dependency initialization. For
example, in a router, the idiom is:
```
from ..dependencies import ApiDependencies
logger = ApiDependencies.invoker.services.logger
logger.warning('uh oh')
```
Currently, to change the logger used by the API, one must change the
logging module passed to `ApiDependencies.initialize()` in `api_app.py`.
However, this will eventually be replaced with a method to select the
preferred logging module using the configuration file (dependent on
merging of PR #3221)
- I've sorted out the issues that make *not* persisting troublesome, these will be rolled out with canvas
- Also realized that persisting gallery images very quickly fills up localStorage, so we can't really do it anyways
vastly improves the gallery performance when many images are loaded.
- `react-virtuoso` to do the virtualized list
- `overlayscrollbars` for a scrollbar
On hyperthreaded CPUs we get two threads operating on the queue by
default on each core. This cases two threads to process queue items.
This results in pytorch errors and sometimes generates garbage.
Locking this to single thread makes sense because we are bound by the
number of GPUs in the system, not by CPU cores. And to parallelize
across GPUs we should just start multiple processors (and use async
instead of threading)
Fixes#3289
- `disabledParametersPanels` -> `disabledFeatures`
- handle disabling `faceRestore`, `upscaling`, `lightbox`, `modelManager` and OSS header links/buttons
- wait until models are loaded to hide loading screen
- also wait until schema is parsed if `nodes` is an enabled tab
When gallery was empty (and there is therefore no selected image), no
progress images were displayed.
- fix by correcting the logic in CurrentImageDisplay
- also fix app crash introduced by fixing the first bug
Prevent legacy CLI crash caused by removal of convert option
- Compensatory change to the CLI that prevents it from crashing when it
tries to import a model.
- Bug introduced when the "convert" option removed from the model
manager.
- Fix the update script to work again and fixes the ambiguity between
when a user wants to update to a tag vs updating to a branch, by making
these two operations explicitly separate.
- Remove dangling functions and arguments related to legacy checkpoint
conversion. These are no longer needed now that all legacy models are
either converted at import time, or on-the-fly in RAM.
I noticed that the current invokeai-new.py was using almost all of a CPU
core. After a bit of profileing I noticed that there were many thousands
of calls to epoll() which suggested to me that something wasn't sleeping
properly in asyncio's loop.
A bit of further investigation with Python profiling revealed that the
__dispatch_from_queue() method in FastAPIEventService
(app/api/events.py:33) was also being called thousands of times.
I believe the asyncio.sleep(0.001) in that method is too aggressive (it
means that the queue will be polled every 1ms) and that 0.1 (100ms) is
still entirely reasonable.
Currently translated at 100.0% (512 of 512 strings)
translationBot(ui): update translation (Russian)
Currently translated at 100.0% (512 of 512 strings)
translationBot(ui): update translation (English)
Currently translated at 100.0% (512 of 512 strings)
translationBot(ui): update translation (Ukrainian)
Currently translated at 100.0% (506 of 506 strings)
translationBot(ui): update translation (Russian)
Currently translated at 100.0% (506 of 506 strings)
translationBot(ui): update translation (Russian)
Currently translated at 100.0% (506 of 506 strings)
Co-authored-by: System X - Files <vasyasos@gmail.com>
Translate-URL: https://hosted.weblate.org/projects/invokeai/web-ui/en/
Translate-URL: https://hosted.weblate.org/projects/invokeai/web-ui/ru/
Translate-URL: https://hosted.weblate.org/projects/invokeai/web-ui/uk/
Translation: InvokeAI/Web UI
Currently translated at 100.0% (512 of 512 strings)
translationBot(ui): update translation (Italian)
Currently translated at 100.0% (511 of 511 strings)
translationBot(ui): update translation (Italian)
Currently translated at 100.0% (506 of 506 strings)
Co-authored-by: Riccardo Giovanetti <riccardo.giovanetti@gmail.com>
Translate-URL: https://hosted.weblate.org/projects/invokeai/web-ui/it/
Translation: InvokeAI/Web UI
Currently translated at 100.0% (512 of 512 strings)
translationBot(ui): update translation (Spanish)
Currently translated at 100.0% (511 of 511 strings)
translationBot(ui): update translation (Spanish)
Currently translated at 100.0% (506 of 506 strings)
Co-authored-by: gallegonovato <fran-carro@hotmail.es>
Translate-URL: https://hosted.weblate.org/projects/invokeai/web-ui/es/
Translation: InvokeAI/Web UI
* if `shouldFetchImages` is passed in, UI will make an additional
request to get valid image URL when an invocation is complete
* this is necessary in order to have optional authorization for images
- Style the Minimap
- Made the Node UI Legend Responsive
- Set Min Width for nodes on Spawn so resize doesn't snap.
- Initial Implementation of Node Search
- Added FuseJS to handle the node filtering
The first draft for a Responsive Mobile Layout for InvokeAI. Some basic
documentation to help contributors. // Notes from: @blessedcoolant
---
The whole rework needs to be done using the `mobile first` concept where
the base design will be catered to mobile and we add responsive changes
as we grow to larger screens.
**Added**
- Basic breakpoints have been added to the `theme.ts` file that indicate
at which values Chakra makes the responsive changes.
- A basic `useResolution` hook has been added that either returns
`mobile`, `tablet` or `desktop` based on the breakpoint. We can
customize this hook further to do more complex checks for us if need be.
**Syntax**
- Any Chakra component is directly capable of taking different values
for the different breakpoints set in our `theme.ts` file. These can be
passed in a few ways with the most descriptive being an object. For
example:
`flexDir={{ base: 'column', xl: 'row' }}` - This would set the `0em and
above` to be column for the flex direction but change to row
automatically when we hit `xl` and above resolutions which in our case
is `80em or 1280px`. This same format is applicable for any element in
Chakra.
`flexDir={['column', null, null, 'row', null]}` - The above syntax can
also be passed as an array to the property with each value in the array
corresponding to each breakpoint we have. Setting `null` just bypasses
it. This is a good short hand but I think we stick to the above syntax
for readability.
**Note**: I've modified a few elements here and there to give an idea on
how the responsive syntax works for reference.
---
**Problems to be solved** @SammCheese
- Some issues you might run into are with the Resizable components.
We've decided we will get not use resizable components for smaller
resolutions. Doesn't make sense. So you'll need to make conditional
renderings around these.
- Some components that need custom layouts for different screens might
be better if ported over to `Grid` and use `gridTemplateAreas` to swap
out the design layout. I've demonstrated an example of this in a commit
I've made. I'll let you be the judge of where we might need this.
- The header will probably need to be converted to a burger menu of some
sort with the model changing being handled correctly UX wise. We'll
discuss this on discord.
---
Anyone willing to contribute to this PR can feel free to join the
discussion on discord.
https://discord.com/channels/1020123559063990373/1020839344170348605/threads/1097323866780606615
* feat(ui): add axios client generator and simple example
* fix(ui): update client & nodes test code w/ new Edge type
* chore(ui): organize generated files
* chore(ui): update .eslintignore, .prettierignore
* chore(ui): update openapi.json
* feat(backend): fixes for nodes/generator
* feat(ui): generate object args for api client
* feat(ui): more nodes api prototyping
* feat(ui): nodes cancel
* chore(ui): regenerate api client
* fix(ui): disable OG web server socket connection
* fix(ui): fix scrollbar styles typing and prop
just noticed the typo, and made the types stronger.
* feat(ui): add socketio types
* feat(ui): wip nodes
- extract api client method arg types instead of manually declaring them
- update example to display images
- general tidy up
* start building out node translations from frontend state and add notes about missing features
* use reference to sampler_name
* use reference to sampler_name
* add optional apiUrl prop
* feat(ui): start hooking up dynamic txt2img node generation, create middleware for session invocation
* feat(ui): write separate nodes socket layer, txt2img generating and rendering w single node
* feat(ui): img2img implementation
* feat(ui): get intermediate images working but types are stubbed out
* chore(ui): add support for package mode
* feat(ui): add nodes mode script
* feat(ui): handle random seeds
* fix(ui): fix middleware types
* feat(ui): add rtk action type guard
* feat(ui): disable NodeAPITest
This was polluting the network/socket logs.
* feat(ui): fix parameters panel border color
This commit should be elsewhere but I don't want to break my flow
* feat(ui): make thunk types more consistent
* feat(ui): add type guards for outputs
* feat(ui): load images on socket connect
Rudimentary
* chore(ui): bump redux-toolkit
* docs(ui): update readme
* chore(ui): regenerate api client
* chore(ui): add typescript as dev dependency
I am having trouble with TS versions after vscode updated and now uses TS 5. `madge` has installed 3.9.10 and for whatever reason my vscode wants to use that. Manually specifying 4.9.5 and then setting vscode to use that as the workspace TS fixes the issue.
* feat(ui): begin migrating gallery to nodes
Along the way, migrate to use RTK `createEntityAdapter` for gallery images, and separate `results` and `uploads` into separate slices. Much cleaner this way.
* feat(ui): clean up & comment results slice
* fix(ui): separate thunk for initial gallery load so it properly gets index 0
* feat(ui): POST upload working
* fix(ui): restore removed type
* feat(ui): patch api generation for headers access
* chore(ui): regenerate api
* feat(ui): wip gallery migration
* feat(ui): wip gallery migration
* chore(ui): regenerate api
* feat(ui): wip refactor socket events
* feat(ui): disable panels based on app props
* feat(ui): invert logic to be disabled
* disable panels when app mounts
* feat(ui): add support to disableTabs
* docs(ui): organise and update docs
* lang(ui): add toast strings
* feat(ui): wip events, comments, and general refactoring
* feat(ui): add optional token for auth
* feat(ui): export StatusIndicator and ModelSelect for header use
* feat(ui) working on making socket URL dynamic
* feat(ui): dynamic middleware loading
* feat(ui): prep for socket jwt
* feat(ui): migrate cancelation
also updated action names to be event-like instead of declaration-like
sorry, i was scattered and this commit has a lot of unrelated stuff in it.
* fix(ui): fix img2img type
* chore(ui): regenerate api client
* feat(ui): improve InvocationCompleteEvent types
* feat(ui): increase StatusIndicator font size
* fix(ui): fix middleware order for multi-node graphs
* feat(ui): add exampleGraphs object w/ iterations example
* feat(ui): generate iterations graph
* feat(ui): update ModelSelect for nodes API
* feat(ui): add hi-res functionality for txt2img generations
* feat(ui): "subscribe" to particular nodes
feels like a dirty hack but oh well it works
* feat(ui): first steps to node editor ui
* fix(ui): disable event subscription
it is not fully baked just yet
* feat(ui): wip node editor
* feat(ui): remove extraneous field types
* feat(ui): nodes before deleting stuff
* feat(ui): cleanup nodes ui stuff
* feat(ui): hook up nodes to redux
* fix(ui): fix handle
* fix(ui): add basic node edges & connection validation
* feat(ui): add connection validation styling
* feat(ui): increase edge width
* feat(ui): it blends
* feat(ui): wip model handling and graph topology validation
* feat(ui): validation connections w/ graphlib
* docs(ui): update nodes doc
* feat(ui): wip node editor
* chore(ui): rebuild api, update types
* add redux-dynamic-middlewares as a dependency
* feat(ui): add url host transformation
* feat(ui): handle already-connected fields
* feat(ui): rewrite SqliteItemStore in sqlalchemy
* fix(ui): fix sqlalchemy dynamic model instantiation
* feat(ui, nodes): metadata wip
* feat(ui, nodes): models
* feat(ui, nodes): more metadata wip
* feat(ui): wip range/iterate
* fix(nodes): fix sqlite typing
* feat(ui): export new type for invoke component
* tests(nodes): fix test instantiation of ImageField
* feat(nodes): fix LoadImageInvocation
* feat(nodes): add `title` ui hint
* feat(nodes): make ImageField attrs optional
* feat(ui): wip nodes etc
* feat(nodes): roll back sqlalchemy
* fix(nodes): partially address feedback
* fix(backend): roll back changes to pngwriter
* feat(nodes): wip address metadata feedback
* feat(nodes): add seeded rng to RandomRange
* feat(nodes): address feedback
* feat(nodes): move GET images error handling to DiskImageStorage
* feat(nodes): move GET images error handling to DiskImageStorage
* fix(nodes): fix image output schema customization
* feat(ui): img2img/txt2img -> linear
- remove txt2img and img2img tabs
- add linear tab
- add initial image selection to linear parameters accordion
* feat(ui): tidy graph builders
* feat(ui): tidy misc
* feat(ui): improve invocation union types
* feat(ui): wip metadata viewer recall
* feat(ui): move fonts to normal deps
* feat(nodes): fix broken upload
* feat(nodes): add metadata module + tests, thumbnails
- `MetadataModule` is stateless and needed in places where the `InvocationContext` is not available, so have not made it a `service`
- Handles loading/parsing/building metadata, and creating png info objects
- added tests for MetadataModule
- Lifted thumbnail stuff to util
* fix(nodes): revert change to RandomRangeInvocation
* feat(nodes): address feedback
- make metadata a service
- rip out pydantic validation, implement metadata parsing as simple functions
- update tests
- address other minor feedback items
* fix(nodes): fix other tests
* fix(nodes): add metadata service to cli
* fix(nodes): fix latents/image field parsing
* feat(nodes): customise LatentsField schema
* feat(nodes): move metadata parsing to frontend
* fix(nodes): fix metadata test
---------
Co-authored-by: maryhipp <maryhipp@gmail.com>
Co-authored-by: Mary Hipp <maryhipp@Marys-MacBook-Air.local>
Since the change itself is quite straight-forward, I'll just describe
the context. Tried using automatic installer on my laptop, kept erroring
out on line 140-something of installer.py, "ERROR: Can not perform a
'--user' install. User site-packages are not visible in this
virtualenv."
Got tired of of fighting with pip so moved on to command line install.
Worked immediately, but at the time lacked instruction for CPU, so
instead of opening any helpful hyperlinks in the readme, took a few
minutes to grab the link from installer.py - thus this pr.
- Fixed a bunch of padding and margin issues across the app
- Fixed the Invoke logo compressing
- Disabled the visibility of the options panel pin button in tablet and mobile views
- Refined the header menu options in mobile and tablet views
- Refined other site header elements in mobile and tablet views
- Aligned Tab Icons to center in mobile and tablet views
Made some basic responsive changes to demonstrate how to go about making changes.
There are a bunch of problems not addressed yet. Like dealing with the resizeable component and etc.
This component just classifies `base` and `sm` as mobile, `md` and `lg` as tablet and `xl` and `2xl` as desktop.
This is a basic hook for quicker work with resolutions. Can be modified and adjusted to our needs. All resolution related work can go into this hook.
This commit adds invokeai.backend.util.logging, which provides support
for formatted console and logfile messages that follow the status
reporting conventions of earlier InvokeAI versions.
Examples:
### A critical error (logging.CRITICAL)
*** A non-fatal error (logging.ERROR)
** A warning (logging.WARNING)
>> Informational message (logging.INFO)
| Debugging message (logging.DEBUG)
This style logs everything through a single logging object and is
identical to using Python's `logging` module. The commonly-used
module-level logging functions are implemented as simple pass-thrus
to logging:
import invokeai.backend.util.logging as ialog
ialog.debug('this is a debugging message')
ialog.info('this is a informational message')
ialog.log(level=logging.CRITICAL, 'get out of dodge')
ialog.disable(level=logging.INFO)
ialog.basicConfig(filename='/var/log/invokeai.log')
Internally, the invokeai logging module creates a new default logger
named "invokeai" so that its logging does not interfere with other
module's use of the vanilla logging module. So `logging.error("foo")`
will go through the regular logging path and not add the additional
message decorations.
For more control, the logging module's object-oriented logging style
is also supported. The API is identical to the vanilla logging
usage. In fact, the only thing that has changed is that the
getLogger() method adds a custom formatter to the log messages.
import logging
from invokeai.backend.util.logging import InvokeAILogger
logger = InvokeAILogger.getLogger(__name__)
fh = logging.FileHandler('/var/invokeai.log')
logger.addHandler(fh)
logger.critical('this will be logged to both the console and the log file')
This commit adds invokeai.backend.util.logging, which provides support
for formatted console and logfile messages that follow the status
reporting conventions of earlier InvokeAI versions.
Examples:
### A critical error (logging.CRITICAL)
*** A non-fatal error (logging.ERROR)
** A warning (logging.WARNING)
>> Informational message (logging.INFO)
| Debugging message (logging.DEBUG)
- add invocation schema customisation
done via fastapi's `Config` class and `schema_extra`. when using `Config`, inherit from `InvocationConfig` to get type hints.
where it makes sense - like for all math invocations - define a `MathInvocationConfig` class and have all invocations inherit from it.
this customisation can provide any arbitrary additional data to the UI. currently it provides tags and field type hints.
this is necessary for `model` type fields, which are actually string fields. without something like this, we can't reliably differentiate `model` fields from normal `string` fields.
can also be used for future field types.
all invocations now have tags, and all `model` fields have ui type hints.
- fix model handling for invocations
added a helper to fall back to the default model if an invalid model name is chosen. model names in graphs now work.
- fix latents progress callback
noticed this wasn't correct while working on everything else.
When running this app first time in WSL2 environment, which is
notoriously slow when it comes to IO, computing the SHAs of the models
takes an eternity.
Computing shas for sd2.1
```
| Calculating sha256 hash of model files
| sha256 = 1e4ce085102fe6590d41ec1ab6623a18c07127e2eca3e94a34736b36b57b9c5e (49 files hashed in 510.87s)
```
I increased the chunk size to 16MB reduce the number of round trips for
loading the data. New results:
```
| Calculating sha256 hash of model files
| sha256 = 1e4ce085102fe6590d41ec1ab6623a18c07127e2eca3e94a34736b36b57b9c5e (49 files hashed in 59.89s)
```
Higher values don't seem to make an impact.
- add `list_images` endpoint at `GET api/v1/images`
- extend `ImageStorageBase` with `list()` method, implemented it for `DiskImageStorage`
- add `ImageReponse` class to for image responses, which includes urls, metadata
- add `ImageMetadata` class (basically a stub at the moment)
- uploaded images now named `"{uuid}_{timestamp}.png"`
- add `models` modules. besides separating concerns more clearly, this helps to mitigate circular dependencies
- improve thumbnail handling
- the functionality to automatically import and run legacy checkpoint
files in a designated folder has been removed from the backend but there
are vestiges of the code remaining in the frontend that are causing
crashes.
- This fixes the problem.
- Closes#3075
This PR introduces a new set of ModelManager methods that enables you to
retrieve the individual parts of a stable diffusion pipeline model,
including the vae, text_encoder, unet, tokenizer, etc.
To use:
```
from invokeai.backend import ModelManager
manager = ModelManager('/path/to/models.yaml')
# get the VAE
vae = manager.get_model_vae('stable-diffusion-1.5')
# get the unet
unet = manager.get_model_unet('stable-diffusion-1.5')
# get the tokenizer
tokenizer = manager.get_model_tokenizer('stable-diffusion-1.5')
# etc etc
feature_extractor = manager.get_model_feature_extractor('stable-diffusion-1.5')
scheduler = manager.get_model_scheduler('stable-diffusion-1.5')
text_encoder = manager.get_model_text_encoder('stable-diffusion-1.5')
# if no model provided, then defaults to the one currently in GPU, if any
vae = manager.get_model_vae()
```
- Compensatory change to the CLI that prevents it from crashing
when it tries to import a model.
- Bug introduced when the "convert" option removed from the model
manager.
* Add latents nodes.
* Fix iteration expansion.
* Add collection generator nodes, math nodes.
* Add noise node.
* Add some graph debug commands to the CLI.
* Fix negative id linking in CLI.
* Fix a CLI bug with multiple links per node.
- New method is ModelManager.get_sub_model(model_name:str,model_part:SDModelComponent)
To use:
```
from invokeai.backend import ModelManager, SDModelComponent as sdmc
manager = ModelManager('/path/to/models.yaml')
vae = manager.get_sub_model('stable-diffusion-1.5', sdmc.vae)
```
The typo accidentally did not affect functionality; when `query==""`, it
`search()`ed but found everything due to empty query, then paginated
results, so it worked the same as `list()`.
Still fix it
currently if users input eg `happy (camper:0.3)` it gets parsed
incorrectly, which causes crashes if it's in the negative prompt. bump
to compel 1.0.5 fixes the parser to avoid this (note the weight is
parsed as plain text, it's not converted to proper invoke syntax)
- This PR adds support for embedding files that contain a single key
"emb_params". The only example I know of this format is the
"EasyNegative" embedding on HuggingFace, but there are certainly others.
- This PR also adds support for loading embedding files that have been
saved in safetensors format.
- It also cleans up the code so that the logic of probing for and
selecting the right format parser is clear.
- This is the same as #3045, which is on the 2.3 branch.
- Commands, invocations and their parameters will now autocomplete using
introspection.
- Two types of parameter *arguments* will also autocomplete:
- --sampler_name will autocomplete the scheduler name
- --model will autocomplete the model name
- There don't seem to be commands for reading/writing image files yet,
so path autocompletion is not implemented
A long-standing issue with importing legacy checkpoints (both ckpt and
safetensors) is that the user has to identify the correct config file,
either by providing its path or by selecting which type of model the
checkpoint is (e.g. "v1 inpainting"). In addition, some users wish to
provide custom VAEs for use with the model. Currently this is done in
the WebUI by importing the model, editing it, and then typing in the
path to the VAE.
## Model configuration file selection
To improve the user experience, the model manager's `heuristic_import()`
method has been enhanced as follows:
1. When initially called, the caller can pass a config file path, in
which case it will be used.
2. If no config file provided, the method looks for a .yaml file in the
same directory as the model which bears the same basename. e.g.
```
my-new-model.safetensors
my-new-model.yaml
```
The yaml file is then used as the configuration file for importation and
conversion.
3. If no such file is found, then the method opens up the checkpoint and
probes it to determine whether it is V1, V1-inpaint or V2. If it is a V1
format, then the appropriate v1-inference.yaml config file is used.
Unfortunately there are two V2 variants that cannot be distinguished by
introspection.
4. If the probe algorithm is unable to determine the model type, then
its last-ditch effort is to execute an optional callback function that
can be provided by the caller. This callback, named
`config_file_callback` receives the path to the legacy checkpoint and
returns the path to the config file to use. The CLI uses to put up a
multiple choice prompt to the user. The WebUI **could** use this to
prompt the user to choose from a radio-button selection.
5. If the config file cannot be determined, then the import is
abandoned.
## Custom VAE Selection
The user can attach a custom VAE to the imported and converted model by
copying the desired VAE into the same directory as the file to be
imported, and giving it the same basename. E.g.:
```
my-new-model.safetensors
my-new-model.vae.pt
```
For this to work, the VAE must end with ".vae.pt", ".vae.ckpt", or
".vae.safetensors". The indicated VAE will be converted into diffusers
format and stored with the converted models file, so the ".pt" file can
be deleted after conversion.
No facility is currently provided to swap a diffusers VAE at import
time, but this can be done after the fact using the WebUI and CLI's
model editing functions.
Note that this is the same fix that was applied to the 2.3 branch in
#3043 . This applies to `main`.
## Enable the on-the-fly conversion of models based on SD 2.0/2.1 into
diffusers
This commit fixes bugs related to the on-the-fly conversion and loading
of legacy checkpoint models built on SD-2.0 base.
- When legacy checkpoints built on SD-2.0 models were converted
on-the-fly using --ckpt_convert, generation would crash with a precision
incompatibility error. This problem has been found and fixed.
This commit fixes bugs related to the on-the-fly conversion and loading of
legacy checkpoint models built on SD-2.0 base.
- When legacy checkpoints built on SD-2.0 models were converted
on-the-fly using --ckpt_convert, generation would crash with a
precision incompatibility error.
The Pytorch ROCm version in the documentation in outdated (`rocm5.2`)
which leads to errors during the installation of InvokeAI.
This PR updates the documentation with the latest Pytorch ROCm `5.4.2`
version.
A long-standing issue with importing legacy checkpoints (both ckpt and
safetensors) is that the user has to identify the correct config file,
either by providing its path or by selecting which type of model the
checkpoint is (e.g. "v1 inpainting"). In addition, some users wish to
provide custom VAEs for use with the model. Currently this is done in
the WebUI by importing the model, editing it, and then typing in the
path to the VAE.
To improve the user experience, the model manager's
`heuristic_import()` method has been enhanced as follows:
1. When initially called, the caller can pass a config file path, in
which case it will be used.
2. If no config file provided, the method looks for a .yaml file in the
same directory as the model which bears the same basename. e.g.
```
my-new-model.safetensors
my-new-model.yaml
```
The yaml file is then used as the configuration file for
importation and conversion.
3. If no such file is found, then the method opens up the checkpoint
and probes it to determine whether it is V1, V1-inpaint or V2.
If it is a V1 format, then the appropriate v1-inference.yaml config
file is used. Unfortunately there are two V2 variants that cannot be
distinguished by introspection.
4. If the probe algorithm is unable to determine the model type, then its
last-ditch effort is to execute an optional callback function that can
be provided by the caller. This callback, named `config_file_callback`
receives the path to the legacy checkpoint and returns the path to the
config file to use. The CLI uses to put up a multiple choice prompt to
the user. The WebUI **could** use this to prompt the user to choose
from a radio-button selection.
5. If the config file cannot be determined, then the import is abandoned.
The user can attach a custom VAE to the imported and converted model
by copying the desired VAE into the same directory as the file to be
imported, and giving it the same basename. E.g.:
```
my-new-model.safetensors
my-new-model.vae.pt
```
For this to work, the VAE must end with ".vae.pt", ".vae.ckpt", or
".vae.safetensors". The indicated VAE will be converted into diffusers
format and stored with the converted models file, so the ".pt" file
can be deleted after conversion.
No facility is currently provided to swap a diffusers VAE at import
time, but this can be done after the fact using the WebUI and CLI's
model editing functions.
- This PR adds support for embedding files that contain a single key
"emb_params". The only example I know of this format is the
"EasyNegative" embedding on HuggingFace, but there are certainly
others.
- This PR also adds support for loading embedding files that have been
saved in safetensors format.
- It also cleans up the code so that the logic of probing for and
selecting the right format parser is clear.
keeping `main` up to date with my api nodes branch:
- bd7e515290: [nodes] Add cancelation to
the API @Kyle0654
- 5fe38f7: fix(backend): simple typing fixes
- just picking some low-hanging fruit to improve IDE hinting
- c34ac91: fix(nodes): fix cancel; fix callback for img2img, inpaint
- makes nodes cancel immediate, use fix progress images on nodes, fix
callbacks for img2img/inpaint
- 4221cf7: fix(nodes): fix schema generation for output classes
- did this previously for some other class; needed to not have node
outputs be optional
Some schedulers report not only the noisy latents at the current
timestep, but also their estimate so far of what the de-noised latents
will be.
It makes for a more legible preview than the noisy latents do.
I think this is a huge improvement, but there are a few considerations:
- Need to not spook @JPPhoto by changing how previews look.
- Some schedulers (most notably **DPM Solver++**) don't provide this
data, and it falls back to the current behavior there. That's not
terrible, but seeing such a big difference in how _previews_ look from
one scheduler to the next might mislead people into thinking there's a
bigger difference in their overall effectiveness than there really is.
My fear of configuration-option-overwhelm leaves me inclined to _not_
add a configuration option for this, but we could.
- Commands, invocations and their parameters will now autocomplete
using introspection.
- Two types of parameter *arguments* will also autocomplete:
- --sampler_name will autocomplete the scheduler name
- --model will autocomplete the model name
- There don't seem to be commands for reading/writing image files yet, so
path autocompletion is not implemented
- resolve conflicts with generate.py invocation
- remove unused symbols that pyflakes complains about
- add **untested** code for passing intermediate latent image to the
step callback in the format expected.
This PR fixes#2951 and restores the step_callback argument in the
refactored generate() method. Note that this issue states that
"something is still wrong because steps and step are zero." However,
I think this is confusion over the call signature of the callback, which
since the diffusers merge has been `callback(state:PipelineIntermediateState)`
This is the test script that I used to determine that `step` is being passed
correctly:
```
from pathlib import Path
from invokeai.backend import ModelManager, PipelineIntermediateState
from invokeai.backend.globals import global_config_dir
from invokeai.backend.generator import Txt2Img
def my_callback(state:PipelineIntermediateState, total_steps:int):
print(f'callback(step={state.step}/{total_steps})')
def main():
manager = ModelManager(Path(global_config_dir()) / "models.yaml")
model = manager.get_model('stable-diffusion-1.5')
print ('=== TXT2IMG TEST ===')
steps=30
output = next(Txt2Img(model).generate(prompt='banana sushi',
iterations=None,
steps=steps,
step_callback=lambda x: my_callback(x,steps)
)
)
print(f'image={output.image}, seed={output.seed}, steps={output.params.steps}')
if __name__=='__main__':
main()
```
- When a legacy checkpoint model is loaded via --convert_ckpt and its
models.yaml stanza refers to a custom VAE path (using the 'vae:' key),
the custom VAE will be converted and used within the diffusers model.
Otherwise the VAE contained within the legacy model will be used.
- Note that the checkpoint import functions in the CLI or Web UIs
continue to default to the standard stabilityai/sd-vae-ft-mse VAE. This
can be fixed after the fact by editing VAE key using either the CLI or
Web UI.
- Fixes issue #2917
The mkdocs-workflow has been failing over the past week due to
permission denied errors. I *think* this is the result of not passing
the GitHub API token to the workflow, and this is a speculative fix for
the issue.
- This PR turns on pickle scanning before a legacy checkpoint file is
loaded from disk within the checkpoint_to_diffusers module.
- Also miscellaneous diagnostic message cleanup.
- See also #3011 for a similar patch to the 2.3 branch.
Currently translated at 100.0% (504 of 504 strings)
translationBot(ui): update translation (Spanish)
Currently translated at 100.0% (501 of 501 strings)
Co-authored-by: gallegonovato <fran-carro@hotmail.es>
Translate-URL: https://hosted.weblate.org/projects/invokeai/web-ui/es/
Translation: InvokeAI/Web UI
Currently translated at 100.0% (504 of 504 strings)
translationBot(ui): update translation (Italian)
Currently translated at 100.0% (501 of 501 strings)
translationBot(ui): update translation (Italian)
Currently translated at 100.0% (500 of 500 strings)
Co-authored-by: Riccardo Giovanetti <riccardo.giovanetti@gmail.com>
Translate-URL: https://hosted.weblate.org/projects/invokeai/web-ui/it/
Translation: InvokeAI/Web UI
This PR fixes#2951 and restores the step_callback argument in the
refactored generate() method. Note that this issue states that
"something is still wrong because steps and step are zero." However,
I think this is confusion over the call signature of the callback, which
since the diffusers merge has been `callback(state:PipelineIntermediateState)`
This is the test script that I used to determine that `step` is being passed
correctly:
```
from pathlib import Path
from invokeai.backend import ModelManager, PipelineIntermediateState
from invokeai.backend.globals import global_config_dir
from invokeai.backend.generator import Txt2Img
def my_callback(state:PipelineIntermediateState, total_steps:int):
print(f'callback(step={state.step}/{total_steps})')
def main():
manager = ModelManager(Path(global_config_dir()) / "models.yaml")
model = manager.get_model('stable-diffusion-1.5')
print ('=== TXT2IMG TEST ===')
steps=30
output = next(Txt2Img(model).generate(prompt='banana sushi',
iterations=None,
steps=steps,
step_callback=lambda x: my_callback(x,steps)
)
)
print(f'image={output.image}, seed={output.seed}, steps={output.params.steps}')
if __name__=='__main__':
main()
```
This PR corrects a bug in which embeddings were not being applied when a
non-diffusers model was loaded.
- Fixes#2954
- Also improves diagnostic reporting during embedding loading.
- This PR turns on pickle scanning before a legacy checkpoint file
is loaded from disk within the checkpoint_to_diffusers module.
- Also miscellaneous diagnostic message cleanup.
- When a legacy checkpoint model is loaded via --convert_ckpt and its
models.yaml stanza refers to a custom VAE path (using the 'vae:'
key), the custom VAE will be converted and used within the diffusers
model. Otherwise the VAE contained within the legacy model will be
used.
- Note that the heuristic_import() method, which imports arbitrary
legacy files on disk and URLs, will continue to default to the
the standard stabilityai/sd-vae-ft-mse VAE. This can be fixed after
the fact by editing the models.yaml stanza using the Web or CLI
UIs.
- Fixes issue #2917
- 86932469e76f1315ee18bfa2fc52b588241dace1 add image_to_dataURL util
- 0c2611059711b45bb6142d30b1d1343ac24268f3 make fast latents method
static
- this method doesn't really need `self` and should be able to be called
without instantiating `Generator`
- 2360bfb6558ea511e9c9576f3d4b5535870d84b4 fix schema gen for
GraphExecutionState
- `GraphExecutionState` uses `default_factory` in its fields; the result
is the OpenAPI schema marks those fields as optional, which propagates
to the generated API client, which means we need a lot of unnecessary
type guards to use this data type. the [simple
fix](https://github.com/pydantic/pydantic/discussions/4577) is to add
config to explicitly say all class properties are required. looks this
this will be resolved in a future pydantic release
- 3cd7319cfdb0f07c6bb12d62d7d02efe1ab12675 fix step callback and fast
latent generation on nodes. have this working in UI. depends on the
small change in #2957
Update `compel` to 1.0.0.
This fixes#2832.
It also changes the way downweighting is applied. In particular,
downweighting should now be much better and more controllable.
From the [compel
changelog](https://github.com/damian0815/compel#changelog):
> Downweighting now works by applying an attention mask to remove the
downweighted tokens, rather than literally removing them from the
sequence. This behaviour is the default, but the old behaviour can be
re-enabled by passing `downweight_mode=DownweightMode.REMOVE` on init of
the `Compel` instance.
>
> Formerly, downweighting a token worked by both multiplying the
weighting of the token's embedding, and doing an inverse-weighted blend
with a copy of the token sequence that had the downweighted tokens
removed. The intuition is that as weight approaches zero, the tokens
being downweighted should be actually removed from the sequence.
However, removing the tokens resulted in the positioning of all
downstream tokens becoming messed up. The blend ended up blending a lot
more than just the tokens in question.
>
> As of v1.0.0, taking advice from @keturn and @bonlime
(https://github.com/damian0815/compel/issues/7) the procedure is by
default different. Downweighting still involves a blend but what is
blended is a version of the token sequence with the downweighted tokens
masked out, rather than removed. This correctly preserves positioning
embeddings of the other tokens.
* Update root component to allow optional children that will render as
dynamic header of UI
* Export additional components (logo & themeChanger) for use in said
dynamic header (more to come here)
# The Problem
Pickle files (.pkl, .ckpt, etc) are extremely unsafe as they can be
trivially crafted to execute arbitrary code when parsed using
`torch.load`
Right now the conventional wisdom among ML researchers and users is to
simply `not run untrusted pickle files ever` and instead only use
Safetensor files, which cannot be injected with arbitrary code. This is
very good advice.
Unfortunately, **I have discovered a vulnerability inside of InvokeAI
that allows an attacker to disguise a pickle file as a safetensor and
have the payload execute within InvokeAI.**
# How It Works
Within `model_manager.py` and `convert_ckpt_to_diffusers.py` there are
if-statements that decide which `load` method to use based on the file
extension of the model file. The logic (written in a slightly more
readable format than it exists in the codebase) is as follows:
```
if Path(file).suffix == '.safetensors':
safetensor_load(file)
else:
unsafe_pickle_load(file)
```
A malicious actor would only need to create an infected .ckpt file, and
then rename the extension to something that does not pass the `==
'.safetensors'` check, but still appears to a user to be a safetensors
file.
For example, this might be something like `.Safetensors`,
`.SAFETENSORS`, `SafeTensors`, etc.
InvokeAI will happily import the file in the Model Manager and execute
the payload.
# Proof of Concept
1. Create a malicious pickle file.
(https://gist.github.com/CodeZombie/27baa20710d976f45fb93928cbcfe368)
2. Rename the `.ckpt` extension to some variation of `.Safetensors`,
ensuring there is a capital letter anywhere in the extension (eg.
`malicious_pickle.SAFETENSORS`)
3. Import the 'model' like you would normally with any other safetensors
file with the Model Manager.
4. Upon trying to select the model in the web ui, it will be loaded (or
attempt to be converted to a Diffuser) with `torch.load` and the payload
will execute.

# The Fix
This pull request changes the logic InvokeAI uses to decide which model
loader to use so that the safe behavior is the default. Instead of
loading as a pickle if the extension is not exactly `.safetensors`, it
will now **always** load as a safetensors file unless the extension is
**exactly** `.ckpt`.
# Notes:
I think support for pickle files should be totally dropped ASAP as a
matter of security, but I understand that there are reasons this would
be difficult.
In the meantime, I think `RestrictedUnpickler` or something similar
should be implemented as a replacement for `torch.load`, as this
significantly reduces the amount of Python methods that an attacker has
to work with when crafting malicious payloads
inside a pickle file.
Automatic1111 already uses this with some success.
(https://github.com/AUTOMATIC1111/stable-diffusion-webui/blob/master/modules/safe.py)
- The value of png_compression was always 6, despite the value provided
to the --png_compression argument. This fixes the bug.
- It also fixes an inconsistency between the maximum range of
png_compression and the help text.
- Closes#2945
- The value of png_compression was always 6, despite the value provided to the
--png_compression argument. This fixes the bug.
- It also fixes an inconsistency between the maximum range of png_compression
and the help text.
- Closes#2945
Prior to this commit, all models would be loaded with the extremely unsafe `torch.load` method, except those with the exact extension `.safetensors`. Even a change in casing (eg. `saFetensors`, `Safetensors`, etc) would cause the file to be loaded with torch.load instead of the much safer `safetensors.toch.load_file`.
If a malicious actor renamed an infected `.ckpt` to something like `.SafeTensors` or `.SAFETENSORS` an unsuspecting user would think they are loading a safe .safetensor, but would in fact be parsing an unsafe pickle file, and executing an attacker's payload. This commit fixes this vulnerability by reversing the loading-method decision logic to only use the unsafe `torch.load` when the file extension is exactly `.ckpt`.
#2931 was caused by new code that held onto the PRNG in `get_make_image`
and used it in `make_image` for img2img and inpainting. This
functionality has been moved elsewhere so that we can generate multiple
images again.
fix(ui): remove old scrollbar css
fix(ui): make guidepopover lazy
feat(ui): wip resizable drawer
feat(ui): wip resizable drawer
feat(ui): add scroll-linked shadow
feat(ui): organize files
Align Scrollbar next to content
Move resizable drawer underneath the progress bar
Add InvokeLogo to unpinned & align
Adds Invoke Logo to Unpinned Parameters panel and aligns to make it feel seamless.
# Remove node dependencies on generate.py
This is a draft PR in which I am replacing `generate.py` with a cleaner,
more structured interface to the underlying image generation routines.
The basic code pattern to generate an image using the new API is this:
```
from invokeai.backend import ModelManager, Txt2Img, Img2Img
manager = ModelManager('/data/lstein/invokeai-main/configs/models.yaml')
model = manager.get_model('stable-diffusion-1.5')
txt2img = Txt2Img(model)
outputs = txt2img.generate(prompt='banana sushi', steps=12, scheduler='k_euler_a', iterations=5)
# generate() returns an iterator
for next_output in outputs:
print(next_output.image, next_output.seed)
outputs = Img2Img(model).generate(prompt='strawberry` sushi', init_img='./banana_sushi.png')
output = next(outputs)
output.image.save('strawberries.png')
```
### model management
The `ModelManager` handles model selection and initialization. Its
`get_model()` method will return a `dict` with the following keys:
`model`, `model_name`,`hash`, `width`, and `height`, where `model` is
the actual StableDiffusionGeneratorPIpeline. If `get_model()` is called
without a model name, it will return whatever is defined as the default
in `models.yaml`, or the first entry if no default is designated.
### InvokeAIGenerator
The abstract base class `InvokeAIGenerator` is subclassed into into
`Txt2Img`, `Img2Img`, `Inpaint` and `Embiggen`. The constructor for
these classes takes the model dict returned by
`model_manager.get_model()` and optionally an
`InvokeAIGeneratorBasicParams` object, which encapsulates all the
parameters in common among `Txt2Img`, `Img2Img` etc. If you don't
provide the basic params, a reasonable set of defaults will be chosen.
Any of these parameters can be overridden at `generate()` time.
These classes are defined in `invokeai.backend.generator`, but they are
also exported by `invokeai.backend` as shown in the example below.
```
from invokeai.backend import InvokeAIGeneratorBasicParams, Img2Img
params = InvokeAIGeneratorBasicParams(
perlin = 0.15
steps = 30
scheduler = 'k_lms'
)
img2img = Img2Img(model, params)
outputs = img2img.generate(scheduler='k_heun')
```
Note that we were able to override the basic params in the call to
`generate()`
The `generate()` method will returns an iterator over a series of
`InvokeAIGeneratorOutput` objects. These objects contain the PIL image,
the seed, the model name and hash, and attributes for all the parameters
used to generate the object (you can also get these as a dict). The
`iterations` argument controls how many objects will be returned,
defaulting to 1. Pass `None` to get an infinite iterator.
Given the proposed use of `compel` to generate a templated series of
prompts, I thought the API would benefit from a style that lets you loop
over the output results indefinitely. I did consider returning a single
`InvokeAIGeneratorOutput` object in the event that `iterations=1`, but I
think it's dangerous for a method to return different types of result
under different circumstances.
Changing the model is as easy as this:
```
model = manager.get_model('inkspot-2.0`)
txt2img = Txt2Img(model)
```
### Node and legacy support
With respect to `Nodes`, I have written `model_manager_initializer` and
`restoration_services` modules that return `model_manager` and
`restoration` services respectively. The latter is used by the face
reconstruction and upscaling nodes. There is no longer any reference to
`Generate` in the `app` tree.
I have confirmed that `txt2img` and `img2img` work in the nodes client.
I have not tested `embiggen` or `inpaint` yet. pytests are passing, with
some warnings that I don't think are related to what I did.
The legacy WebUI and CLI are still working off `Generate` (which has not
yet been removed from the source tree) and fully functional.
I've finished all the tasks on my TODO list:
- [x] Update the pytests, which are failing due to dangling references
to `generate`
- [x] Rewrite the `reconstruct.py` and `upscale.py` nodes to call
directly into the postprocessing modules rather than going through
`Generate`
- [x] Update the pytests, which are failing due to dangling references
to `generate`
Prior to the folder restructure, the `paths` for `test-invoke-pip` did
not include the UI's path `invokeai/frontend/`:
```yaml
paths:
- 'pyproject.toml'
- 'ldm/**'
- 'invokeai/backend/**'
- 'invokeai/configs/**'
- 'invokeai/frontend/dist/**'
```
After the restructure, more code was moved into the `invokeai/frontend/`
folder, and `paths` was updated:
```yaml
paths:
- 'pyproject.toml'
- 'invokeai/**'
- 'invokeai/backend/**'
- 'invokeai/configs/**'
- 'invokeai/frontend/web/dist/**'
```
Now, the second path includes the UI. The UI now needs to be excluded,
and must be excluded prior to `invokeai/frontend/web/dist/**` being
included.
On `test-invoke-pip-skip`, we need to do a bit of logic juggling to
invert the folder selection. First, include the web folder, then exclude
everying around it and finally exclude the `dist/` folder
Currently translated at 100.0% (500 of 500 strings)
translationBot(ui): update translation (Italian)
Currently translated at 100.0% (500 of 500 strings)
translationBot(ui): update translation (Italian)
Currently translated at 100.0% (482 of 482 strings)
translationBot(ui): update translation (Italian)
Currently translated at 100.0% (480 of 480 strings)
Co-authored-by: Riccardo Giovanetti <riccardo.giovanetti@gmail.com>
Translate-URL: https://hosted.weblate.org/projects/invokeai/web-ui/it/
Translation: InvokeAI/Web UI
Currently translated at 100.0% (500 of 500 strings)
translationBot(ui): update translation (Spanish)
Currently translated at 100.0% (482 of 482 strings)
translationBot(ui): update translation (Spanish)
Currently translated at 100.0% (480 of 480 strings)
Co-authored-by: gallegonovato <fran-carro@hotmail.es>
Translate-URL: https://hosted.weblate.org/projects/invokeai/web-ui/es/
Translation: InvokeAI/Web UI
Cause of the problem was inadvertent activation of the safety checker.
When conversion occurs on disk, the safety checker is disabled during loading.
However, when converting in RAM, the safety checker was not removed, resulting
in it activating even when user specified --no-nsfw_checker.
This PR fixes the problem by detecting when the caller has requested the InvokeAi
StableDiffusionGeneratorPipeline class to be returned and setting safety checker
to None. Do not do this with diffusers models destined for disk because then they
will be incompatible with the merge script!!
Closes#2836
Some schedulers report not only the noisy latents at the current timestep,
but also their estimate so far of what the de-noised latents will be.
It makes for a more legible preview than the noisy latents do.
Reverts invoke-ai/InvokeAI#2903
@mauwii has a point here. It looks like triggering on a comment results
in an action for each of the stale issues, even ones that have been
previously dealt with. I'd like to revert this back to the original
behavior of running once every time the cron job executes.
What's the original motivation for having more frequent labeling of the
issues?
I found it to be a chore to remove labels manually in order to
"un-stale" issues. This is contrary to the bot message which says
commenting should remove "stale" status. On the current `cron` schedule,
there may be a delay of up to 24 hours before the label is removed. This
PR will trigger the workflow on issue comments in addition to the
schedule.
Also adds a condition to not run this job on PRs (Github treats issues
and PRs equivalently in this respect), and rewords the messages for
clarity.
This ought to be working but i don't know how it's supposed to behave so
i haven't been able to verify. At least, I know the numbers are getting
pushed all the way to the SD unet, i just have been unable to verify if
what's coming out is what is expected. Please test.
You'll `need to pip install -e .` after switching to the branch, because
it's currently pulling from a non-main `compel` branch. Once it's
verified as working as intended i'll promote the compel branch to pypi.
# Overview
Adding a few accessibility items (I think 9 total items). Mostly
`aria-label`, but also a `<VisuallyHidden>` to the left-side nav tab
icons. Tried to match existing copy that was being used. Feedback
welcome
* Fix img2img and inpainting code so a strength of 1 behaves the same as txt2img.
* Make generated images identical to their txt2img counterparts when strength is 1.
Updates the CLI to define CLI commands as Pydantic objects, similar to
how Invocations (nodes) work. For example:
```py
class HelpCommand(BaseCommand):
"""Shows help"""
type: Literal['help'] = 'help'
def run(self, context: CliContext) -> None:
context.parser.print_help()
```
*looks like this #2814 was reverted accidentally. instead of trying to
revert the revert, this PR can simply be re-accepted and will fix the
ui.*
- Migrate UI from SCSS to Chakra's CSS-in-JS system
- better dx
- more capable theming
- full RTL language support (we now have Arabic and Hebrew)
- general cleanup of the whole UI's styling
- Tidy npm packages and update scripts, necessitates update to github
actions
To test this PR in dev mode, you will need to do a `yarn install` as a
lot has changed.
thanks to @blessedcoolant for helping out on this, it was a big effort.
There are actually two Stable Diffusion v2 legacy checkpoint
configurations:
1. "epsilon" prediction type for Stable Diffusion v2 Base
2. "v-prediction" type for Stable Diffusion v2-768
This commit adds the configuration file needed for epsilon prediction
type models as well as the UI that prompts the user to select the
appropriate configuration file when the code can't do so automatically.
To avoid `git blame` recording all the autoformatting changes under the
name 'lstein', this PR adds a `.git-blame-ignore-revs` that will ignore
any provenance changes that occurred during the recent refactor merge.
This fixes the crash that was occurring when trying to load a legacy
checkpoint file.
Note that this PR includes commits from #2867 to avoid diffusers files
from re-downloading at startup time.
There are actually two Stable Diffusion v2 legacy checkpoint
configurations:
1) "epsilon" prediction type for Stable Diffusion v2 Base
2) "v-prediction" type for Stable Diffusion v2-768
This commit adds the configuration file needed for epsilon prediction
type models as well as the UI that prompts the user to select the
appropriate configuration file when the code can't do so
automatically.
# Migrate to new HF diffusers cache location
This PR adjusts the model cache directory to use the layout of
`diffusers 0.14`. This will automatically migrate any diffusers models
located in `INVOKEAI_ROOT/models/diffusers` to
`INVOKEAI_ROOT/models/hub`, and cache new downloaded diffusers files
into the same location.
As before, if environment variable `HF_HOME` is set, then both
HuggingFace `from_pretrained()` calls as well as all InvokeAI methods
will use `HF_HOME/hub` as their cache.
- Migrate UI from SCSS to Chakra's CSS-in-JS system
- better dx
- more capable theming
- full RTL language support (we now have Arabic and Hebrew)
- general cleanup of the whole UI's styling
- Tidy npm packages and update scripts, necessitates update to github
actions
To test this PR in dev mode, you will need to do a `yarn install` as a
lot has changed.
thanks to @blessedcoolant for helping out on this, it was a big effort.
This removes modules that appear to be no longer used by any code under
the `invokeai` package now that the `ckpt_generator` is gone.
There are a few small changes in here to code that was referencing code
in a conditional branch for ckpt, or to swap out a ⚡ function for a
🤗 one, but only as much was strictly necessary to get things to
run. We'll follow with more clean-up to get lingering `if isinstance` or
`except AttributeError` branches later.
build(ui): fix husky path
build(ui): fix hmr issue, remove emotion cache
build(ui): clean up package.json
build(ui): update gh action and npm scripts
feat(ui): wip port lightbox to chakra theme
feat(ui): wip use chakra theme tokens
feat(ui): Add status text to main loading spinner
feat(ui): wip chakra theme tweaking
feat(ui): simply iaisimplemenu button
feat(ui): wip chakra theming
feat(ui): Theme Management
feat(ui): Add Ocean Blue Theme
feat(ui): wip lightbox
fix(ui): fix lightbox mouse
feat(ui): set default theme variants
feat(ui): model manager chakra theme
chore(ui): lint
feat(ui): remove last scss
feat(ui): fix switch theme
feat(ui): Theme Cleanup
feat(ui): Stylize Search Models Found List
feat(ui): hide scrollbars
feat(ui): fix floating button position
feat(ui): Scrollbar Styling
fix broken scripts
This PR fixes the following scripts:
1) Scripts that can be executed within the repo's scripts directory.
Note that these are for development testing and are not intended
to be exposed to the user.
configure_invokeai.py - configuration
dream.py - the legacy CLI
images2prompt.py - legacy "dream prompt" retriever
invoke-new.py - new nodes-based CLI
invoke.py - the legacy CLI under another name
make_models_markdown_table.py - a utility used during the release/doc process
pypi_helper.py - another utility used during the release process
sd-metadata.py - retrieve JSON-formatted metadata from a PNG file
2) Scripts that are installed by pip install. They get placed into the venv's
PATH and are intended to be the official entry points:
invokeai-node-cli - new nodes-based CLI
invokeai-node-web - new nodes-based web server
invokeai - legacy CLI
invokeai-configure - install time configuration script
invokeai-merge - model merging script
invokeai-ti - textual inversion script
invokeai-model-install - model installer
invokeai-update - update script
invokeai-metadata" - retrieve JSON-formatted metadata from PNG files
protect invocations against black autoformatting
deps: upgrade to diffusers 0.14, safetensors 0.3, transformers 4.26, accelerate 0.16
Things to check for in this version:
- `diffusers` cache location is now more consistent with other
huggingface-hub using code (i.e. `transformers`) as of
https://github.com/huggingface/diffusers/pull/2005. I think ultimately
this should make @damian0815 (and other folks with multiple
diffusers-using projects) happier, but it's worth taking a look to make
sure the way @lstein set things up to respect `HF_HOME` is still
functioning as intended.
- I've gone ahead and updated `transformers` to the current version
(4.26), but I have a vague memory that we were holding it back at some
point? Need to look that up and see if that's the case and why.
This PR fixes the following scripts:
1) Scripts that can be executed within the repo's scripts directory.
Note that these are for development testing and are not intended
to be exposed to the user.
```
configure_invokeai.py - configuration
dream.py - the legacy CLI
images2prompt.py - legacy "dream prompt" retriever
invoke-new.py - new nodes-based CLI
invoke.py - the legacy CLI under another name
make_models_markdown_table.py - a utility used during the release/doc process
pypi_helper.py - another utility used during the release process
sd-metadata.py - retrieve JSON-formatted metadata from a PNG file
```
2) Scripts that are installed by pip install. They get placed into the
venv's
PATH and are intended to be the official entry points:
```
invokeai-node-cli - new nodes-based CLI
invokeai-node-web - new nodes-based web server
invokeai - legacy CLI
invokeai-configure - install time configuration script
invokeai-merge - model merging script
invokeai-ti - textual inversion script
invokeai-model-install - model installer
invokeai-update - update script
invokeai-metadata" - retrieve JSON-formatted metadata from PNG files
```
Fix error when using txt2img
ModuleNotFoundError: No module named 'invokeai.backend.models'
and
ModuleNotFoundError: No module named
'invokeai.backend.generator.diffusers_pipeline'
This PR fixes the following scripts:
1) Scripts that can be executed within the repo's scripts directory.
Note that these are for development testing and are not intended
to be exposed to the user.
configure_invokeai.py - configuration
dream.py - the legacy CLI
images2prompt.py - legacy "dream prompt" retriever
invoke-new.py - new nodes-based CLI
invoke.py - the legacy CLI under another name
make_models_markdown_table.py - a utility used during the release/doc process
pypi_helper.py - another utility used during the release process
sd-metadata.py - retrieve JSON-formatted metadata from a PNG file
2) Scripts that are installed by pip install. They get placed into the venv's
PATH and are intended to be the official entry points:
invokeai-node-cli - new nodes-based CLI
invokeai-node-web - new nodes-based web server
invokeai - legacy CLI
invokeai-configure - install time configuration script
invokeai-merge - model merging script
invokeai-ti - textual inversion script
invokeai-model-install - model installer
invokeai-update - update script
invokeai-metadata" - retrieve JSON-formatted metadata from PNG files
To avoid `git blame` recording all the autoformatting changes
under the name 'lstein', this PR adds a `.git-blame-ignore-revs`
that will ignore any provenance changes that occurred during the
recent refactor merge.
# All python code has been moved under `invokeai`. All vestiges of `ldm`
and `ldm.invoke` are now gone.
***You will need to run `pip install -e .` before the code will work
again!***
Everything seems to be functional, but extensive testing is advised.
A guide to where the files have gone is forthcoming.
This is the first phase of a big shifting of files and directories
in the source tree.
You will need to run `pip install -e .` before the code will work again!
Here's what's in the current commit:
1) Remove a lot of dead code that dealt with checkpoint and safetensor loading.
2) Entire ckpt_generator hierarchy is now gone!
3) ldm.invoke.generator.* => invokeai.generator.*
4) ldm.model.* => invokeai.model.*
5) ldm.invoke.model_manager => invokeai.model.model_manager
6) In addition, a number of frequently-accessed classes can be imported
from the invokeai.model and invokeai.generator modules:
from invokeai.generator import ( Generator, PipelineIntermediateState,
StableDiffusionGeneratorPipeline, infill_methods)
from invokeai.models import ( ModelManager, SDLegacyType
InvokeAIDiffuserComponent, AttentionMapSaver,
DDIMSampler, KSampler, PLMSSampler,
PostprocessingSettings )
* [nodes] Add better error handling to processor and CLI
* [nodes] Use more explicit name for marking node execution error
* [nodes] Update the processor call to error
This should make caching way easier and therefore speed up the image
(re-)creation a lot.
Other small improvements:
- reorder .dockerignore
- rename amd flavor to rocm to align with cuda flavor
- use `user:group` for definitions
- add `--platform=${TARGETPLATFORM}` to base
This PR adds the core of the node-based invocation system first
discussed in https://github.com/invoke-ai/InvokeAI/discussions/597 and
implements it through a basic CLI and API. This supersedes #1047, which
was too far behind to rebase.
## Architecture
### Invocations
The core of the new system is **invocations**, found in
`/ldm/invoke/app/invocations`. These represent individual nodes of
execution, each with inputs and outputs. Core invocations are already
implemented (`txt2img`, `img2img`, `upscale`, `face_restore`) as well as
a debug invocation (`show_image`). To implement a new invocation, all
that is required is to add a new implementation in this folder (there is
a markdown document describing the specifics, though it is slightly
out-of-date).
### Sessions
Invocations and links between them are maintained in a **session**.
These can be queued for invocation (either the next ready node, or all
nodes). Some notes:
* Sessions may be added to at any time (including after invocation), but
may not be modified.
* Links are always added with a node, and are always links from existing
nodes to the new node. These links can be relative "history" links, e.g.
`-1` to link from a previously executed node, and can link either
specific outputs, or can opportunistically link all matching outputs by
name and type by using `*`.
* There are no iteration/looping constructs. Most needs for this could
be solved by either duplicating nodes or cloning sessions. This is open
for discussion, but is a difficult problem to solve in a way that
doesn't make the code even more complex/confusing (especially regarding
node ids and history).
### Services
These make up the core the invocation system, found in
`/ldm/invoke/app/services`. One of the key design philosophies here is
that most components should be replaceable when possible. For example,
if someone wants to use cloud storage for their images, they should be
able to replace the image storage service easily.
The services are broken down as follows (several of these are
intentionally implemented with an initial simple/naïve approach):
* Invoker: Responsible for creating and executing **sessions** and
managing services used to do so.
* Session Manager: Manages session history. An on-disk implementation is
provided, which stores sessions as json files on disk, and caches
recently used sessions for quick access.
* Image Storage: Stores images of multiple types. An on-disk
implementation is provided, which stores images on disk and retains
recently used images in an in-memory cache.
* Invocation Queue: Used to queue invocations for execution. An
in-memory implementation is provided.
* Events: An event system, primarily used with socket.io to support
future web UI integration.
## Apps
Apps are available through the `/scripts/invoke-new.py` script (to-be
integrated/renamed).
### CLI
```
python scripts/invoke-new.py
```
Implements a simple CLI. The CLI creates a single session, and
automatically links all inputs to the previous node's output. Commands
are automatically generated from all invocations, with command options
being automatically generated from invocation inputs. Help is also
available for the cli and for each command, and is very verbose.
Additionally, the CLI supports command piping for single-line entry of
multiple commands. Example:
```
> txt2img --prompt "a cat eating sushi" --steps 20 --seed 1234 | upscale | show_image
```
### API
```
python scripts/invoke-new.py --api --host 0.0.0.0
```
Implements an API using FastAPI with Socket.io support for signaling.
API documentation is available at `http://localhost:9090/docs` or
`http://localhost:9090/redoc`. This includes OpenAPI schema for all
available invocations, session interaction APIs, and image APIs.
Socket.io signals are per-session, and can be subscribed to by session
id. These aren't currently auto-documented, though the code for event
emission is centralized in `/ldm/invoke/app/services/events.py`.
A very simple test html and script are available at
`http://localhost:9090/static/test.html` This demonstrates creating a
session from a graph, invoking it, and receiving signals from Socket.io.
## What's left?
* There are a number of features not currently covered by invocations. I
kept the set of invocations small during core development in order to
simplify refactoring as I went. Now that the invocation code has
stabilized, I'd love some help filling those out!
* There's no image metadata generated. It would be fairly
straightforward (and would make good sense) to serialize either a
session and node reference into an image, or the entire node into the
image. There are a lot of questions to answer around source images,
linked images, etc. though. This history is all stored in the session as
well, and with complex sessions, the metadata in an image may lose its
value. This needs some further discussion.
* We need a list of features (both current and future) that would be
difficult to implement without looping constructs so we can have a good
conversation around it. I'm really hoping we can avoid needing
looping/iteration in the graph execution, since it'll necessitate
separating an execution of a graph into its own concept/system, and will
further complicate the system.
* The API likely needs further filling out to support the UI. I think
using the new API for the current UI is possible, and potentially
interesting, since it could work like the new/demo CLI in a "single
operation at a time" workflow. I don't know how compatible that will be
with our UI goals though. It would be nice to support only a single API
though.
* Deeper separation of systems. I intentionally tried to not touch
Generate or other systems too much, but a lot could be gained by
breaking those apart. Even breaking apart Args into two pieces (command
line arguments and the parser for the current CLI) would make it easier
to maintain. This is probably in the future though.
author Kyle Schouviller <kyle0654@hotmail.com> 1669872800 -0800
committer Kyle Schouviller <kyle0654@hotmail.com> 1676240900 -0800
Adding base node architecture
Fix type annotation errors
Runs and generates, but breaks in saving session
Fix default model value setting. Fix deprecation warning.
Fixed node api
Adding markdown docs
Simplifying Generate construction in apps
[nodes] A few minor changes (#2510)
* Pin api-related requirements
* Remove confusing extra CORS origins list
* Adds response models for HTTP 200
[nodes] Adding graph_execution_state to soon replace session. Adding tests with pytest.
Minor typing fixes
[nodes] Fix some small output query hookups
[node] Fixing some additional typing issues
[nodes] Move and expand graph code. Add base item storage and sqlite implementation.
Update startup to match new code
[nodes] Add callbacks to item storage
[nodes] Adding an InvocationContext object to use for invocations to provide easier extensibility
[nodes] New execution model that handles iteration
[nodes] Fixing the CLI
[nodes] Adding a note to the CLI
[nodes] Split processing thread into separate service
[node] Add error message on node processing failure
Removing old files and duplicated packages
Adding python-multipart
- Add curated set of starter models based on team discussion. The final
list of starter models can be found in
`invokeai/configs/INITIAL_MODELS.yaml`
- To test model installation, I selected and installed all the models on
the list. This led to my discovering that when there are no more starter
models to display, the console front end crashes. So I made a fix to
this in which the entire starter model selection is no longer shown.
- Update model table in 050_INSTALL_MODELS.md
- Add guide to dealing with low-memory situations
- Version is now `v2.3.1`
- add new script `scripts/make_models_markdown_table.py` that parses
INITIAL_MODELS.yaml and creates markdown table for the model installation
documentation file
- update 050_INSTALLING_MODELS.md with above table, and add a warning
about additional license terms that apply to some of the models.
- Final list can be found in invokeai/configs/INITIAL_MODELS.yaml
- After installing all the models, I discovered a bug in the file
selection form that caused a crash when no remaining uninstalled
models remained. So had to fix this.
The sample_to_image method in `ldm.invoke.generator.base` was still
using ckpt-era code. As a result when the WebUI was set to show
"accurate" intermediate images, there'd be a crash. This PR corrects the
problem.
- Closes#2784
- Closes#2775
- Discord member @marcus.llewellyn reported that some civitai
2.1-derived checkpoints were not converting properly (probably
dreambooth-generated):
https://discord.com/channels/1020123559063990373/1078386197589655582/1078387806122025070
- @blessedcoolant tracked this down to a missing key that was used to
derive vector length of the CLIP model used by fetching the second
dimension of the tensor at "cond_stage_model.model.text_projection".
- On inspection, I found that the same second dimension can be recovered
from key 'cond_stage_model.model.ln_final.bias', and use that instead. I
hope this is correct; tested on multiple v1, v2 and inpainting models
and they converted correctly.
- While debugging this, I found and fixed several other issues:
- model download script was not pre-downloading the OpenCLIP
text_encoder or text_tokenizer. This is fixed.
- got rid of legacy code in `ckpt_to_diffuser.py` and replaced with
calls into `model_manager`
- more consistent status reporting in the CLI.
without this change, the project can be installed on 3.9 but not used
this also fixes the container images
Maybe we should re-enable Python 3.9 checks which would have prevented
this.
- Discord member @marcus.llewellyn reported that some civitai 2.1-derived checkpoints were
not converting properly (probably dreambooth-generated):
https://discord.com/channels/1020123559063990373/1078386197589655582/1078387806122025070
- @blessedcoolant tracked this down to a missing key that was used to
derive vector length of the CLIP model used by fetching the second
dimension of the tensor at "cond_stage_model.model.text_projection".
His proposed solution was to hardcode a value of 1024.
- On inspection, I found that the same second dimension can be
recovered from key 'cond_stage_model.model.ln_final.bias', and use
that instead. I hope this is correct; tested on multiple v1, v2 and
inpainting models and they converted correctly.
- While debugging this, I found and fixed several other issues:
- model download script was not pre-downloading the OpenCLIP
text_encoder or text_tokenizer. This is fixed.
- got rid of legacy code in `ckpt_to_diffuser.py` and replaced
with calls into `model_manager`
- more consistent status reporting in the CLI.
Root directory finding algorithm is:
2) use --root argument
2) use INVOKEAI_ROOT environment variable
3) use VIRTUAL_ENV environment variable
4) use ~/invokeai
Since developers are liable to put virtual environments in their
favorite places, not necessarily in the invokeai root directory, this PR
adds a sanity check that looks for the existence of
`VIRTUAL_ENV/invokeai.init`, and moves on to (4) if not found.
# This will constitute v2.3.1+rc2
## Windows installer enhancements
1. resize installer window to give more room for configure and download
forms
2. replace '\' with '/' in directory names to allow user to
drag-and-drop
folders into the dialogue boxes that accept directories.
3. similar change in CLI for the !import_model and !convert_model
commands
4. better error reporting when a model download fails due to network
errors
5. put the launcher scripts into a loop so that menu reappears after
invokeai, merge script, etc exits. User can quit with "Q".
6. do not try to download fp16 of sd-ft-mse-vae, since it doesn't exist.
7. cleaned up status reporting when installing models
8. Detect when install failed for some reason and print helpful error
message rather than stack trace.
9. Detect window size and resize to minimum acceptable values to provide
better display of configure and install forms.
10. Fix a bug in the CLI which prevented diffusers imported by their
repo_ids
from being correctly registered in the current session (though they
install
correctly)
11. Capitalize the "i" in Imported in the autogenerated descriptions.
Root directory finding algorithm is:
2) use --root argument
2) use INVOKEAI_ROOT environment variable
3) use VIRTUAL_ENV environment variable
4) use ~/invokeai
Since developer's are liable to put virtual environments in their
favorite places, not necessarily in the invokeai root directory, this
PR adds a sanity check that looks for the existence of
VIRTUAL_ENV/invokeai.init, and moves to (4) if not found.
- Fix a bug in the CLI which prevented diffusers imported by their repo_ids
from being correctly registered in the current session (though they install
correctly)
- Capitalize the "i" in Imported in the autogenerated descriptions.
1. resize installer window to give more room for configure and download forms
2. replace '\' with '/' in directory names to allow user to drag-and-drop
folders into the dialogue boxes that accept directories.
3. similar change in CLI for the !import_model and !convert_model commands
4. better error reporting when a model download fails due to network errors
5. put the launcher scripts into a loop so that menu reappears after
invokeai, merge script, etc exits. User can quit with "Q".
6. do not try to download fp16 of sd-ft-mse-vae, since it doesn't exist.
7. cleaned up status reporting when installing models
- Detect when install failed for some reason and print helpful error
message rather than stack trace.
- Detect window size and resize to minimum acceptable values to provide
better display of configure and install forms.
Currently translated at 81.4% (382 of 469 strings)
translationBot(ui): update translation (Russian)
Currently translated at 81.6% (382 of 468 strings)
Co-authored-by: Sergey Krashevich <svk@svk.su>
Translate-URL: https://hosted.weblate.org/projects/invokeai/web-ui/ru/
Translation: InvokeAI/Web UI
## Major Changes
The invokeai-configure script has now been refactored. The work of
selecting and downloading initial models at install time is now done by
a script named `invokeai-model-install` (module name is
`ldm.invoke.config.model_install`)
Screen 1 - adjust startup options:

Screen 2 - select SD models:
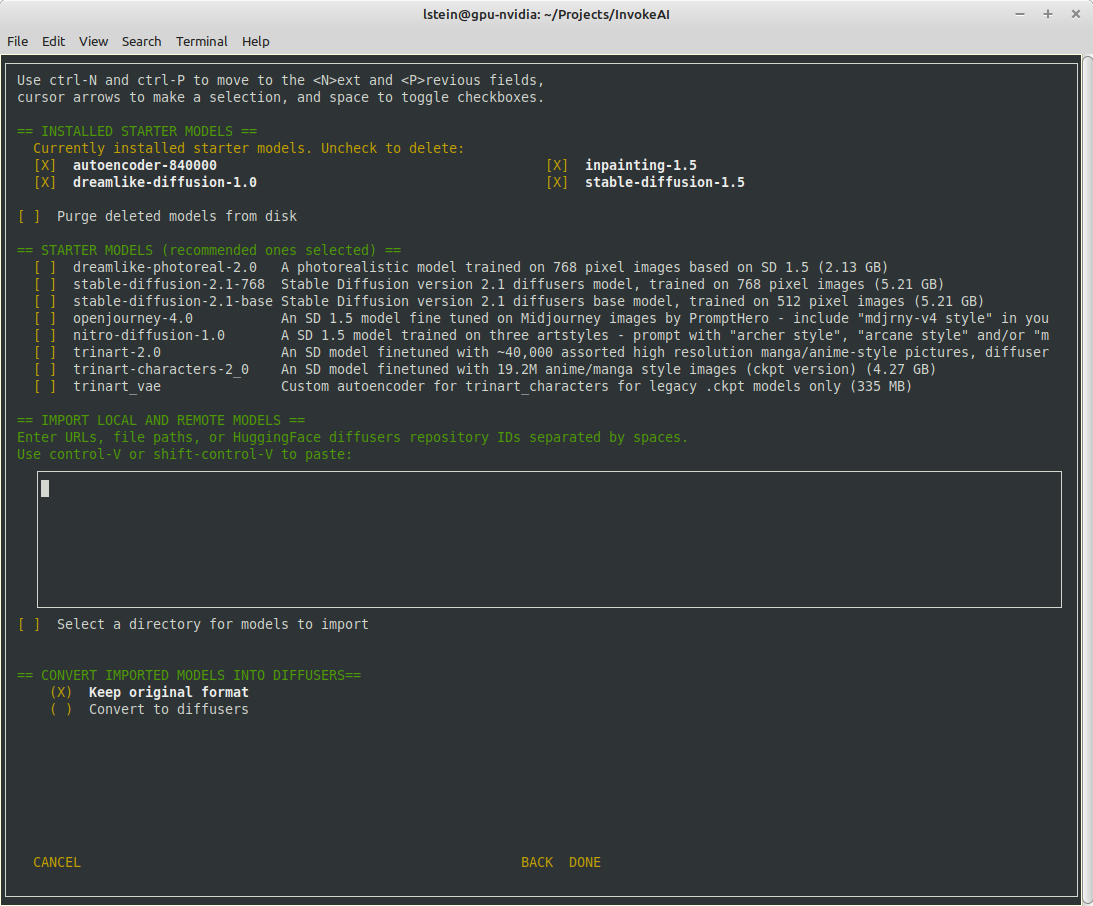
The calling arguments for `invokeai-configure` have not changed, so
nothing should break. After initializing the root directory, the script
calls `invokeai-model-install` to let the user select the starting
models to install.
`invokeai-model-install puts up a console GUI with checkboxes to
indicate which models to install. It respects the `--default_only` and
`--yes` arguments so that CI will continue to work. Here are the various
effects you can achieve:
`invokeai-configure`
This will use console-based UI to initialize invokeai.init,
download support models, and choose and download SD models
`invokeai-configure --yes`
Without activating the GUI, populate invokeai.init with default values,
download support models and download the "recommended" SD models
`invokeai-configure --default_only`
Activate the GUI for changing init options, but don't show the SD
download
form, and automatically download the default SD model (currently SD-1.5)
`invokeai-model-install`
Select and install models. This can be used to download arbitrary
models from the Internet, install HuggingFace models using their
repo_id,
or watch a directory for models to load at startup time
`invokeai-model-install --yes`
Import the recommended SD models without a GUI
`invokeai-model-install --default_only`
As above, but only import the default model
## Flexible Model Imports
The console GUI allows the user to import arbitrary models into InvokeAI
using:
1. A HuggingFace Repo_id
2. A URL (http/https/ftp) that points to a checkpoint or safetensors
file
3. A local path on disk pointing to a checkpoint/safetensors file or
diffusers directory
4. A directory to be scanned for all checkpoint/safetensors files to be
imported
The UI allows the user to specify multiple models to bulk import. The
user can specify whether to import the ckpt/safetensors as-is, or
convert to `diffusers`. The user can also designate a directory to be
scanned at startup time for checkpoint/safetensors files.
## Backend Changes
To support the model selection GUI PR introduces a new method in
`ldm.invoke.model_manager` called `heuristic_import(). This accepts a
string-like object which can be a repo_id, URL, local path or directory.
It will figure out what the object is and import it. It interrogates the
contents of checkpoint and safetensors files to determine what type of
SD model they are -- v1.x, v2.x or v1.x inpainting.
## Installer
I am attaching a zip file of the installer if you would like to try the
process from end to end.
[InvokeAI-installer-v2.3.0.zip](https://github.com/invoke-ai/InvokeAI/files/10785474/InvokeAI-installer-v2.3.0.zip)
motivation: i want to be doing future prompting development work in the
`compel` lib (https://github.com/damian0815/compel) - which is currently
pip installable with `pip install compel`.
-At some point pathlib was added to the list of imported modules and
this broken the os.path code that assembled the sample data set.
-Now fixed by replacing os.path calls with Path methods
-At some point pathlib was added to the list of imported modules and this
broken the os.path code that assembled the sample data set.
-Now fixed by replacing os.path calls with Path methods
- Disable responsive resizing below starting dimensions (you can make
form larger, but not smaller than what it was at startup)
- Fix bug that caused multiple --ckpt_convert entries (and similar) to
be written to init file.
This bug is related to the format in which we stored prompts for some time: an array of weighted subprompts.
This caused some strife when recalling a prompt if the prompt had colons in it, due to our recently introduced handling of negative prompts.
Currently there is no need to store a prompt as anything other than a string, so we revert to doing that.
Compatibility with structured prompts is maintained via helper hook.
Lots of earlier embeds use a common trigger token such as * or the
hebrew letter shan. Previously, the textual inversion manager would
refuse to load the second and subsequent embeddings that used a
previously-claimed trigger. Now, when this case is encountered, the
trigger token is replaced by <filename> and the user is informed of the
fact.
1. Fixed display crash when the number of installed models is less than
the number of desired columns to display them.
2. Added --ckpt_convert option to init file.
Enhancements:
1. Directory-based imports will not attempt to import components of diffusers models.
2. Diffuser directory imports now supported
3. Files that end with .ckpt that are not Stable Diffusion models (such as VAEs) are
skipped during import.
Bugs identified in Psychedelicious's review:
1. The invokeai-configure form now tracks the current contents of `invokeai.init` correctly.
2. The autoencoders are no longer treated like installable models, but instead are
mandatory support models. They will no longer appear in `models.yaml`
Bugs identified in Damian's review:
1. If invokeai-model-install is started before the root directory is initialized, it will
call invokeai-configure to fix the matter.
2. Fix bug that was causing empty `models.yaml` under certain conditions.
3. Made import textbox smaller
4. Hide the "convert to diffusers" options if nothing to import.
In theory, this reduces peak memory consumption by doing the conditioned
and un-conditioned predictions one after the other instead of in a
single mini-batch.
In practice, it doesn't reduce the reported "Max VRAM used for this
generation" for me, even without xformers. (But it does slow things down
by a good 18%.)
That suggests to me that the peak memory usage is during VAE decoding,
not the diffusion unet, but ymmv. It does [improve things for gogurt's
16 GB
M1](https://github.com/invoke-ai/InvokeAI/pull/2732#issuecomment-1436187407),
so it seems worthwhile.
To try it out, use the `--sequential_guidance` option:
2dded68267/ldm/invoke/args.py (L487-L492)
- Adds an update action to launcher script
- This action calls new python script `invokeai-update`, which prompts
user to update to latest release version, main development version, or
an arbitrary git tag or branch name.
- It then uses `pip` to update to whatever tag was specified.
The user interface (such as it is) looks like this:
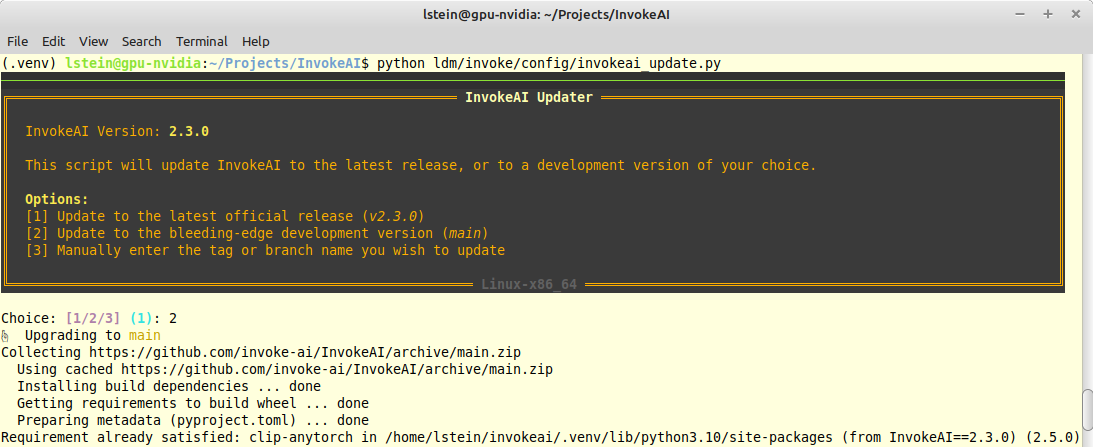
- The TI script was looping over all files in the training image
directory, regardless of whether they were image files or not. This PR
adds a check for image file extensions.
-
- Closes#2715
- Fixes longstanding bug in the token vector size code which caused .pt
files to be assigned the wrong token vector length. These were then
tossed out during directory scanning.
- Fixes longstanding bug in the token vector size code which caused
.pt files to be assigned the wrong token vector length. These
were then tossed out during directory scanning.
- Fixed the test for token length; tested on several .pt and .bin files
- Also added a __main__ entrypoint for CLI.py, to make pdb debugging a
bit more convenient.
When selecting the last model of the third model-list in the
model-merging-TUI it crashed because the code forgot about the "None"
element.
Additionally it seems that it accidentally always took the wrong model
as third model if selected?
This simple fix resolves both issues.
Added symmetry to Invoke based on discussions with @damian0815. This can currently only be activated via the CLI with the `--h_symmetry_time_pct` and `--v_symmetry_time_pct` options. Those take values from 0.0-1.0, exclusive, indicating the percentage through generation at which symmetry is applied as a one-time operation. To have symmetry in either axis applied after the first step, use a very low value like 0.001.
- not sure why, but at some pont --ckpt_convert (which converts legacy checkpoints)
into diffusers in memory, stopped working due to float16/float32 issues.
- this commit repairs the problem
- also removed some debugging messages I found in passing
- Fixed the test for token length; tested on several .pt and .bin files
- Also added a __main__ entrypoint for CLI.py, to make pdb debugging a bit
more convenient.
- You can now achieve several effects:
`invokeai-configure`
This will use console-based UI to initialize invokeai.init,
download support models, and choose and download SD models
`invokeai-configure --yes`
Without activating the GUI, populate invokeai.init with default values,
download support models and download the "recommended" SD models
`invokeai-configure --default_only`
As above, but only download the default SD model (currently SD-1.5)
`invokeai-model-install`
Select and install models. This can be used to download arbitrary
models from the Internet, install HuggingFace models using their repo_id,
or watch a directory for models to load at startup time
`invokeai-model-install --yes`
Import the recommended SD models without a GUI
`invokeai-model-install --default_only`
As above, but only import the default model
A few bugs fixed.
- After the recent update to the Cancel Button, it was no longer
respecting sizing in Floating Mode and the Beta Canvas. Fixed that.
- After the recent dependency update, useHotkeys was bugging out for the
fullscreen hotkey `f`. Realized this was happening because the hotkey
was initialized in two places -- in both the gallery and the parameter
floating button. Removed it from both those places and moved it to the
InvokeTabs component. It makes sense to reside it here because it is a
global hotkey.
- Also added index `0` to the default Accordion index in state in order
to ensure that the main accordions stay open. Conveniently this works
great on all tabs. We have all the primary options in accordions so they
stay open. And as for advanced settings, the first one is always Seed
which is an important accordion, so it opens up by default.
Think there may be some more bugs. Looking in to them.
After upgrading the deps, the full screen hotkey started to bug out. I believe this was happening because it was triggered in two different components causing it to run twice. Removed it from both floating buttons and moved it to the Invoke tab. Makes sense to keep it there as it is a global hotkey.
After the recent changes the Cancel button wasn't maintaining min height in floating mode. Also the new button group was not scaling in width correctly on the Canvas Beta UI. Fixed both.
- Adds a translation status badge
- Adds a blurb about contributing a translation (we want Weblate to be
the source of truth for translations, and to avoid updating translations
directly here)
- Upgraded all dependencies
- Removed beta TS 5.0 as it conflicted with some packages
- Added types for `Array.prototype.findLast` and
`Array.prototype.findLastIndex` (these definitions are provided in TS
5.0
- Fixed fixed type import syntax in a few components
- Re-patched `redux-deep-persist` and tested to ensure the patch still
works
The husky pre-commit command was `npx run lint`, but it should run
`lint-staged`. Also, `npx` wasn't working for me. Changed the command to
`npm run lint-staged` and it all works. Extended the `lint-staged`
triggers to hit `json`, `scss` and `html`.
When encountering a bad embedding, InvokeAI was asking about reconfiguring models. This is because the embedding load error was never handled - it now is.
- Upgraded all dependencies
- Removed beta TS 5.0 as it conflicted with some packages
- Added types for `Array.prototype.findLast` and `Array.prototype.findLastIndex` (these definitions are provided in TS 5.0
- Fixed fixed type import syntax in a few components
- Re-patched `redux-deep-persist` and tested to ensure the patch still works
Model Manager lags a bit if you have a lot of models.
Basically added a fake delay to rendering the model list so the modal
has time to load first. Hacky but if it works it works.
## What was the problem/requirement? (What/Why)
Frequently, I wish to cancel the processing of images, but also want the
current image to finalize before I do. To work around this, I need to
wait until the current one finishes before pressing the cancel.
## What was the solution? (How)
* Implemented a button that allows to "Cancel after current iteration,"
which stores a state in the UI that will attempt to cancel the
processing after the current image finishes
* If the button is pressed again, while it is spinning and before the
next iteration happens, this will stop the scheduling of the cancel, and
behave as if the button was never pressed.
### Minor
* Added `.yarn` to `.gitignore` as this was an output folder produced
from following Frontend's README
### Revision 2
#### Major
* Changed from a standalone button to a context menu next to the
original cancel button. Pressing the context menu will give the
drop-down option to select which type of cancel method the user prefers,
and they can press that button for canceling in the specified type
* Moved states to system state for cross-screen and toggled cancel types
management
* Added in distribution for the target yarn version (allowing any
version of yarn to compile successfully), and updated the README to
ensure `--immutable` is passed for onboarding developers
#### Minor
* Updated `.gitignore` to ignore specific yarn folders, as specified by
their team -
https://yarnpkg.com/getting-started/qa#which-files-should-be-gitignored
## How were these changes tested?
* `yarn dev` => Server started successfully
* Manual testing on the development server to ensure the button behaved
as expected
* `yarn run build` => Success
### Artifacts
#### Revision 1
* Video showing the UI changes in action
https://user-images.githubusercontent.com/89283782/218347722-3a15ce61-2d8c-4c38-b681-e7a3e79dd595.mov
* Images showing the basic UI changes


#### Revision 2
* Video showing the UI changes in action
https://user-images.githubusercontent.com/89283782/219901217-048d2912-9b61-4415-85fd-9e8fedb00c79.mov
* Images showing the basic UI changes
(Default state)

(Drop-down context menu active)

(Scheduled cancel selected and running)

(Scheduled cancel started)

## Notes
* Using `SystemState`'s `currentStatus` variable, when the value is
`common:statusIterationComplete` is an alternative to this approach (and
would be more optimal as it should prevent the next iteration from even
starting), but since the names are within the translations, rather than
an enum or other type, this method of tracking the current iteration was
used instead.
* `isLoading` on `IAIIconButton` caused the Icon Button to also be
disabled, so the current solution works around that with conditionally
rendering the icon of the button instead of passing that value.
* I don't have context on the development expectation for `dist` folder
interactions (and couldn't find any documentation outside of the
`.gitignore` mentioning that the folder should remain. Let me know if
they need to be modified a certain way.
- The checkpoint conversion script was generating diffusers models with
the safety checker set to null. This resulted in models that could not
be merged with ones that have the safety checker activated.
- This PR fixes the issue by incorporating the safety checker into all
1.x-derived checkpoints, regardless of user's nsfw_checker setting.
- The checkpoint conversion script was generating diffusers models
with the safety checker set to null. This resulted in models
that could not be merged with ones that have the safety checker
activated.
- This PR fixes the issue by incorporating the safety checker into
all 1.x-derived checkpoints, regardless of user's nsfw_checker setting.
Also tighten up the typing of `device` attributes in general.
Fixes
> ValueError: Expected a torch.device with a specified index or an
integer, but got:cuda
Weblate's first PR was it attempting to fix some translation issues we
had overlooked!
It wanted to remove some keys which it did not see in our translation
source due to typos.
This PR instead corrects the key names to resolve the issues.
# Weblate Translation
After doing a full integration test of 3 translation service providers
on my fork of InvokeAI, we have chosen
[Weblate](https://hosted.weblate.org). The other two viable options were
[Crowdin](https://crowdin.com/) and
[Transifex](https://www.transifex.com/).
Weblate was the choice because its hosted service provides a very solid
UX / DX, can scale as much as we may ever need, is FOSS itself, and
generously offers free hosted service to other libre projects like ours.
## How it works
Weblate hosts its own fork of our repo and establishes a kind of
unidirectional relationship between our repo and its fork.
### InvokeAI --> Weblate
The `invoke-ai/InvokeAI` repo has had the Weblate GitHub app added to
it. This app watches for changes to our translation source
(`invokeai/frontend/public/locales/en.json`) and then updates the
Weblate fork. The Weblate UI then knows there are new strings to be
translated, or changes to be made.
### Translation
Our translators can then update the translations on the Weblate UI. The
plan now is to invite individual community members who have expressed
interest in maintaining a language or two and give them access to the
app. We can also open the doors to the general public if desired.
### Weblate --> InvokeAI
When a translation is ready or changed, the system will make a PR to
`main`. We have a substantial degree of control over this and will
likely manually trigger these PRs instead of letting them fire off
automatically.
Once a PR is merged, we will still need to rebuild the web UI. I think
we can set things up so that we only need the rebuild when a totally new
language is added, but for now, we will stick to this relatively simple
setup.
## This PR
This PR sets up the web UI's translation stuff to work with Weblate:
- merged each locale into a single file
- updated the i18next config and UI to work with this simpler file
structure
- update our eslint and prettier rules to ensure the locale files have
the same format as what Weblate outputs (`tabWidth: 4`)
- added a thank you to Weblate in our README
Once this is merged, I'll link Weblate to `main` and do a couple tests
to ensure it is all working as expected.
This fixes a few cosmetic bugs in the merge models console GUI:
1) Fix the minimum and maximum ranges on alpha. Was 0.05 to 0.95. Now
0.01 to 0.99.
2) Don't show the 'add_difference' interpolation method when 2 models
selected, or the other three methods when three models selected
## Convert v2 models in CLI
- This PR introduces a CLI prompt for the proper configuration file to
use when converting a ckpt file, in order to support both inpainting
and v2 models files.
- When user tries to directly !import a v2 model, it prints out a proper
warning that v2 ckpts are not directly supported and converts it into a
diffusers model automatically.
The user interaction looks like this:
```
(stable-diffusion-1.5) invoke> !import_model /home/lstein/graphic-art.ckpt
Short name for this model [graphic-art]: graphic-art-test
Description for this model [Imported model graphic-art]: Imported model graphic-art
What type of model is this?:
[1] A model based on Stable Diffusion 1.X
[2] A model based on Stable Diffusion 2.X
[3] An inpainting model based on Stable Diffusion 1.X
[4] Something else
Your choice: [1] 2
```
In addition, this PR enhances the bulk checkpoint import function. If a
directory path is passed to `!import_model` then it will be scanned for
`.ckpt` and `.safetensors` files. The user will be prompted to import
all the files found, or select which ones to import.
Addresses
https://discord.com/channels/1020123559063990373/1073730061380894740/1073954728544845855
- fix alpha slider to show values from 0.01 to 0.99
- fix interpolation list to show 'difference' method for 3 models,
- and weighted_sum, sigmoid and inverse_sigmoid methods for 2
Porting over as many usable options to slider as possible.
- Ported Face Restoration settings to Sliders.
- Ported Upscale Settings to Sliders.
- Ported Variation Amount to Sliders.
- Ported Noise Threshold to Sliders <-- Optimized slider so the values
actually make sense.
- Ported Perlin Noise to Sliders.
- Added a suboption hook for the High Res Strength Slider.
- Fixed a couple of small issues with the Slider component.
- Ported Main Options to Sliders.
- Corrected error that caused --full-precision argument to be ignored
when models downloaded using the --yes argument.
- Improved autodetection of v1 inpainting files; no longer relies on the
file having 'inpaint' in the name.
* new OffloadingDevice loads one model at a time, on demand
* fixup! new OffloadingDevice loads one model at a time, on demand
* fix(prompt_to_embeddings): call the text encoder directly instead of its forward method
allowing any associated hooks to run with it.
* more attempts to get things on the right device from the offloader
* more attempts to get things on the right device from the offloader
* make offloading methods an explicit part of the pipeline interface
* inlining some calls where device is only used once
* ensure model group is ready after pipeline.to is called
* fixup! Strategize slicing based on free [V]RAM (#2572)
* doc(offloading): docstrings for offloading.ModelGroup
* doc(offloading): docstrings for offloading-related pipeline methods
* refactor(offloading): s/SimpleModelGroup/FullyLoadedModelGroup
* refactor(offloading): s/HotSeatModelGroup/LazilyLoadedModelGroup
to frame it is the same terms as "FullyLoadedModelGroup"
---------
Co-authored-by: Damian Stewart <null@damianstewart.com>
- filter paths for `build-container.yml` and `test-invoke-pip.yml`
- add workflow to pass required checks on PRs with `paths-ignore`
- this triggers if `test-invoke-pip.yml` does not
- fix "CI checks on main link" in `/README.md`
- filter paths for `build-container.yml` and `test-invoke-pip.yml`
- add workflow to pass required checks on PRs with `paths-ignore`
- this triggers if `test-invoke-pip.yml` does not
- fix "CI checks on main link" in `/README.md`
Assuming that mixing `"literal strings"` and `{'JSX expressions'}`
throughout the code is not for a explicit reason but just a result IDE
autocompletion, I changed all props to be consistent with the
conventional style of using simple string literals where it is
sufficient.
This is a somewhat trivial change, but it makes the code a little more
readable and uniform
- quashed multiple bugs in model conversion and importing
- found old issue in handling of resume of interrupted downloads
- will require extensive testing
### WebUI Model Conversion
**Model Search Updates**
- Model Search now has a radio group that allows users to pick the type
of model they are importing. If they know their model has a custom
config file, they can assign it right here. Based on their pick, the
model config data is automatically populated. And this same information
is used when converting the model to `diffusers`.
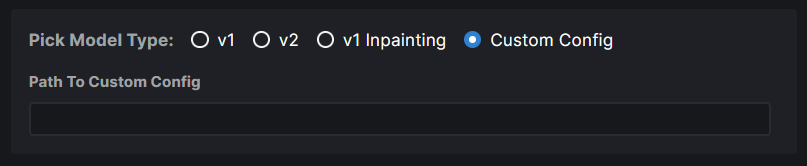
- Files named `model.safetensors` and
`diffusion_pytorch_model.safetensors` are excluded from the search
because these are naming conventions used by diffusers models and they
will end up showing on the list because our conversion saves safetensors
and not bin files.
**Model Conversion UI**
- The **Convert To Diffusers** button can be found on the Edit page of
any **Checkpoint Model**.
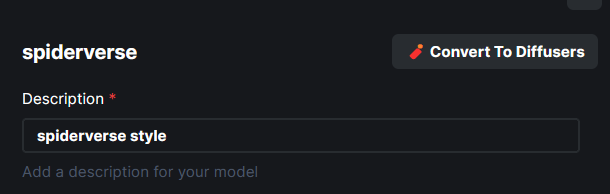
- When converting the model, the entire process is handled
automatically. The corresponding config while at the time of the Ckpt
addition is used in the process.
- Users are presented with the choice on where to save the diffusers
converted model - same location as the ckpt, InvokeAI models root folder
or a completely custom location.
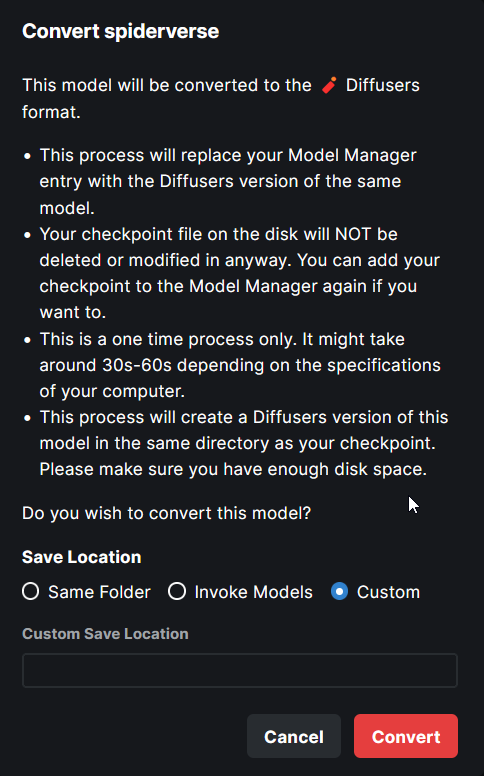
- When the model is converted, the checkpoint entry is replaced with the
diffusers model entry. A user can readd the ckpt if they wish to.
---
More or less done. Might make some minor UX improvements as I refine
things.
Tensors with diffusers no longer have to be multiples of 8. This broke Perlin noise generation. We now generate noise for the next largest multiple of 8 and return a cropped result. Fixes#2674.
`generator` now asks `InvokeAIDiffuserComponent` to do postprocessing work on latents after every step. Thresholding - now implemented as replacing latents outside of the threshold with random noise - is called at this point. This postprocessing step is also where we can hook up symmetry and other image latent manipulations in the future.
Note: code at this layer doesn't need to worry about MPS as relevant torch functions are wrapped and made MPS-safe by `generator.py`.
1. Now works with sites that produce lots of redirects, such as CIVITAI
2. Derive name of destination model file from HTTP Content-Disposition header,
if present.
3. Swap \\ for / in file paths provided by users, to hopefully fix issues with
Windows.
This PR adds a new attributer to ldm.generate, `embedding_trigger_strings`:
```
gen = Generate(...)
strings = gen.embedding_trigger_strings
strings = gen.embedding_trigger_strings()
```
The trigger strings will change when the model is updated to show only
those strings which are compatible with the current
model. Dynamically-downloaded triggers from the HF Concepts Library
will only show up after they are used for the first time. However, the
full list of concepts available for download can be retrieved
programatically like this:
```
from ldm.invoke.concepts_lib import HuggingFAceConceptsLibrary
concepts = HuggingFaceConceptsLibrary()
trigger_strings = concepts.list_concepts()
```
I have added the arabic locale files. There need to be some
modifications to the code in order to detect the language direction and
add it to the current document body properties.
For example we can use this:
import { appWithTranslation, useTranslation } from "next-i18next";
import React, { useEffect } from "react";
const { t, i18n } = useTranslation();
const direction = i18n.dir();
useEffect(() => {
document.body.dir = direction;
}, [direction]);
This should be added to the app file. It uses next-i18next to
automatically get the current language and sets the body text direction
(ltr or rtl) depending on the selected language.
## Provide informative error messages when TI and Merge scripts have
insufficient space for console UI
- The invokeai-ti and invokeai-merge scripts will crash if there is not
enough space in the console to fit the user interface (even after
responsive formatting).
- This PR intercepts the errors and prints a useful error message
advising user to make window larger.
1. The invokeai-configure script has now been refactored. The work of
selecting and downloading initial models at install time is now done
by a script named invokeai-initial-models (module
name is ldm.invoke.config.initial_model_select)
The calling arguments for invokeai-configure have not changed, so
nothing should break. After initializing the root directory, the
script calls invokeai-initial-models to let the user select the
starting models to install.
2. invokeai-initial-models puts up a console GUI with checkboxes to
indicate which models to install. It respects the --default_only
and --yes arguments so that CI will continue to work.
3. User can now edit the VAE assigned to diffusers models in the CLI.
4. Fixed a bug that caused a crash during model loading when the VAE
is set to None, rather than being empty.
- The invokeai-ti and invokeai-merge scripts will crash if there is not enough space
in the console to fit the user interface (even after responsive formatting).
- This PR intercepts the errors and prints a useful error message advising user to
make window larger.
- fix unused variables and f-strings found by pyflakes
- use global_converted_ckpts_dir() to find location of diffusers
- fixed bug in model_manager that was causing the description of converted
models to read "Optimized version of {model_name}'
Strategize slicing based on free [V]RAM when not using xformers. Free [V]RAM is evaluated at every generation. When there's enough memory, the entire generation occurs without slicing. If there is not enough free memory, we use diffusers' sliced attention.
- Adds an update action to launcher script
- This action calls new python script `invokeai-update`, which prompts
user to update to latest release version, main development version,
or an arbitrary git tag or branch name.
- It then uses `pip` to update to whatever tag was specified.
Some of the core features of this PR include:
- optional push image to dockerhub (will be skipped in repos which
didn't set it up)
- stop using the root user at runtime
- trigger builds also for update/docker/* and update/ci/docker/*
- always cache image from current branch and main branch
- separate caches for container flavors
- updated comments with instructions in build.sh and run.sh
This commit cleans up the code that did bulk imports of legacy model
files. The code has been refactored, and the user is now offered the
option of importing all the model files found in the directory, or
selecting which ones to import.
Users can now pick the folder to save their diffusers converted model. It can either be the same folder as the ckpt, or the invoke root models folder or a totally custom location.
Fixed a couple of bugs:
1. The original config file for the ckpt file is derived from the entry in
`models.yaml` rather than relying on the user to select. The implication
of this is that V2 ckpt models need to be assigned `v2-inference-v.yaml`
when they are first imported. Otherwise they won't convert right. Note
that currently V2 ckpts are imported with `v1-inference.yaml`, which
isn't right either.
2. Fixed a backslash in the output diffusers path, which was causing
load failures on Linux.
Remaining issues:
1. The radio buttons for selecting the model type are
nonfunctional. It feels to me like these should be moved into the
dialogue for importing ckpt/safetensors files, because this is
where the algorithm needs help from the user.
2. The output diffusers model is written into the same directory as
the input ckpt file. The CLI does it differently and stores the
diffusers model in `ROOTDIR/models/converted-ckpts`. We should
settle on one way or the other.
Converted the picker options to a Radio Group and also updated the backend to use the appropriate config if it is a v2 model that needs to be converted.
- This PR introduces a CLI prompt for the proper configuration file to
use when converting a ckpt file, in order to support both inpainting
and v2 models files.
- When user tries to directly !import a v2 model, it prints out a proper
warning that v2 ckpts are not directly supported.
## What was the problem/requirement? (What/Why)
* Windows location for the Python environment activate location is
currently incorrect
* Due to this, this command will fail for Windows-based users
* The contributing link within the `Developer Install` sections leads to
a [404](https://invoke-ai.github.io/index.md#Contributing)
* `Developer Install`'s numbered list currently lists 1, 1, 2, . . .
## What was the solution? (How)
* Changed the location of Windows script based on actual location -
[reference](https://docs.python.org/3/library/venv.html)
* Moved the link to point to one directory higher -- the main index.md
* Minor format adjustments to allow for the numbered list to appear as
expected
## How were these changes tested?
* `mkdocs serve` => Verified on local server that the changes reflected
as expected
## Notes
Contributing mentions to set the upstream towards the `development`
branch, but that branch has been untouched for several months, so I've
pointed to the `main` branch. Let me know if we need to switch to a
different one.
…odels
- If CLI asked to convert the currently loaded model, the model would
crash on the first rendering. CLI will now refuse to convert a model
loaded in memory (probably a good idea in any case).
- CLI will offer the `v1-inpainting-inference.yaml` as the configuration
file when importing an inpainting a .ckpt or .safetensors file that has
"inpainting" in the name. Otherwise it offers `v1-inference.yaml` as the
default.
rather than bypassing any path with diffusers in it, im specifically bypassing model.safetensors and diffusion_pytorch_model.safetensors both of which should be diffusers files in most cases.
- If CLI asked to convert the currently loaded model, the model would crash
on the first rendering. CLI will now refuse to convert a model loaded
in memory (probably a good idea in any case).
- CLI will offer the `v1-inpainting-inference.yaml` as the configuration
file when importing an inpainting a .ckpt or .safetensors file that
has "inpainting" in the name. Otherwise it offers `v1-inference.yaml`
as the default.
Found a couple of places where the formatting was messed up. I also
added a "Quick Start Guide" to the README for people who encounter
InvokeAI through PyPi. It features the PyPi install!
pulling in denoising support from upstream (its already there, invoke
just isn't using it). I've enabled this as a command line argument as
construction of the ESRGAN handler happens once. Ideally this would be a
UI option that could be adjusted for each upscaling task. Unfortunately
that is beyond my current level of InvokeAI-foo.
Upstream reference is here, starting on line 99 "use dni to control the
denoise strength"
https://github.com/xinntao/Real-ESRGAN/blob/master/inference_realesrgan.py
- This makes the launcher options menu on Windows look and act the same
as the Linux/Mac launcher, which previously was lacking the command-line
help option and didn't list item (6) as an option.
Work in progress. I am reviewing and updating the documentation for
2.3.0. The following sections need to be done:
- [x] index.md
- [x] installation/010_INSTALL_AUTOMATED.md
- [x] installation/020_INSTALL_MANUAL.md
- [x] installation/030_INSTALL_CUDA_AND_ROCM.md (needs to be written
from scratch)
- [x] installation/040_INSTALL_DOCKER.md
- [x] installation/050_INSTALLING_MODELS.md
- [x] features/CLI.md
- [x] features/WEB.md
Using Windows 10 I found I needed to use double backslashes to import a
new model, when using single backslash the output would say
"e:_ProjectsCodemodelsldmstable-diffusion-model-to-import.ckpt is
neither the path to a .ckpt file nor a diffusers repository id. Can't
import." This added tip in the documentation will help Windows users
overcome this.
- The following were supposed to be equivalent, but the latter crashes:
```
invoke> banana sushi
invoke> --prompt="banana sushi"
```
This PR fixes the problem.
- Fixes#2548
- This makes the launcher options menu on Windows look and act the same
as the Linux/Mac launcher, which previously was lacking the command-line
help option and didn't list item (6) as an option.
The `useHotkeys` hook for this hotkey didn't have `isConnected` or `isProcessing` in its dependencies array. This prevented `handleDelete()` from dispatching the delete request.
This is an early draft of a codeowners file for InvokeAI. It has plenty
of gaps in it. Please use this PR to add yourself and others where
appropriate.
- The following were supposed to be equivalent, but the latter crashes:
```
invoke> banana sushi
invoke> --prompt="banana sushi"
```
This PR fixes the problem.
- Fixes#2548
This adds some platform-specific help messages to the installer welcome
screen:
- For Windows, the message encourages them to install VC++ core
libraries and the registry long name patch
- For MacOSX, the message warns the user to install the XCode tools.
I found I needed to use double backslashes to import a new model, when using single backslash the output would say "e:_ProjectsCodemodelsldmstable-diffusion-model-to-import.ckpt is neither the path to a .ckpt file nor a diffusers repository id. Can't import." This added tip in the documentation will help Windows users overcome this.
- `eslint` and `prettier` configs
- `husky` to format and lint via pre-commit hook
- `babel-plugin-transform-imports` to treeshake `lodash` and other packages if needed
Lints and formats codebase.
`options` slice was huge and managed a mix of generation parameters and general app settings. It has been split up:
- Generation parameters are now in `generationSlice`.
- Postprocessing parameters are now in `postprocessingSlice`
- UI related things are now in `uiSlice`
There is probably more to be done, like `gallerySlice` perhaps should only manage internal gallery state, and not if the gallery is displayed.
Full-slice selectors have been made for each slice.
Other organisational tweaks.
Previously conversions of .ckpt and .safetensors files to diffusers
models were failing with channel mismatch errors. This is corrected
with this PR.
- The model_manager convert_and_import() method now accepts the path
to the checkpoint file's configuration file, using the parameter
`original_config_file`. For inpainting files this should be set to
the full path to `v1-inpainting-inference.yaml`.
- If no configuration file is provided in the call, then the presence
of an inpainting file will be inferred at the
`ldm.ckpt_to_diffuser.convert_ckpt_to_diffUser()` level by looking
for the string "inpaint" in the path. AUTO1111 does something
similar to this, but it is brittle and not recommended.
- This PR also changes the model manager model_names() method to return
the model names in case folded sort order.
- `eslint` and `prettier` configs
- `husky` to format and lint via pre-commit hook
- `babel-plugin-transform-imports` to treeshake `lodash` and other packages if needed
Lints and formats codebase.
`options` slice was huge and managed a mix of generation parameters and general app settings. It has been split up:
- Generation parameters are now in `generationSlice`.
- Postprocessing parameters are now in `postprocessingSlice`
- UI related things are now in `uiSlice`
There is probably more to be done, like `gallerySlice` perhaps should only manage internal gallery state, and not if the gallery is displayed.
Full-slice selectors have been made for each slice.
Other organisational tweaks.
# enhance model_manager support for converting inpainting ckpt files
Previously conversions of .ckpt and .safetensors files to diffusers
models were failing with channel mismatch errors. This is corrected
with this PR.
- The model_manager convert_and_import() method now accepts the path
to the checkpoint file's configuration file, using the parameter
`original_config_file`. For inpainting files this should be set to
the full path to `v1-inpainting-inference.yaml`.
- If no configuration file is provided in the call, then the presence
of an inpainting file will be inferred at the
`ldm.ckpt_to_diffuser.convert_ckpt_to_diffUser()` level by looking
for the string "inpaint" in the path. AUTO1111 does something
similar to this, but it is brittle and not recommended.
- This PR also changes the model manager model_names() method to return
the model names in case folded sort order.
- Diffusers Sampler list is independent from CKPT Sampler list. And the
app will load the correct list based on what model you have loaded.
- Isolated the activeModelSelector coz this is used in multiple places.
- Possible fix to the white screen bug that some users face. This was
happening because of a possible null in the active model list
description tag. Which should hopefully now be fixed with the new
activeModelSelector.
I'll keep tabs on the last thing. Good to go.
For the torch and torchvision libraries **only**, the installer will now
pass the pip `--force-reinstall` option. This is intended to fix issues
with the user getting a CPU-only version of torch and then not being
able to replace it.
Previously conversions of .ckpt and .safetensors files to diffusers
models were failing with channel mismatch errors. This is corrected
with this PR.
- The model_manager convert_and_import() method now accepts the path
to the checkpoint file's configuration file, using the parameter
`original_config_file`. For inpainting files this should be set to
the full path to `v1-inpainting-inference.yaml`.
- If no configuration file is provided in the call, then the presence
of an inpainting file will be inferred at the
`ldm.ckpt_to_diffuser.convert_ckpt_to_diffUser()` level by looking
for the string "inpaint" in the path. AUTO1111 does something
similar to this, but it is brittle and not recommended.
- This PR also changes the model manager model_names() method to return
the model names in case folded sort order.
test-invoke-pip.yml:
- enable caching of pip dependencies in `actions/setup-python@v4`
- add workflow_dispatch trigger
- fix indentation in concurrency
- set env `PIP_USE_PEP517: '1'`
- cache python dependencies
- remove models cache (since we currently use 190.96 GB of 10 GB while I
am writing this)
- add step to set `INVOKEAI_OUTDIR`
- add outdir arg to invokeai
- fix path in archive results
model_manager.py:
- read files in chunks when calculating sha (windows runner is crashing
otherwise)
- help users to avoid glossing over per-platform prerequisites
- better link colouring
- update link to community instructions to install xcode command line tools
- Issue is that if insufficient diffusers models are defined in
models.yaml the frontend would ungraciously crash.
- Now it emits appropriate error messages telling user what the problem
is.
- Issue is that if insufficient diffusers models are defined in
models.yaml the frontend would ungraciously crash.
- Now it emits appropriate error messages telling user what the problem
is.
- dont build frontend since complications with QEMU
- set pip cache dir
- add pip cache to all pip related build steps
- dont lock pip cache
- update dockerignore to exclude uneeded files
env.sh:
- move check for torch to CONVTAINER_FLAVOR detection
Dockerfile
- only mount `/var/cache/apt` for apt related steps
- remove `docker-clean` from `/etc/apt/apt.conf.d` for BuildKit cache
- remove apt-get clean for BuildKit cache
- only copy frontend to frontend-builder
- mount `/usr/local/share/.cache/yarn` in frountend-builder
- separate steps for yarn install and yarn build
- build pytorch in pyproject-builder
build.sh
- prepare for installation with extras
This change allows passing a directory with multiple models in it to be
imported.
Ensures that diffusers directories will still work.
Fixed up some minor type issues.
This allows the --log_tokenization option to be used as a command line
argument (or from invokeai.init), making it possible to view
tokenization information in the terminal when using the web interface.
- This fixes an edge case crash when the textual inversion frontend
tried to display the list of models and no default model defined
in models.yaml
Co-authored-by: Jonathan <34005131+JPPhoto@users.noreply.github.com>
This allows the --log_tokenization option to be used as a command line argument (or from invokeai.init), making it possible to view tokenization information in the terminal when using the web interface.
- Rename configure_invokeai.py to invokeai_configure.py to be consistent
with installed script name
- Remove warning message about half-precision models not being available
during the model download process.
- adjust estimated file size reported by configure
- guesstimate disk space needed for "all" models
- fix up the "latest" tag to be named 'v2.3-latest'
- To ensure a clean environment, the installer will now detect whether a
previous .venv exists in the install location, and move it to .venv-backup
before creating a fresh .venv.
- Any previous .venv-backup is deleted.
- User is informed of process.
- Rename configure_invokeai.py to invokeai_configure.py to be
consistent with installed script name
- Remove warning message about half-precision models not being
available during the model download process.
- adjust estimated file size reported by configure
- guesstimate disk space needed for "all" models
- fix up the "latest" tag to be named 'v2.3-latest'
`torch` wasn't seeing the environment variable. I suspect this is
because it was imported before the variable was set, so was running with
a different environment.
Many `torch` ops are supported on MPS so this wasn't noticed
immediately, but some samplers like k_dpm_2 still use unsupported
operations and need this fallback.
This PR forces the installer to install the official torch-cu117 wheel
from download.torch.org, rather than relying on PyPi.org to return the
correct version. It ought to correct the problems that some people have
experienced with cuda support not being installed.
1. The convert module was converting ckpt models into
StableDiffusionGeneratorPipeline objects for use in-memory, but then
when saved to disk created files that could not be merged with
StableDiffusionPipeline models. I have added a flag that selects which
pipeline class to return, so that both in-memory and disk conversions
work properly.
2. This PR also fixes an issue with `invoke.sh` not using the correct
path for the textual inversion and merge scripts.
3. Quench nags during the merge process about the safety checker being
turned off.
`torch` wasn't seeing the environment variable. I suspect this is because it was imported before the variable was set, so was running with a different environment.
Many `torch` ops are supported on MPS so this wasn't noticed immediately, but some samplers like k_dpm_2 still use unsupported operations and need this fallback.
* remove non maintained Dockerfile
* adapt Docker related files to latest changes
- also build the frontend when building the image
- skip user response if INVOKE_MODEL_RECONFIGURE is set
- split INVOKE_MODEL_RECONFIGURE to support more than one argument
* rename `docker-build` dir to `docker`
* update build-container.yml
- rename image to invokeai
- add cpu flavor
- add metadata to build summary
- enable caching
- remove build-cloud-img.yml
* fix yarn cache path, link copyjob
Crashes would occur in the invokeai-configure script if no HF token
was found in cache and the user declines to provide one when prompted.
The reason appears to be that on Linux systems getpass_asterisk()
raises an EOFError when no input is provided
On windows10, getpass_asterisk() does not raise the EOFError, but
returns an empty string instead. This patch detects this and raises
the exception so that the control logic is preserved.
if reinstalling over an existing installation where the .venv was
created with symlinks to system python instead of copies of the python
executable, the installer would raise a `SameFileError`, because it
would attempt to copy Python over itself. This fixes the issue.
Copying the executable is still preferred for new environments, because
this guarantees the stable Python version.
- fixes bug in finding the source of the configs dir;
- updates the docs for manual install to clarify the preference to
keeping the `.venv` inside the runtime dir, and the caveat/extra steps
required if done otherwise
if reinstalling over an existing installation where the .venv
was created with symlinks to system python instead of copies
of the python executable, the installer would raise a
SameFileError, because it would attempt to copy Python over
itself. This fixes the issue.
- Added modest adaptive behavior; if the screen is wide enough the three
checklists of models will be arranged in a horizontal row.
- Added color support
## Summary
This PR rewrites the core of the installer in Python for cross-platform
compatibility. Filesystem path manipulation, platform/arch decisions and
various edge cases are handled in a more convenient fashion. The
original `install.bat.in`/`install.sh.in` scripts are kept as
entrypoints for their respective OSs, but only serve as thin wrappers to
the Python module.
In addition, it:
- builds and **packages the .whl with the installer**, so that
downloading a versioned installer will guarantee installation of the
same version of the application.
- updates shell entrypoints:
- new commands are `invokeai`, `invokeai-configure`, `invokeai-ti`,
`invokeai-merge`.
- these commands will be available in the activated `.venv` or via the
launch scripts
- `invoke.py` and `configure_invokeai.py` scripts are deprecated but
kept around for backwards compatibility and keeping users' surprise to a
minimum.
- introduces a new `ldm/invoke/config` package and moves the
`configure_invokeai` script into it. Similarly, movers Textual Inversion
script and TUI to `ldm/invoke/training`.
- moves the `configs` directory into the `ldm/invoke/config` package for
easy distribution.
- updates documentation to reflect all of the above changes
- fixes a failing test
- reduces wheel size to 3MB (from 27MB) by excluding unnecessary image
files under `assets`
⚠️ self-updating functionality and ability to install arbitrary
versions are still WIP. For now we can recommend downloading and running
the installer for a specific version as desired.
## Testing the source install
From the cloned source, check out this branch, and:
`$ python3 installer/main.py --root <path_to_destination>`
Also try:
`$ python3 installer/main.py ` - will prompt for paths
`$ python3 installer/main.py --yes` - will not prompt for any input
- try to combine the `--yes` and `--root` options
- try to install in destinations with "quirky" paths, such as paths
containing spaces in the directory name, etc.
## Testing the packaged install ("Automated Installer"):
Download the
[InvokeAI-installer-v2.3.0+a0.zip](https://github.com/invoke-ai/InvokeAI/files/10533913/InvokeAI-installer-v2.3.0%2Ba0.zip)
file, unzip it, and run the install script for your platform (preferably
in a terminal window)
OR make your own: from the cloned source, check out this branch, and:
```
cd installer
./create_installer.sh
# (do NOT tag/push when prompted! just say "no")
```
This will create the installation media:
`InvokeAI-installer-v2.3.0+a0.zip`. The installer is now
*platform-agnostic* - meaning, both Windows and *nix install resources
are packaged together.
Copy it somewhere as if it had been downloaded from the internet. Unzip
the file, enter the created `InvokeAI-Installer` directory, and run
`install.sh` or `install.bat` as applicable your platform.
⚠️ NOTE!!! `install.sh` accepts the same arguments as are
applicable to the Python script, i.e. you can `install.sh --yes --root
....`. This is NOT yet supported by the Windows `.bat` script. Only
interactive installation is supported on Windows. (this is still a
TODO).
* refactor ckpt_to_diffuser to allow converted pipeline to remain in memory
- This idea was introduced by Damian
- Note that although I attempted to use the updated HuggingFace module
pipelines/stable_diffusion/convert_from_ckpt.py, it was unable to
convert safetensors files for reasons I didn't dig into.
- Default is to extract EMA weights.
* add --ckpt_convert option to load legacy ckpt files as diffusers models
- not quite working - I'm getting artifacts and glitches in the
converted diffuser models
- leave as draft for time being
* do not include safety checker in converted files
* add ability to control which vae is used
API now allows the caller to pass an external VAE model to the
checkpoint conversion process. In this way, if an external VAE is
specified in the checkpoint's config stanza, this VAE will be used
when constructing the diffusers model.
Tested with both regular and inpainting 1.X models.
Not tested with SD 2.X models!
---------
Co-authored-by: Jonathan <34005131+JPPhoto@users.noreply.github.com>
Co-authored-by: Damian Stewart <null@damianstewart.com>
This PR changes the codeowner for the installer directory from
@tildebyte to @ebr due to the former's time commitments.
Further reorganization of the codeowners is pending.
1. only load triton on linux machines
2. require pip >= 23.0 so that editable installs can run without setup.py
3. model files default to SD-1.5, not 2.1
4. use diffusers model of inpainting rather than ckpt
5. selected a new set of initial models based on # of likes at huggingface
- launcher scripts are installed *before* the configure script runs,
so that if something goes wrong in the configure script, the user
can run invoke.{sh,bat} and get the option to re-run configure
- fixed typo in invoke.sh which misspelled name of invokeai-configure
Draft PRs are triggering actions on every commit (except
`test-invoke-pip.yml`).
I've added a conditional to each job to only run when the PR is not a
draft.
(maybe there is a reason we are running all applicable workflows on
draft PRs?)
- also remove conda related things
- rename `invoke` to `invokeai`
- rename `configure_invokeai` to `invokeai-configure`
- rename venv back to common `.venv` but add `--prompt InvokeAI`
- remove outdated information
A new infill method, **solid:** solid color. currently using middle
gray.
Fixes#2417
It seems like the runwayml inpainting model specifically expects those
masked areas to be blanked out like this.
I haven't tried the SD 2.0 inpainting model with it yet.
Otherwise the model seems too reluctant to change these areas, even
though the mask channel should allow it to.
This makes the solid infill method proposed by #2441 less necessary,
though I think there's still a place for an infill method that is faster
than patchmatch and more predictable than tiles.
Even with #2441, this PR is still useful because it influences all areas
to be painted, not just the infill area.
Fixes#2417
- implement the following pattern for finding data files under both
regular and editable install conditions:
import invokeai.foo.bar as bar
path = bar.__path__[0]
- this *seems* to work reliably with Python 3.9. Testing on 3.10 needs
to be performed.
- fixes a spurious "unknown model name" error when trying to edit the
short name of an existing model.
- relaxes naming requirements to include the ':' and '/' characters
in model names
1) Downgrade numpy to avoid dependency conflict with numba
2) Move all non ldm/invoke files into `invokeai`. This includes assets, backend, frontend, and configs.
3) Fix up way that the backend finds the frontend and the generator finds the NSFW caution.png icon.
if running `python3 installer/main.py` from the source distribution,
it would fail because it expected to find a wheel.
this PR tries to perform a source install by going one level up the directory
tree and checking for `pyproject.toml` and `ldm` directory entries to
confirm (to a degree) that this is an InvokeAI distribution
* Update --hires_fix
Change `--hires_fix` to calculate initial width and height based on the model's resolution (if available) and with a minimum size.
- install.sh is now a thin wrapper around the pythonized install script
- install.bat not done yet - to follow
- user messaging is tailored to the current platform (paste shortcuts, file paths, etc)
- emit invoke.sh/invoke.bat scripts to the runtime dir
- improve launch scripts (add help option, etc)
- only emit the platform-specific scripts
if the config directory is missing, initialize it using the standard
process of copying it over, instead of failing to create the config file
this can happen if the user is re-running the config script in a directory which
already has the init file, but no configs dir
the 'setup.py install' method is deprecated in favour of a
build-system independent format: https://peps.python.org/pep-0517/
this is needed to install dependencies that don't have a pyproject.toml
file (only setup.py) in a forward-compatible way
This allows reliable distribution of the initial 'configs' directory
with the Python package, and enables the configuration script to be running
from anywhere, as long as the virtual environment is available on the sys.path
There is a race condition affecting the 'tempfile' module on Windows.
A PermissionsError is raised when cleaning up the temp dir
Python3.10 introduced a flag to suppress this error.
Windows + Python3.9 users will receive an unpleasant stack trace for now
The original textual inversion script in scripts is now superseded. The
replacement can be found in ldm/invoke/textual_inversion.py and is a
merging of the command line and front end scripts. After running `pip
install -e .` there will be a `textual_inversion` command on your path.
You can activate the front end this way:
`textual_inversion -gui`
Adds double-click to reset canvas view to 100%.
- Adds hook to manage single and double clicks
- Single Click `Reset Canvas View` --> scale to fit, no change to
current behaviour
- Double Click `Reset Canvas View` --> set scale to 1
Testing suggests that the diffusers versions of Waifu-1.4 anything-v4.0
require the `sd-vae-ft-mse` to generate decent images, so the
appropriate arguments have been added to the initial model file.
- Model merging and textual inversion scripts have been moved into
`ldm/invoke`, which allows them to be installed properly by
pyproject.toml.
- As part of the pyproject install, the .py suffix is removed from the
command. I.e. use `invoke`, `configure_invokeai`, `merge_models` and
`textual_inversion`.
- GUI versions are activated by adding `--gui` to the command. Without
this, you get a classical argv-based command. Example: `merge_models
--gui`
- Fixed up the launcher scripts to accommodate new naming scheme.
- Keyboard behavior of the GUI front ends has been improved. You can now
use up and down arrow to move from field to field, in addition to <tab>
and ctrl-N/ctrl-P
So far the slider component was unable to take typed input due to a
bunch of issues that were a pain to solve. This PR fixes it.
Things to test:
- Moving the slider also updates the value in the input text box.
- Input text box next to slider can be changed in two ways: If you type
a manual value, the slider will be updated when you lose focus from the
input box. If you use the stepper icons to update the values, the slider
should update immediately.
- Make sure the reset buttons next to the slider are updating correctly
and make sure this updates both the slider and the input box values.
- Brush Size slider -> make sure the hotkeys are updating the input box
too.
- This replaces the original clipseg library with the transformers
version from HuggingFace.
- This should make it possible to register InvokeAI at PyPi and do a
fully automated pip-based install.
- Minor regression: it is no longer possible to specify which device the
clipseg model will be loaded into, and it will reside in CPU. However,
performance is more than acceptable.
- This replaces the original clipseg library with the transformers
version from HuggingFace.
- This should make it possible to register InvokeAI at PyPi and do
a fully automated pip-based install.
- Minor regression: it is no longer possible to specify which device
the clipseg model will be loaded into, and it will reside in CPU.
However, performance is more than acceptable.
Fix two deficiencies in the CLI's support for model management:
1. `!import_model` did not allow user to specify VAE file. This is now
fixed.
2. `!del_model` did not offer the user the opportunity to delete the
underlying
weights file or diffusers directory. This is now fixed.
This PR improves the console reporting of the process of recognizing
trigger tokens and loading their embeds.
1. Do not report "concept is not known to HuggingFace" if the trigger
term is in fact a local embedding trigger.
2. When a trigger term is first recognized during a session, report the
fact.
This should help debug embedding issues in the future.
Note that the local embeddings produced by the new InvokeAI TI training
script default to the format <trigger> with literal angle brackets. This
sets them off from the rest of the text well and will enable
autocomplete at some point in the future. However, this means that they
supersede like-named HuggingFace concepts, and may cause problems for
people uploading them to the HuggingFace repository (although that
problem already exists).
This PR attempts to fix `--free_gpu_mem` option that was not working in
CKPT-based diffuser model after #1583.
I noticed that the memory usage after #1583 did not decrease after
generating an image when `--free_gpu_mem` option was enabled.
It turns out that the option was not propagated into `Generator`
instance, hence the generation will always run without the memory saving
procedure.
This PR also related to #2326. Initially, I was trying to make
`--free_gpu_mem` works on 🤗 diffuser model as well.
In the process, I noticed that InvokeAI will raise an exception when
`--free_gpu_mem` is enabled.
I tried to quickly fix it by simply ignoring the exception and produce a
warning message to user's console.
This PR adds `scripts/merge_fe.py`, which will merge any 2-3 diffusers
models registered in InvokeAI's `models.yaml`, producing a new merged
model that will be registered as well.
Currently this script will only work if all models to be merged are
known by their repo_ids. Local models, including those converted from
ckpt files, will cause a crash due to a bug in the diffusers
`checkpoint_merger.py` code. I have made a PR against
huggingface/diffusers which fixes this:
https://github.com/huggingface/diffusers/pull/2060
I've written up the install procedure for xFormers on Linux systems.
I need help with the Windows install; I don't know what the build
dependencies (compiler, etc) are. This section of the docs is currently
empty.
Please see `docs/installation/070_INSTALL_XFORMERS.md`
other changes which where required:
- move configure_invokeai.py into ldm.invoke
- update files which imported configure_invokeai to use new location:
- ldm/invoke/CLI.py
- scripts/load_models.py
- scripts/preload_models.py
- update test-invoke-pip.yml:
- remove pr type "converted_to_draft"
- remove reference to dev/diffusers
- remove no more needed requirements from matrix
- add pytorch to matrix
- install via `pip3 install --use-pep517 .`
- use the created executables
- this should also fix configure_invoke not executed in windows
To install use `pip install --use-pep517 -e .` where `-e` is optional
- Added new documentation for textual inversion training process
- Move `main.py` into the deprecated scripts folder
- Fix bug in `textual_inversion.py` which was causing it to not load
the globals module correctly.
- Sort models alphabetically in console front end
- Only show diffusers models in console front end
Starting `invoke.py` with --no-xformers will disable
memory-efficient-attention support if xformers is installed.
For symmetry, `--xformers` will enable support, but this is already the
default if xformers is available.
This commit suppresses a few irrelevant warning messages that the
diffusers module produces:
1. The warning that turning off the NSFW detector makes you an
irresponsible person.
2. Warnings about running fp16 models stored in CPU (we are not running
them in CPU, just caching them in CPU RAM)
This commit suppresses a few irrelevant warning messages that the
diffusers module produces:
1. The warning that turning off the NSFW detector makes you an
irresponsible person.
2. Warnings about running fp16 models stored in CPU (we are not running
them in CPU, just caching them in CPU RAM)
Starting `invoke.py` with --no-xformers will disable
memory-efficient-attention support if xformers is installed.
--xformers will enable support, but this is already the
default.
- During trigger token processing, emit better status messages indicating
which triggers were found.
- Suppress message "<token> is not known to HuggingFace library, when
token is in fact a local embed.
- When a ckpt or safetensors file uses an external autoencoder and we
don't know which diffusers model corresponds to this (if any!), then
we fallback to using stabilityai/sd-vae-ft-mse
- This commit improves error reporting so that user knows what is happening.
- After successfully converting a ckt file to diffusers, model_manager
will attempt to create an equivalent 'vae' entry to the resulting
diffusers stanza.
- This is a bit of a hack, as it relies on a hard-coded dictionary
to map ckpt VAEs to diffusers VAEs. The correct way to do this
would be to convert the VAE to a diffusers model and then point
to that. But since (almost) all models are using vae-ft-mse-840000-ema-pruned,
I did it the easy way first and will work on the better solution later.
1. !import_model did not allow user to specify VAE file. This is now fixed.
2. !del_model did not offer the user the opportunity to delete the underlying
weights file or diffusers directory. This is now fixed.
This commit allows InvokeAI to store & load 🤗 models at a location set
by `XDG_CACHE_HOME` environment variable if `HF_HOME` is not set.
By integrating this commit, a user who either use `HF_HOME` or
`XDG_CACHE_HOME` environment variables in their environment can let
InvokeAI to reuse the existing cache directory used by 🤗 library by
default. I happened to benefit from this commit because I have a Jupyter
Notebook that uses 🤗 diffusers model stored at `XDG_CACHE_HOME`
directory.
Reference:
https://huggingface.co/docs/huggingface_hub/main/en/package_reference/environment_variables#xdgcachehome
Updated the link for the MS Visual C libraries - I'm not sure if MS
changed the location of the files but this new one leads right to the
file downloads.
- Migration process will not crash if duplicate model files are found,
one in legacy location and the other in new location. The model in the
legacy location will be deleted in this case.
- Added a hint to stable-diffusion-2.1 telling people it will work best
with 768 pixel images.
- Added the anything-4.0 model.
Added a --default_only argument that limits model downloads to the
single default model, for use in continuous integration.
New behavior
- switch -
--yes --default_only Behavior
----- -------------- --------
<not set> <not set> interactive download
--yes <not set> non-interactively download all
recommended models
--yes --default_only non-interactively download the
default model
Added a --default_only argument that limits model downloads to the single
default model, for use in continuous integration.
New behavior
- switch -
--yes --default_only Behavior
----- -------------- --------
<not set> <not set> interactive download
--yes <not set> non-interactively download all
recommended models
--yes --default_only non-interactively download the
default model
- All tensors in diffusers code path are now set explicitly to
float32 or float16, depending on the --precision flag.
- autocast is still used in the ckpt path, since it is being
deprecated.
- Work around problem with OmegaConf.update() that prevented model names
from containing periods.
- Fix logic bug in !delete_model that didn't check for existence of model
in config file.
* docs: Fix links to pip and Conda installation methods
* docs: Improve installation script readability
This commit adds a space between `-m` option and the module name.
* docs: Fix alignments of step 4 & 9 in `pip` installation method
* docs: Rewrite step 10 of the ` pip` installation method
Co-authored-by: Lincoln Stein <lincoln.stein@gmail.com>
- Migration process will not crash if duplicate model files are found,
one in legacy location and the other in new location.
The model in the legacy location will be deleted in this case.
- Added a hint to stable-diffusion-2.1 telling people it will work best
with 768 pixel images.
- Added the anything-4.0 model.
* initial commit of DiffusionPipeline class
* spike: proof of concept using diffusers for txt2img
* doc: type hints for Generator
* refactor(model_cache): factor out load_ckpt
* model_cache: add ability to load a diffusers model pipeline
and update associated things in Generate & Generator to not instantly fail when that happens
* model_cache: fix model default image dimensions
* txt2img: support switching diffusers schedulers
* diffusers: let the scheduler do its scaling of the initial latents
Remove IPNDM scheduler; it is not behaving.
* web server: update image_progress callback for diffusers data
* diffusers: restore prompt weighting feature
* diffusers: fix set-sampler error following model switch
* diffusers: use InvokeAIDiffuserComponent for conditioning
* cross_attention_control: stub (no-op) implementations for diffusers
* model_cache: let offload_model work with DiffusionPipeline, sorta.
* models.yaml.example: add diffusers-format model, set as default
* test-invoke-conda: use diffusers-format model
test-invoke-conda: put huggingface-token where the library can use it
* environment-mac: upgrade to diffusers 0.7 (from 0.6)
this was already done for linux; mac must have been lost in the merge.
* preload_models: explicitly load diffusers models
In non-interactive mode too, as long as you're logged in.
* fix(model_cache): don't check `model.config` in diffusers format
clean-up from recent merge.
* diffusers integration: support img2img
* dev: upgrade to diffusers 0.8 (from 0.7.1)
We get to remove some code by using methods that were factored out in the base class.
* refactor: remove backported img2img.get_timesteps
now that we can use it directly from diffusers 0.8.1
* ci: use diffusers model
* dev: upgrade to diffusers 0.9 (from 0.8.1)
* lint: correct annotations for Python 3.9.
* lint: correct AttributeError.name reference for Python 3.9.
* CI: prefer diffusers-1.4 because it no longer requires a token
The RunwayML models still do.
* build: there's yet another place to update requirements?
* configure: try to download models even without token
Models in the CompVis and stabilityai repos no longer require them. (But runwayml still does.)
* configure: add troubleshooting info for config-not-found
* fix(configure): prepend root to config path
* fix(configure): remove second `default: true` from models example
* CI: simplify test-on-push logic now that we don't need secrets
The "test on push but only in forks" logic was only necessary when tests didn't work for PRs-from-forks.
* create an embedding_manager for diffusers
* internal: avoid importing diffusers DummyObject
see https://github.com/huggingface/diffusers/issues/1479
* fix "config attributes…not expected" diffusers warnings.
* fix deprecated scheduler construction
* work around an apparent MPS torch bug that causes conditioning to have no effect
* 🚧 post-rebase repair
* preliminary support for outpainting (no masking yet)
* monkey-patch diffusers.attention and use Invoke lowvram code
* add always_use_cpu arg to bypass MPS
* add cross-attention control support to diffusers (fails on MPS)
For unknown reasons MPS produces garbage output with .swap(). Use
--always_use_cpu arg to invoke.py for now to test this code on MPS.
* diffusers support for the inpainting model
* fix debug_image to not crash with non-RGB images.
* inpainting for the normal model [WIP]
This seems to be performing well until the LAST STEP, at which point it dissolves to confetti.
* fix off-by-one bug in cross-attention-control (#1774)
prompt token sequences begin with a "beginning-of-sequence" marker <bos> and end with a repeated "end-of-sequence" marker <eos> - to make a default prompt length of <bos> + 75 prompt tokens + <eos>. the .swap() code was failing to take the column for <bos> at index 0 into account. the changes here do that, and also add extra handling for a single <eos> (which may be redundant but which is included for completeness).
based on my understanding and some assumptions about how this all works, the reason .swap() nevertheless seemed to do the right thing, to some extent, is because over multiple steps the conditioning process in Stable Diffusion operates as a feedback loop. a change to token n-1 has flow-on effects to how the [1x4x64x64] latent tensor is modified by all the tokens after it, - and as the next step is processed, all the tokens before it as well. intuitively, a token's conditioning effects "echo" throughout the whole length of the prompt. so even though the token at n-1 was being edited when what the user actually wanted was to edit the token at n, it nevertheless still had some non-negligible effect, in roughly the right direction, often enough that it seemed like it was working properly.
* refactor common CrossAttention stuff into a mixin so that the old ldm code can still work if necessary
* inpainting for the normal model. I think it works this time.
* diffusers: reset num_vectors_per_token
sync with 44a0055571
* diffusers: txt2img2img (hires_fix)
with so much slicing and dicing of pipeline methods to stitch them together
* refactor(diffusers): reduce some code duplication amongst the different tasks
* fixup! refactor(diffusers): reduce some code duplication amongst the different tasks
* diffusers: enable DPMSolver++ scheduler
* diffusers: upgrade to diffusers 0.10, add Heun scheduler
* diffusers(ModelCache): stopgap to make from_cpu compatible with diffusers
* CI: default to diffusers-1.5 now that runwayml token requirement is gone
* diffusers: update to 0.10 (and transformers to 4.25)
* diffusers: use xformers when available
diffusers no longer auto-enables this as of 0.10.2.
* diffusers: make masked img2img behave better with multi-step schedulers
re-randomizing the noise each step was confusing them.
* diffusers: work more better with more models.
fixed relative path problem with local models.
fixed models on hub not always having a `fp16` branch.
* diffusers: stopgap fix for attention_maps_callback crash after recent merge
* fixup import merge conflicts
correction for 061c5369a2
* test: add tests/inpainting inputs for masked img2img
* diffusers(AddsMaskedGuidance): partial fix for k-schedulers
Prevents them from crashing, but results are still hot garbage.
* fix --safety_checker arg parsing
and add note to diffusers loader about where safety checker gets called
* generate: fix import error
* CI: don't try to read the old init location
* diffusers: support loading an alternate VAE
* CI: remove sh-syntax if-statement so it doesn't crash powershell
* CI: fold strings in yaml because backslash is not line-continuation in powershell
* attention maps callback stuff for diffusers
* build: fix syntax error in environment-mac
* diffusers: add INITIAL_MODELS with diffusers-compatible repos
* re-enable the embedding manager; closes#1778
* Squashed commit of the following:
commit e4a956abc37fcb5cf188388b76b617bc5c8fda7d
Author: Damian Stewart <d@damianstewart.com>
Date: Sun Dec 18 15:43:07 2022 +0100
import new load handling from EmbeddingManager and cleanup
commit c4abe91a5ba0d415b45bf734068385668b7a66e6
Merge: 032e856e 1efc6397
Author: Damian Stewart <d@damianstewart.com>
Date: Sun Dec 18 15:09:53 2022 +0100
Merge branch 'feature_textual_inversion_mgr' into dev/diffusers_with_textual_inversion_manager
commit 032e856eefb3bbc39534f5daafd25764bcfcef8b
Merge: 8b4f0fe9 bc515e24
Author: Damian Stewart <d@damianstewart.com>
Date: Sun Dec 18 15:08:01 2022 +0100
Merge remote-tracking branch 'upstream/dev/diffusers' into dev/diffusers_with_textual_inversion_manager
commit 1efc6397fc6e61c1aff4b0258b93089d61de5955
Author: Damian Stewart <d@damianstewart.com>
Date: Sun Dec 18 15:04:28 2022 +0100
cleanup and add performance notes
commit e400f804ac471a0ca2ba432fd658778b20c7bdab
Author: Damian Stewart <d@damianstewart.com>
Date: Sun Dec 18 14:45:07 2022 +0100
fix bug and update unit tests
commit deb9ae0ae1016750e93ce8275734061f7285a231
Author: Damian Stewart <d@damianstewart.com>
Date: Sun Dec 18 14:28:29 2022 +0100
textual inversion manager seems to work
commit 162e02505dec777e91a983c4d0fb52e950d25ff0
Merge: cbad4583 12769b3d
Author: Damian Stewart <d@damianstewart.com>
Date: Sun Dec 18 11:58:03 2022 +0100
Merge branch 'main' into feature_textual_inversion_mgr
commit cbad45836c6aace6871a90f2621a953f49433131
Author: Damian Stewart <d@damianstewart.com>
Date: Sun Dec 18 11:54:10 2022 +0100
use position embeddings
commit 070344c69b0e0db340a183857d0a787b348681d3
Author: Damian Stewart <d@damianstewart.com>
Date: Sun Dec 18 11:53:47 2022 +0100
Don't crash CLI on exceptions
commit b035ac8c6772dfd9ba41b8eeb9103181cda028f8
Author: Damian Stewart <d@damianstewart.com>
Date: Sun Dec 18 11:11:55 2022 +0100
add missing position_embeddings
commit 12769b3d3562ef71e0f54946b532ad077e10043c
Author: Damian Stewart <d@damianstewart.com>
Date: Fri Dec 16 13:33:25 2022 +0100
debugging why it don't work
commit bafb7215eabe1515ca5e8388fd3bb2f3ac5362cf
Author: Damian Stewart <d@damianstewart.com>
Date: Fri Dec 16 13:21:33 2022 +0100
debugging why it don't work
commit 664a6e9e14
Author: Damian Stewart <d@damianstewart.com>
Date: Fri Dec 16 12:48:38 2022 +0100
use TextualInversionManager in place of embeddings (wip, doesn't work)
commit 8b4f0fe9d6e4e2643b36dfa27864294785d7ba4e
Author: Damian Stewart <d@damianstewart.com>
Date: Fri Dec 16 12:48:38 2022 +0100
use TextualInversionManager in place of embeddings (wip, doesn't work)
commit ffbe1ab11163ba712e353d89404e301d0e0c6cdf
Merge: 6e4dad60023df37e
Author: Damian Stewart <d@damianstewart.com>
Date: Fri Dec 16 02:37:31 2022 +0100
Merge branch 'feature_textual_inversion_mgr' into dev/diffusers
commit 023df37eff
Author: Damian Stewart <d@damianstewart.com>
Date: Fri Dec 16 02:36:54 2022 +0100
cleanup
commit 05fac594ea
Author: Damian Stewart <d@damianstewart.com>
Date: Fri Dec 16 02:07:49 2022 +0100
tweak error checking
commit 009f32ed39
Author: damian <null@damianstewart.com>
Date: Thu Dec 15 21:29:47 2022 +0100
unit tests passing for embeddings with vector length >1
commit beb1b08d9a
Author: Damian Stewart <d@damianstewart.com>
Date: Thu Dec 15 13:39:09 2022 +0100
more explicit equality tests when overwriting
commit 44d8a5a7c8
Author: Damian Stewart <d@damianstewart.com>
Date: Thu Dec 15 13:30:13 2022 +0100
wip textual inversion manager (unit tests passing for 1v embedding overwriting)
commit 417c2b57d9
Author: Damian Stewart <d@damianstewart.com>
Date: Thu Dec 15 12:30:55 2022 +0100
wip textual inversion manager (unit tests passing for base stuff + padding)
commit 2e80872e3b
Author: Damian Stewart <d@damianstewart.com>
Date: Thu Dec 15 10:57:57 2022 +0100
wip new TextualInversionManager
* stop using WeightedFrozenCLIPEmbedder
* store diffusion models locally
- configure_invokeai.py reconfigured to store diffusion models rather than
CompVis models
- hugging face caching model is used, but cache is set to ~/invokeai/models/repo_id
- models.yaml does **NOT** use path, just repo_id
- "repo_name" changed to "repo_id" to following hugging face conventions
- Models are loaded with full precision pending further work.
* allow non-local files during development
* path takes priority over repo_id
* MVP for model_cache and configure_invokeai
- Feature complete (almost)
- configure_invokeai.py downloads both .ckpt and diffuser models,
along with their VAEs. Both types of download are controlled by
a unified INITIAL_MODELS.yaml file.
- model_cache can load both type of model and switches back and forth
in CPU. No memory leaks detected
TO DO:
1. I have not yet turned on the LocalOnly flag for diffuser models, so
the code will check the Hugging Face repo for updates before using the
locally cached models. This will break firewalled systems. I am thinking
of putting in a global check for internet connectivity at startup time
and setting the LocalOnly flag based on this. It would be good to check
updates if there is connectivity.
2. I have not gone completely through INITIAL_MODELS.yaml to check which
models are available as diffusers and which are not. So models like
PaperCut and VoxelArt may not load properly. The runway and stability
models are checked, as well as the Trinart models.
3. Add stanzas for SD 2.0 and 2.1 in INITIAL_MODELS.yaml
REMAINING PROBLEMS NOT DIRECTLY RELATED TO MODEL_CACHE:
1. When loading a .ckpt file there are lots of messages like this:
Warning! ldm.modules.attention.CrossAttention is no longer being
maintained. Please use InvokeAICrossAttention instead.
I'm not sure how to address this.
2. The ckpt models ***don't actually run*** due to the lack of special-case
support for them in the generator objects. For example, here's the hard
crash you get when you run txt2img against the legacy waifu-diffusion-1.3
model:
```
>> An error occurred:
Traceback (most recent call last):
File "/data/lstein/InvokeAI/ldm/invoke/CLI.py", line 140, in main
main_loop(gen, opt)
File "/data/lstein/InvokeAI/ldm/invoke/CLI.py", line 371, in main_loop
gen.prompt2image(
File "/data/lstein/InvokeAI/ldm/generate.py", line 496, in prompt2image
results = generator.generate(
File "/data/lstein/InvokeAI/ldm/invoke/generator/base.py", line 108, in generate
image = make_image(x_T)
File "/data/lstein/InvokeAI/ldm/invoke/generator/txt2img.py", line 33, in make_image
pipeline_output = pipeline.image_from_embeddings(
File "/home/lstein/invokeai/.venv/lib/python3.9/site-packages/torch/nn/modules/module.py", line 1265, in __getattr__
raise AttributeError("'{}' object has no attribute '{}'".format(
AttributeError: 'LatentDiffusion' object has no attribute 'image_from_embeddings'
```
3. The inpainting diffusion model isn't working. Here's the output of "banana
sushi" when inpainting-1.5 is loaded:
```
Traceback (most recent call last):
File "/data/lstein/InvokeAI/ldm/generate.py", line 496, in prompt2image
results = generator.generate(
File "/data/lstein/InvokeAI/ldm/invoke/generator/base.py", line 108, in generate
image = make_image(x_T)
File "/data/lstein/InvokeAI/ldm/invoke/generator/txt2img.py", line 33, in make_image
pipeline_output = pipeline.image_from_embeddings(
File "/data/lstein/InvokeAI/ldm/invoke/generator/diffusers_pipeline.py", line 301, in image_from_embeddings
result_latents, result_attention_map_saver = self.latents_from_embeddings(
File "/data/lstein/InvokeAI/ldm/invoke/generator/diffusers_pipeline.py", line 330, in latents_from_embeddings
result: PipelineIntermediateState = infer_latents_from_embeddings(
File "/data/lstein/InvokeAI/ldm/invoke/generator/diffusers_pipeline.py", line 185, in __call__
for result in self.generator_method(*args, **kwargs):
File "/data/lstein/InvokeAI/ldm/invoke/generator/diffusers_pipeline.py", line 367, in generate_latents_from_embeddings
step_output = self.step(batched_t, latents, guidance_scale,
File "/home/lstein/invokeai/.venv/lib/python3.9/site-packages/torch/autograd/grad_mode.py", line 27, in decorate_context
return func(*args, **kwargs)
File "/data/lstein/InvokeAI/ldm/invoke/generator/diffusers_pipeline.py", line 409, in step
step_output = self.scheduler.step(noise_pred, timestep, latents, **extra_step_kwargs)
File "/home/lstein/invokeai/.venv/lib/python3.9/site-packages/diffusers/schedulers/scheduling_lms_discrete.py", line 223, in step
pred_original_sample = sample - sigma * model_output
RuntimeError: The size of tensor a (9) must match the size of tensor b (4) at non-singleton dimension 1
```
* proper support for float32/float16
- configure script now correctly detects user's preference for
fp16/32 and downloads the correct diffuser version. If fp16
version not available, falls back to fp32 version.
- misc code cleanup and simplification in model_cache
* add on-the-fly conversion of .ckpt to diffusers models
1. On-the-fly conversion code can be found in the file ldm/invoke/ckpt_to_diffusers.py.
2. A new !optimize command has been added to the CLI. Should be ported to Web GUI.
User experience on the CLI is this:
```
invoke> !optimize /home/lstein/invokeai/models/ldm/stable-diffusion-v1/sd-v1-4.ckpt
INFO: Converting legacy weights file /home/lstein/invokeai/models/ldm/stable-diffusion-v1/sd-v1-4.ckpt to optimized diffuser model.
This operation will take 30-60s to complete.
Success. Optimized model is now located at /home/lstein/tmp/invokeai/models/optimized-ckpts/sd-v1-4
Writing new config file entry for sd-v1-4...
>> New configuration:
sd-v1-4:
description: Optimized version of sd-v1-4
format: diffusers
path: /home/lstein/tmp/invokeai/models/optimized-ckpts/sd-v1-4
OK to import [n]? y
>> Verifying that new model loads...
>> Current VRAM usage: 2.60G
>> Offloading stable-diffusion-2.1 to CPU
>> Loading diffusers model from /home/lstein/tmp/invokeai/models/optimized-ckpts/sd-v1-4
| Using faster float16 precision
You have disabled the safety checker for <class 'ldm.invoke.generator.diffusers_pipeline.StableDiffusionGeneratorPipeline'> by passing `safety_checker=None`. Ensure that you abide to the conditions of the Stable Diffusion \
license and do not expose unfiltered results in services or applications open to the public. Both the diffusers team and Hugging Face strongly recommend to keep the safety filter enabled in all public facing circumstances,\
disabling it only for use-cases that involve analyzing network behavior or auditing its results. For more information, please have a look at https://github.com/huggingface/diffusers/pull/254 .
| training width x height = (512 x 512)
>> Model loaded in 3.48s
>> Max VRAM used to load the model: 2.17G
>> Current VRAM usage:2.17G
>> Textual inversions available:
>> Setting Sampler to k_lms (LMSDiscreteScheduler)
Keep model loaded? [y]
```
* add parallel set of generator files for ckpt legacy generation
* generation using legacy ckpt models now working
* diffusers: fix missing attention_maps_callback
fix for 23eb80b404
* associate legacy CrossAttention with .ckpt models
* enable autoconvert
New --autoconvert CLI option will scan a designated directory for
new .ckpt files, convert them into diffuser models, and import
them into models.yaml.
Works like this:
invoke.py --autoconvert /path/to/weights/directory
In ModelCache added two new methods:
autoconvert_weights(config_path, weights_directory_path, models_directory_path)
convert_and_import(ckpt_path, diffuser_path)
* diffusers: update to diffusers 0.11 (from 0.10.2)
* fix vae loading & width/height calculation
* refactor: encapsulate these conditioning data into one container
* diffusers: fix some noise-scaling issues by pushing the noise-mixing down to the common function
* add support for safetensors and accelerate
* set local_files_only when internet unreachable
* diffusers: fix error-handling path when model repo has no fp16 branch
* fix generatorinpaint error
Fixes :
"ModuleNotFoundError: No module named 'ldm.invoke.generatorinpaint'
https://github.com/invoke-ai/InvokeAI/pull/1583#issuecomment-1363634318
* quench diffuser safety-checker warning
* diffusers: support stochastic DDIM eta parameter
* fix conda env creation on macos
* fix cross-attention with diffusers 0.11
* diffusers: the VAE needs to be tiling as well as the U-Net
* diffusers: comment on subfolders
* diffusers: embiggen!
* diffusers: make model_cache.list_models serializable
* diffusers(inpaint): restore scaling functionality
* fix requirements clash between numba and numpy 1.24
* diffusers: allow inpainting model to do non-inpainting tasks
* start expanding model_cache functionality
* add import_ckpt_model() and import_diffuser_model() methods to model_manager
- in addition, model_cache.py is now renamed to model_manager.py
* allow "recommended" flag to be optional in INITIAL_MODELS.yaml
* configure_invokeai now downloads VAE diffusers in advance
* rename ModelCache to ModelManager
* remove support for `repo_name` in models.yaml
* check for and refuse to load embeddings trained on incompatible models
* models.yaml.example: s/repo_name/repo_id
and remove extra INITIAL_MODELS now that the main one has diffusers models in it.
* add MVP textual inversion script
* refactor(InvokeAIDiffuserComponent): factor out _combine()
* InvokeAIDiffuserComponent: implement threshold
* InvokeAIDiffuserComponent: diagnostic logs for threshold
...this does not look right
* add a curses-based frontend to textual inversion
- not quite working yet
- requires npyscreen installed
- on windows will also have the windows-curses requirement, but not added
to requirements yet
* add curses-based interface for textual inversion
* fix crash in convert_and_import()
- This corrects a "local variable referenced before assignment" error
in model_manager.convert_and_import()
* potential workaround for no 'state_dict' key error
- As reported in https://github.com/huggingface/diffusers/issues/1876
* create TI output dir if needed
* Update environment-lin-cuda.yml (#2159)
Fixing line 42 to be the proper order to define the transformers requirement: ~= instead of =~
* diffusers: update sampler-to-scheduler mapping
based on https://github.com/huggingface/diffusers/issues/277#issuecomment-1371428672
* improve user exp for ckt to diffusers conversion
- !optimize_models command now operates on an existing ckpt file entry in models.yaml
- replaces existing entry, rather than adding a new one
- offers to delete the ckpt file after conversion
* web: adapt progress callback to deal with old generator or new diffusers pipeline
* clean-up model_manager code
- add_model() verified to work for .ckpt local paths,
.ckpt remote URLs, diffusers local paths, and
diffusers repo_ids
- convert_and_import() verified to work for local and
remove .ckpt files
* handle edge cases for import_model() and convert_model()
* add support for safetensor .ckpt files
* fix name error
* code cleanup with pyflake
* improve model setting behavior
- If the user enters an invalid model name at startup time, will not
try to load it, warn, and use default model
- CLI UI enhancement: include currently active model in the command
line prompt.
* update test-invoke-pip.yml
- fix model cache path to point to runwayml/stable-diffusion-v1-5
- remove `skip-sd-weights` from configure_invokeai.py args
* exclude dev/diffusers from "fail for draft PRs"
* disable "fail on PR jobs"
* re-add `--skip-sd-weights` since no space
* update workflow environments
- include `INVOKE_MODEL_RECONFIGURE: '--yes'`
* clean up model load failure handling
- Allow CLI to run even when no model is defined or loadable.
- Inhibit stack trace when model load fails - only show last error
- Give user *option* to run configure_invokeai.py when no models
successfully load.
- Restart invokeai after reconfiguration.
* further edge-case handling
1) only one model in models.yaml file, and that model is broken
2) no models in models.yaml
3) models.yaml doesn't exist at all
* fix incorrect model status listing
- "cached" was not being returned from list_models()
- normalize handling of exceptions during model loading:
- Passing an invalid model name to generate.set_model() will return
a KeyError
- All other exceptions are returned as the appropriate Exception
* CI: do download weights (if not already cached)
* diffusers: fix scheduler loading in offline mode
* CI: fix model name (no longer has `diffusers-` prefix)
* Update txt2img2img.py (#2256)
* fixes to share models with HuggingFace cache system
- If HF_HOME environment variable is defined, then all huggingface models
are stored in that directory following the standard conventions.
- For seamless interoperability, set HF_HOME to ~/.cache/huggingface
- If HF_HOME not defined, then models are stored in ~/invokeai/models.
This is equivalent to setting HF_HOME to ~/invokeai/models
A future commit will add a migration mechanism so that this change doesn't
break previous installs.
* feat - make model storage compatible with hugging face caching system
This commit alters the InvokeAI model directory to be compatible with
hugging face, making it easier to share diffusers (and other models)
across different programs.
- If the HF_HOME environment variable is not set, then models are
cached in ~/invokeai/models in a format that is identical to the
HuggingFace cache.
- If HF_HOME is set, then models are cached wherever HF_HOME points.
- To enable sharing with other HuggingFace library clients, set
HF_HOME to ~/.cache/huggingface to set the default cache location
or to ~/invokeai/models to have huggingface cache inside InvokeAI.
* fixes to share models with HuggingFace cache system
- If HF_HOME environment variable is defined, then all huggingface models
are stored in that directory following the standard conventions.
- For seamless interoperability, set HF_HOME to ~/.cache/huggingface
- If HF_HOME not defined, then models are stored in ~/invokeai/models.
This is equivalent to setting HF_HOME to ~/invokeai/models
A future commit will add a migration mechanism so that this change doesn't
break previous installs.
* fix error "no attribute CkptInpaint"
* model_manager.list_models() returns entire model config stanza+status
* Initial Draft - Model Manager Diffusers
* added hash function to diffusers
* implement sha256 hashes on diffusers models
* Add Model Manager Support for Diffusers
* fix various problems with model manager
- in cli import functions, fix not enough values to unpack from
_get_name_and_desc()
- fix crash when using old-style vae: value with new-style diffuser
* rebuild frontend
* fix dictconfig-not-serializable issue
* fix NoneType' object is not subscriptable crash in model_manager
* fix "str has no attribute get" error in model_manager list_models()
* Add path and repo_id support for Diffusers Model Manager
Also fixes bugs
* Fix tooltip IT localization not working
* Add Version Number To WebUI
* Optimize Model Search
* Fix incorrect font on the Model Manager UI
* Fix image degradation on merge fixes - [Experimental]
This change should effectively fix a couple of things.
- Fix image degradation on subsequent merges of the canvas layers.
- Fix the slight transparent border that is left behind when filling the bounding box with a color.
- Fix the left over line of color when filling a bounding box with color.
So far there are no side effects for this. If any, please report.
* Add local model filtering for Diffusers / Checkpoints
* Go to home on modal close for the Add Modal UI
* Styling Fixes
* Model Manager Diffusers Localization Update
* Add Safe Tensor scanning to Model Manager
* Fix model edit form dispatching string values instead of numbers.
* Resolve VAE handling / edge cases for supplied repos
* defer injecting tokens for textual inversions until they're used for the first time
* squash a console warning
* implement model migration check
* add_model() overwrites previous config rather than merges
* fix model config file attribute merging
* fix precision handling in textual inversion script
* allow ckpt conversion script to work with safetensors .ckpts
Applied patch here:
beb932c5d1
* fix name "args" is not defined crash in textual_inversion_training
* fix a second NameError: name 'args' is not defined crash
* fix loading of the safety checker from the global cache dir
* add installation step to textual inversion frontend
- After a successful training run, the script will copy learned_embeds.bin
to a subfolder of the embeddings directory.
- User given the option to delete the logs and intermediate checkpoints
(which together use 7-8G of space)
- If textual inversion training fails, reports the error gracefully.
* don't crash out on incompatible embeddings
- put try: blocks around places where the system tries to load an embedding
which is incompatible with the currently loaded model
* add support for checkpoint resuming
* textual inversion preferences are saved and restored between sessions
- Preferences are stored in a file named text-inversion-training/preferences.conf
- Currently the resume-from-checkpoint option is not working correctly. Possible
bug in textual_inversion_training.py?
* copy learned_embeddings.bin into right location
* add front end for diffusers model merging
- Front end doesn't do anything yet!!!!
- Made change to model name parsing in CLI to support ability to have merged models
with the "+" character in their names.
* improve inpainting experience
- recommend ckpt version of inpainting-1.5 to user
- fix get_noise() bug in ckpt version of omnibus.py
* update environment*yml
* tweak instructions to install HuggingFace token
* bump version number
* enhance update scripts
- update scripts will now fetch new INITIAL_MODELS.yaml so that
configure_invokeai.py will know about the diffusers versions.
* enhance invoke.sh/invoke.bat launchers
- added configure_invokeai.py to menu
- menu defaults to browser-based invoke
* remove conda workflow (#2321)
* fix `token_ids has shape torch.Size([79]) - expected [77]`
* update CHANGELOG.md with 2.3.* info
- Add information on how formats have changed and the upgrade process.
- Add short bug list.
Co-authored-by: Damian Stewart <d@damianstewart.com>
Co-authored-by: Damian Stewart <null@damianstewart.com>
Co-authored-by: Lincoln Stein <lincoln.stein@gmail.com>
Co-authored-by: Wybartel-luxmc <37852506+Wybartel-luxmc@users.noreply.github.com>
Co-authored-by: mauwii <Mauwii@outlook.de>
Co-authored-by: mickr777 <115216705+mickr777@users.noreply.github.com>
Co-authored-by: blessedcoolant <54517381+blessedcoolant@users.noreply.github.com>
Co-authored-by: Eugene Brodsky <ebr@users.noreply.github.com>
Co-authored-by: Matthias Wild <40327258+mauwii@users.noreply.github.com>
* update version number
* print version number at startup
* move version number into ldm/invoke/_version.py
* bump version to 2.2.6+a0
* handle whitespace better
* resolve issues raised by mauwii during PR review
1. create_installers.sh now asks before tagging and committing the
current repo
2. trailing whitespace removed from user-provided location of invokeai
directory in install.bat
Updated the link for the MS Visual C libraries - I'm not sure if MS changed the location of the files but this new one leads right to the file downloads.
- Removed links from the install instructions to the installer zip files.
- Replaced "2.2.4" with "2.X.X" globally, to avoid the docs going out of
date.
* Permit cmd override for CORS modification
* Enable multiple origins for CORS
* Remove CMD_OVERRIDE
* Revert executable bit change
* Defensively convert list into string
* Bad if statement
* Retry rebase
* Retry rebase
Co-authored-by: Chris Dawson <chris@vivoh.com>
- fix problem of facexlib weights being downloaded into the .venv
package directory when codeformer restoration requested.
- now users pre-downloaded weights in ~/invokeai/models/gfpgan/weights
(which is shared with gfpgan)
Co-authored-by: Matthias Wild <40327258+mauwii@users.noreply.github.com>
- Fixed codeformer module so that the facexlib files are downloaded
into their pre-stored location in models/gfpgan/weights (shared
with the GFPGAN module)
* installer tweaks in preparation for v2.2.5
- pin numpy to 1.23.* to avoid requirements conflict with numba
- update.sh and update.bat now accept a tag or branch string, not a URL
- update scripts download latest requirements-base before updating.
* update.bat.in debugged and working
* update pulls from "latest" now
* bump version number
* fix permissions on create_installer.sh
* give Linux user option of installing ROCm or CUDA
* rc2.2.5 (install.sh) relative path fixes (#2155)
* (installer) fix bug in resolution of relative paths in linux install script
point installer at 2.2.5-rc1
selecting ~/Data/myapps/ as location would create a ./~/Data/myapps
instead of expanding the ~/ to the value of ${HOME}
also, squash the trailing slash in path, if it was entered by the user
* (installer) add option to automatically start the app after install
also: when exiting, print the command to get back into the app
* remove extraneous whitespace
* model_cache applies rootdir to config path
* bring installers up to date with 2.2.5-rc2
* bump rc version
* create_installer now adds version number
* rebuild frontend
* bump rc#
* add locales to frontend dist package
- bump to patchlevel 6
* bump patchlevel
* use invoke-ai version of GFPGAN
- This version is very slightly modified to allow weights files
to be pre-downloaded by the configure script.
* fix formatting error during startup
* bump patch level
* workaround #2 for GFPGAN facexlib() weights downloading
* bump patch
* ready for merge and release
* remove extraneous comment
* set PYTORCH_ENABLE_MPS_FALLBACK directly in invoke.py
Co-authored-by: Eugene Brodsky <ebr@users.noreply.github.com>
* Update WEBUIHOTKEYS.md
Fixed display errors so it no longer show extra plus signs on the site
* Update WEBUIHOTKEYS.md
Correction to keycap look to have symbols on special keys like enter, shift, and ctrl.
label:What version did you experience this issue on?
description:|
Please share the version of Invoke AI that you experienced the issue on. If this is not the latest version, please update first to confirm the issue still exists. If you are testing main, please include the commit hash instead.
stale-issue-message:"There has been no activity in this issue for ${{ env.DAYS_BEFORE_ISSUE_STALE }} days. If this issue is still being experienced, please reply with an updated confirmation that the issue is still being experienced with the latest release."
close-issue-message:"Due to inactivity, this issue was automatically closed. If you are still experiencing the issue, please recreate the issue."
[![CI checks on main badge]][CI checks on main link] [![CI checks on dev badge]][CI checks on dev link] [![latest commit to dev badge]][latest commit to dev link]
[![CI checks on main badge]][CI checks on main link] [![latest commit to main badge]][latest commit to main link]
[![github open issues badge]][github open issues link] [![github open prs badge]][github open prs link]
[![github open issues badge]][github open issues link] [![github open prs badge]][github open prs link] [![translation status badge]][translation status link]
[CI checks on dev badge]: https://flat.badgen.net/github/checks/invoke-ai/InvokeAI/development?label=CI%20status%20on%20dev&cache=900&icon=github
[CI checks on dev link]: https://github.com/invoke-ai/InvokeAI/actions?query=branch%3Adevelopment
[CI checks on main badge]: https://flat.badgen.net/github/checks/invoke-ai/InvokeAI/main?label=CI%20status%20on%20main&cache=900&icon=github
[CI checks on main link]:https://github.com/invoke-ai/InvokeAI/actions/workflows/test-invoke-conda.yml
[CI checks on main link]:https://github.com/invoke-ai/InvokeAI/actions?query=branch%3Amain
[latest commit to dev badge]: https://flat.badgen.net/github/last-commit/invoke-ai/InvokeAI/development?icon=github&color=yellow&label=last%20dev%20commit&cache=900
[latest commit to dev link]: https://github.com/invoke-ai/InvokeAI/commits/development
[latest commit to main badge]: https://flat.badgen.net/github/last-commit/invoke-ai/InvokeAI/main?icon=github&color=yellow&label=last%20dev%20commit&cache=900
[latest commit to main link]: https://github.com/invoke-ai/InvokeAI/commits/main
the open source text-to-image generator. It provides a streamlined
process with various new features and options to aid the image
generation process. It runs on Windows, macOS and Linux machines, with
GPU cards with as little as 4 GB of RAM. It provides both a polished
Web interface (see below), and an easy-to-use command-line interface.
_**Note: The UI is not fully functional on `main`. If you need a stable UI based on `main`, use the `pre-nodes` tag while we [migrate to a new backend](https://github.com/invoke-ai/InvokeAI/discussions/3246).**_
**Quick links**: [[How to Install](#installation)] [<ahref="https://discord.gg/ZmtBAhwWhy">Discord Server</a>] [<ahref="https://invoke-ai.github.io/InvokeAI/">Documentation and Tutorials</a>] [<ahref="https://github.com/invoke-ai/InvokeAI/">Code and Downloads</a>] [<ahref="https://github.com/invoke-ai/InvokeAI/issues">Bug Reports</a>] [<ahref="https://github.com/invoke-ai/InvokeAI/discussions">Discussion, Ideas & Q&A</a>]
InvokeAI is a leading creative engine built to empower professionals and enthusiasts alike. Generate and create stunning visual media using the latest AI-driven technologies. InvokeAI offers an industry leading Web Interface, interactive Command Line Interface, and also serves as the foundation for multiple commercial products.
**Quick links**: [[How to Install](https://invoke-ai.github.io/InvokeAI/#installation)] [<ahref="https://discord.gg/ZmtBAhwWhy">Discord Server</a>] [<ahref="https://invoke-ai.github.io/InvokeAI/">Documentation and Tutorials</a>] [<ahref="https://github.com/invoke-ai/InvokeAI/">Code and Downloads</a>] [<ahref="https://github.com/invoke-ai/InvokeAI/issues">Bug Reports</a>] [<ahref="https://github.com/invoke-ai/InvokeAI/discussions">Discussion, Ideas & Q&A</a>]
_Note: InvokeAI is rapidly evolving. Please use the
[Issues](https://github.com/invoke-ai/InvokeAI/issues) tab to report bugs and make feature
requests. Be sure to use the provided templates. They will help us diagnose issues faster._
### Automatic Installer (suggested for 1st time users)
1. Go to the bottom of the [Latest Release Page](https://github.com/invoke-ai/InvokeAI/releases/latest)
2. Download the .zip file for your OS (Windows/macOS/Linux).
3. Unzip the file.
4. If you are on Windows, double-click on the `install.bat` script. On macOS, open a Terminal window, drag the file `install.sh` from Finder into the Terminal, and press return. On Linux, run `install.sh`.
5. Wait a while, until it is done.
6. The folder where you ran the installer from will now be filled with lots of files. If you are on Windows, double-click on the `invoke.bat` file. On macOS, open a Terminal window, drag `invoke.sh` from the folder into the Terminal, and press return. On Linux, run `invoke.sh`
7. Press 2 to open the "browser-based UI", press enter/return, wait a minute or two for Stable Diffusion to start up, then open your browser and go to http://localhost:9090.
8. Type `banana sushi` in the box on the top left and click `Invoke`:
InvokeAI is supported across Linux, Windows and macOS. Linux
users can use either an Nvidia-based card (with CUDA support) or an
AMD card (using the ROCm driver).
#### System
You wil need one of the following:
### System
You will need one of the following:
- An NVIDIA-based graphics card with 4 GB or more VRAM memory.
- An Apple computer with an M1 chip.
- An AMD-based graphics card with 4GB or more VRAM memory. (Linux only)
We do not recommend the GTX 1650 or 1660 series video cards. They are
unable to run in half-precision mode and do not have sufficient VRAM
to render 512x512 images.
#### Memory
### Memory
- At least 12 GB Main Memory RAM.
#### Disk
### Disk
- At least 12 GB of free disk space for the machine learning model, Python, and all its dependencies.
**Note**
## Features
If you have a Nvidia 10xx series card (e.g. the 1080ti), please
run the dream script in full-precision mode as shown below.
Feature documentation can be reviewed by navigating to [the InvokeAI Documentation page](https://invoke-ai.github.io/InvokeAI/features/)
Similarly, specify full-precision mode on Apple M1 hardware.
### *Web Server & UI*
Precision is auto configured based on the device. If however you encounter
errors like 'expected type Float but found Half' or 'not implemented for Half'
you can try starting `invoke.py` with the `--precision=float32` flag to your initialization command
InvokeAI offers a locally hosted Web Server & React Frontend, with an industry leading user experience. The Web-based UI allows for simple and intuitive workflows, and is responsive for use on mobile devices and tablets accessing the web server.
Or by updating your InvokeAI configuration file with this argument.
### *Unified Canvas*
### Features
The Unified Canvas is a fully integrated canvas implementation with support for all core generation capabilities, in/outpainting, brush tools, and more. This creative tool unlocks the capability for artists to create with AI as a creative collaborator, and can be used to augment AI-generated imagery, sketches, photography, renders, and more.
- [Simplified API for text to image generation](https://invoke-ai.github.io/InvokeAI/features/OTHER/#simplified-api)
InvokeAI's advanced prompt syntax allows for token weighting, cross-attention control, and prompt blending, allowing for fine-tuned tweaking of your invocations and exploration of the latent space.
For users utilizing a terminal-based environment, or who want to take advantage of CLI features, InvokeAI offers an extensive and actively supported command-line interface that provides the full suite of generation functionality available in the tool.
### Other features
- *Support for both ckpt and diffusers models*
- *SD 2.0, 2.1 support*
- *Noise Control & Tresholding*
- *Popular Sampler Support*
- *Upscaling & Face Restoration Tools*
- *Embedding Manager & Support*
- *Model Manager & Support*
### Coming Soon
- *Node-Based Architecture & UI*
- And more...
### Latest Changes
For our latest changes, view our [Release Notes](https://github.com/invoke-ai/InvokeAI/releases)
For our latest changes, view our [Release
Notes](https://github.com/invoke-ai/InvokeAI/releases) and the
[CHANGELOG](docs/CHANGELOG.md).
### Troubleshooting
## Troubleshooting
Please check out our **[Q&A](https://invoke-ai.github.io/InvokeAI/help/TROUBLESHOOT/#faq)** to get solutions for common installation
problems and other issues.
# Contributing
## Contributing
Anyone who wishes to contribute to this project, whether documentation, features, bug fixes, code
cleanup, testing, or code reviews, is very much encouraged to do so.
To join, just raise your hand on the InvokeAI Discord server (#dev-chat) or the GitHub discussion board.
If you'd like to help with translation, please see our [translation guide](docs/other/TRANSLATION.md).
If you are unfamiliar with how
to contribute to GitHub projects, here is a
[Getting Started Guide](https://opensource.com/article/19/7/create-pull-request-github). A full set of contribution guidelines, along with templates, are in progress. You can **make your pull request against the "main" branch**.
[Getting Started Guide](https://opensource.com/article/19/7/create-pull-request-github). A full set of contribution guidelines, along with templates, are in progress. You can **make your pull request against the "main" branch**.
We hope you enjoy using our software as much as we enjoy creating it,
and we hope that some of those of you who are reading this will elect
@ -181,15 +284,11 @@ This fork is a combined effort of various people from across the world.
[Check out the list of all these amazing people](https://invoke-ai.github.io/InvokeAI/other/CONTRIBUTORS/). We thank them for
their time, hard work and effort.
Thanks to [Weblate](https://weblate.org/) for generously providing translation services to this project.
### Support
For support, please use this repository's GitHub Issues tracking service. Feel free to send me an
email if you use and like the script.
For support, please use this repository's GitHub Issues tracking service, or join the Discord.
Original portions of the software are Copyright (c) 2022
[Lincoln D. Stein](https://github.com/lstein)
Original portions of the software are Copyright (c) 2023 by respective contributors.
### Further Reading
Please see the original README for more information on this software and underlying algorithm,
located in the file [README-CompViz.md](https://invoke-ai.github.io/InvokeAI/other/README-CompViz/).
Applications are built on top of the invoke framework. They should construct `invoker` and then interact through it. They should avoid interacting directly with core code in order to support a variety of configurations.
### Web UI
The Web UI is built on top of an HTTP API built with [FastAPI](https://fastapi.tiangolo.com/) and [Socket.IO](https://socket.io/). The frontend code is found in `/frontend` and the backend code is found in `/ldm/invoke/app/api_app.py` and `/ldm/invoke/app/api/`. The code is further organized as such:
| Component | Description |
| --- | --- |
| api_app.py | Sets up the API app, annotates the OpenAPI spec with additional data, and runs the API |
| dependencies | Creates all invoker services and the invoker, and provides them to the API |
| events | An eventing system that could in the future be adapted to support horizontal scale-out |
| sockets | The Socket.IO interface - handles listening to and emitting session events (events are defined in the events service module) |
| routers | API definitions for different areas of API functionality |
### CLI
The CLI is built automatically from invocation metadata, and also supports invocation piping and auto-linking. Code is available in `/ldm/invoke/app/cli_app.py`.
## Invoke
The Invoke framework provides the interface to the underlying AI systems and is built with flexibility and extensibility in mind. There are four major concepts: invoker, sessions, invocations, and services.
### Invoker
The invoker (`/ldm/invoke/app/services/invoker.py`) is the primary interface through which applications interact with the framework. Its primary purpose is to create, manage, and invoke sessions. It also maintains two sets of services:
- **invocation services**, which are used by invocations to interact with core functionality.
- **invoker services**, which are used by the invoker to manage sessions and manage the invocation queue.
### Sessions
Invocations and links between them form a graph, which is maintained in a session. Sessions can be queued for invocation, which will execute their graph (either the next ready invocation, or all invocations). Sessions also maintain execution history for the graph (including storage of any outputs). An invocation may be added to a session at any time, and there is capability to add and entire graph at once, as well as to automatically link new invocations to previous invocations. Invocations can not be deleted or modified once added.
The session graph does not support looping. This is left as an application problem to prevent additional complexity in the graph.
### Invocations
Invocations represent individual units of execution, with inputs and outputs. All invocations are located in `/ldm/invoke/app/invocations`, and are all automatically discovered and made available in the applications. These are the primary way to expose new functionality in Invoke.AI, and the [implementation guide](INVOCATIONS.md) explains how to add new invocations.
### Services
Services provide invocations access AI Core functionality and other necessary functionality (e.g. image storage). These are available in `/ldm/invoke/app/services`. As a general rule, new services should provide an interface as an abstract base class, and may provide a lightweight local implementation by default in their module. The goal for all services should be to enable the usage of different implementations (e.g. using cloud storage for image storage), but should not load any module dependencies unless that implementation has been used (i.e. don't import anything that won't be used, especially if it's expensive to import).
## AI Core
The AI Core is represented by the rest of the code base (i.e. the code outside of `/ldm/invoke/app/`).
| Name | `strength` | This field is referred to as `strength` |
| Type Hint | `float` | This field must be of type `float` |
| Field | `Field(default=0.75, gt=0, le=1, description="The strength")` | The default value is `0.75`, the value must be in the range (0,1], and help text will show "The strength" for this field. |
Notice that `image` has type `Union[ImageField,None]`. The `Union` allows this
field to be parsed with `None` as a value, which enables linking to previous
invocations. All fields should either provide a default value or allow `None` as
a value, so that they can be overwritten with a linked output from another
invocation.
The special type `ImageField` is also used here. All images are passed as
`ImageField`, which protects them from pydantic validation errors (since images
only ever come from links).
Finally, note that for all linking, the `type` of the linked fields must match.
If the `name` also matches, then the field can be **automatically linked** to a
| `--prompt_as_dir` | `-p` | `False` | Name output directories using the prompt text. |
| `--from_file <path>` | | `None` | Read list of prompts from a file. Use `-` to read from standard input |
| `--model <modelname>` | | `stable-diffusion-1.4` | Loads model specified in configs/models.yaml. Currently one of "stable-diffusion-1.4" or "laion400m" |
| `--full_precision` | `-F` | `False` | Run in slower full-precision mode. Needed for Macintosh M1/M2 hardware and some older video cards. |
| `--model <modelname>` | | `stable-diffusion-1.5` | Loads the initial model specified in configs/models.yaml. |
| `--ckpt_convert ` | | `False` | If provided both .ckpt and .safetensors files will be auto-converted into diffusers format in memory |
| `--autoconvert <path>` | | `None` | On startup, scan the indicated directory for new .ckpt/.safetensor files and automatically convert and import them |
| `--precision` | | `fp16` | Provide `fp32` for full precision mode, `fp16` for half-precision. `fp32` needed for Macintoshes and some NVidia cards. |
| `--png_compression <0-9>` | `-z<0-9>` | `6` | Select level of compression for output files, from 0 (no compression) to 9 (max compression) |
| `--safety-checker` | | `False` | Activate safety checker for NSFW and other potentially disturbing imagery |
| `--full_precision` | | `False` | Same as `--precision=fp32`|
| `--weights <path>` | | `None` | Path to weights file; use `--model stable-diffusion-1.4` instead |
| `--laion400m` | `-l` | `False` | Use older LAION400m weights; use `--model=laion400m` instead |
@ -136,7 +142,7 @@ mixture of both using any of the accepted command switch formats:
# InvokeAI initialization file
# This is the InvokeAI initialization file, which contains command-line default values.
# Feel free to edit. If anything goes wrong, you can re-initialize this file by deleting
# or renaming it and then running configure_invokeai.py again.
# or renaming it and then running invokeai-configure again.
# The --root option below points to the folder in which InvokeAI stores its models, configs and outputs.
--root="/Users/mauwii/invokeai"
@ -208,6 +214,8 @@ Here are the invoke> command that apply to txt2img:
| `--variation <float>` | `-v<float>` | `0.0` | Add a bit of noise (0.0=none, 1.0=high) to the image in order to generate a series of variations. Usually used in combination with `-S<seed>` and `-n<int>` to generate a series a riffs on a starting image. See [Variations](./VARIATIONS.md). |
| `--with_variations <pattern>` | | `None` | Combine two or more variations. See [Variations](./VARIATIONS.md) for now to use this. |
| `--save_intermediates <n>` | | `None` | Save the image from every nth step into an "intermediates" folder inside the output directory |
| `--h_symmetry_time_pct <float>` | | `None` | Create symmetry along the X axis at the desired percent complete of the generation process. (Must be between 0.0 and 1.0; set to a very small number like 0.0001 for just after the first step of generation.) |
| `--v_symmetry_time_pct <float>` | | `None` | Create symmetry along the Y axis at the desired percent complete of the generation process. (Must be between 0.0 and 1.0; set to a very small number like 0.0001 for just after the first step of generation.) |
!!! note
@ -336,8 +344,10 @@ useful for debugging the text masking process prior to inpainting with the
### Model selection and importation
The CLI allows you to add new models on the fly, as well as to switch among them
rapidly without leaving the script.
The CLI allows you to add new models on the fly, as well as to switch
among them rapidly without leaving the script. There are several
different model formats, each described in the [Model Installation
Guide](../installation/050_INSTALLING_MODELS.md).
#### `!models`
@ -347,9 +357,9 @@ model is bold-faced
Example:
<pre>
laion400mnot loaded <nodescription>
<b>stable-diffusion-1.4 active Stable Diffusion v1.4</b>
waifu-diffusion not loaded Waifu Diffusion v1.3
inpainting-1.5 not loaded Stable Diffusion inpainting model
<b>stable-diffusion-1.5 active Stable Diffusion v1.5</b>
waifu-diffusion not loaded Waifu Diffusion v1.4
</pre>
#### `!switch <model>`
@ -361,43 +371,30 @@ Note how the second column of the `!models` table changes to `cached` after a
model is first loaded, and that the long initialization step is not needed when
corresponding to bloc97's `prompt_edit_spatial_start/_end` and
`prompt_edit_tokens_start/_end` but with the math swapped to make it easier to
intuitively understand.
- Example usage:`a (cat).swap(dog, s_end=0.3) eating a hotdog` - the `s_end`
argument means that the "spatial" (self-attention) edit will stop having any
effect after 30% (=0.3) of the steps have been done, leaving Stable
Diffusion with 70% of the steps where it is free to decide for itself how to
reshape the cat-form into a dog form.
- The numbers represent a percentage through the step sequence where the edits
should happen. 0 means the start (noisy starting image), 1 is the end (final
image).
- For img2img, the step sequence does not start at 0 but instead at
(1-strength) - so if strength is 0.7, s_start and s_end must both be
greater than 0.3 (1-0.7) to have any effect.
- Convenience option `shape_freedom` (0-1) to specify how much "freedom" Stable
Diffusion should have to change the shape of the subject being swapped.
- `a (cat).swap(dog, shape_freedom=0.5) eating a hotdog`.
For example, consider the prompt `a cat.swap(dog) playing with a ball in the forest`. Normally, because of the word words interact with each other when doing a stable diffusion image generation, these two prompts would generate different compositions:
- `a cat playing with a ball in the forest`
- `a dog playing with a ball in the forest`
| `a cat playing with a ball in the forest` | `a dog playing with a ball in the forest` |
| --- | --- |
| img | img |
- For multiple word swaps, use parentheses: `a (fluffy cat).swap(barking dog) playing with a ball in the forest`.
- To swap a comma, use quotes: `a ("fluffy, grey cat").swap("big, barking dog") playing with a ball in the forest`.
- Supports options `t_start` and `t_end` (each 0-1) loosely corresponding to bloc97's `prompt_edit_tokens_start/_end` but with the math swapped to make it easier to
intuitively understand. `t_start` and `t_end` are used to control on which steps cross-attention control should run. With the default values `t_start=0` and `t_end=1`, cross-attention control is active on every step of image generation. Other values can be used to turn cross-attention control off for part of the image generation process.
- For example, if doing a diffusion with 10 steps for the prompt is `a cat.swap(dog, t_start=0.3, t_end=1.0) playing with a ball in the forest`, the first 3 steps will be run as `a cat playing with a ball in the forest`, while the last 7 steps will run as `a dog playing with a ball in the forest`, but the pixels that represent `dog` will be locked to the pixels that would have represented `cat` if the `cat` prompt had been used instead.
- Conversely, for `a cat.swap(dog, t_start=0, t_end=0.7) playing with a ball in the forest`, the first 7 steps will run as `a dog playing with a ball in the forest` with the pixels that represent `dog` locked to the same pixels that would have represented `cat` if the `cat` prompt was being used instead. The final 3 steps will just run `a cat playing with a ball in the forest`.
> For img2img, the step sequence does not start at 0 but instead at `(1.0-strength)` - so if the img2img `strength` is `0.7`, `t_start` and `t_end` must both be greater than `0.3` (`1.0-0.7`) to have any effect.
Prompt2prompt `.swap()` is not compatible with xformers, which will be temporarily disabled when doing a `.swap()` - so you should expect to use more VRAM and run slower that with xformers enabled.
invoke> "waterfall and rainbow in the style of *" --init_img=./init-images/crude_drawing.png --strength=0.5 -s100 -n4
```
After training completes, the resultant embeddings will be saved into your `$INVOKEAI_ROOT/embeddings/<trigger word>/learned_embeds.bin`.
For .pt files it's also possible to train multiple tokens (modify the
placeholder string in `configs/stable-diffusion/v1-finetune.yaml`) and combine
LDM checkpoints using:
These will be automatically loaded when you start InvokeAI.
```bash
python3 ./scripts/merge_embeddings.py \
--manager_ckpts /path/to/first/embedding.pt \
[</path/to/second/embedding.pt>,[...]]\
--output_path /path/to/output/embedding.pt
```
Add the trigger word, surrounded by angle brackets, to use that embedding. For example, if your trigger word was `terence`, use `<terence>` in prompts. This is the same syntax used by the HuggingFace concepts library.
Credit goes to rinongal and the repository
**Note:**`.pt` embeddings do not require the angle brackets.
Please see [the repository](https://github.com/rinongal/textual_inversion) and
associated paper for details and limitations.
## Troubleshooting
### `Cannot load embedding for <trigger>. It was trained on a model with token dimension 1024, but the current model has token dimension 768`
Messages like this indicate you trained the embedding on a different base model than the currently selected one.
For example, in the error above, the training was done on SD2.1 (768x768) but it was used on SD1.5 (512x512).
## Reading
For more information on textual inversion, please see the following
resources:
* The [textual inversion repository](https://github.com/rinongal/textual_inversion) and
This fork is rapidly evolving. Please use the [Issues tab](https://github.com/invoke-ai/InvokeAI/issues) to report bugs and make feature requests. Be sure to use the provided templates. They will help aid diagnose issues faster.
- [Not Safe for Work (NSFW) Checker](features/NSFW.md)
<!-- seperator -->
### Prompt Engineering
- [Prompt Syntax](features/PROMPTS.md)
- [Generating Variations](features/VARIATIONS.md)
<!-- seperator -->
- [Prompt Engineering](features/PROMPTS.md)
<!-- seperator -->
- Miscellaneous
- [NSFW Checker](features/NSFW.md)
- [Embiggen upscaling](features/EMBIGGEN.md)
- [Other](features/OTHER.md)
## :octicons-log-16: Latest Changes
### v2.2.4 <small>(11 December 2022)</small>
### v2.3.0 <small>(9 February 2023)</small>
#### the `invokeai` directory
#### Migration to Stable Diffusion `diffusers` models
Previously there were two directories to worry about, the directory that
contained the InvokeAI source code and the launcher scripts, and the `invokeai`
directory that contained the models files, embeddings, configuration and
outputs. With the 2.2.4 release, this dual system is done away with, and
everything, including the `invoke.bat` and `invoke.sh` launcher scripts, now
live in a directory named `invokeai`. By default this directory is located in
your home directory (e.g. `\Users\yourname` on Windows), but you can select
where it goes at install time.
Previous versions of InvokeAI supported the original model file format introduced with Stable Diffusion 1.4. In the original format, known variously as "checkpoint", or "legacy" format, there is a single large weights file ending with `.ckpt` or `.safetensors`. Though this format has served the community well, it has a number of disadvantages, including file size, slow loading times, and a variety of non-standard variants that require special-case code to handle. In addition, because checkpoint files are actually a bundle of multiple machine learning sub-models, it is hard to swap different sub-models in and out, or to share common sub-models. A new format, introduced by the StabilityAI company in collaboration with HuggingFace, is called `diffusers` and consists of a directory of individual models. The most immediate benefit of `diffusers` is that they load from disk very quickly. A longer term benefit is that in the near future `diffusers` models will be able to share common sub-models, dramatically reducing disk space when you have multiple fine-tune models derived from the same base.
After installation, you can delete the install directory (the one that the zip
file creates when it unpacks). Do **not** delete or move the `invokeai`
directory!
When you perform a new install of version 2.3.0, you will be offered the option to install the `diffusers` versions of a number of popular SD models, including Stable Diffusion versions 1.5 and 2.1 (including the 768x768 pixel version of 2.1). These will act and work just like the checkpoint versions. Do not be concerned if you already have a lot of ".ckpt" or ".safetensors" models on disk! InvokeAI 2.3.0 can still load these and generate images from them without any extra intervention on your part.
To take advantage of the optimized loading times of `diffusers` models, InvokeAI offers options to convert legacy checkpoint models into optimized `diffusers` models. If you use the `invokeai` command line interface, the relevant commands are:
You can place frequently-used startup options in this file, such as the default
number of steps or your preferred sampler. To keep everything in one place, this
file has now been moved into the `invokeai` directory and is named
`invokeai.init`.
* `!convert_model` -- Take the path to a local checkpoint file or a URL that is pointing to one, convert it into a `diffusers` model, and import it into InvokeAI's models registry file.
* `!optimize_model` -- If you already have a checkpoint model in your InvokeAI models file, this command will accept its short name and convert it into a like-named `diffusers` model, optionally deleting the original checkpoint file.
* `!import_model` -- Take the local path of either a checkpoint file or a `diffusers` model directory and import it into InvokeAI's registry file. You may also provide the ID of any diffusers model that has been published on the [HuggingFace models repository](https://huggingface.co/models?pipeline_tag=text-to-image&sort=downloads) and it will be downloaded and installed automatically.
#### To update from Version 2.2.3
The WebGUI offers similar functionality for model management.
The easiest route is to download and unpack one of the 2.2.4 installer files.
When it asks you for the location of the `invokeai` runtime directory, respond
with the path to the directory that contains your 2.2.3 `invokeai`. That is, if
`invokeai` lives at `C:\Users\fred\invokeai`, then answer with `C:\Users\fred`
and answer "Y" when asked if you want to reuse the directory.
For advanced users, new command-line options provide additional functionality. Launching `invokeai` with the argument `--autoconvert <path to directory>` takes the path to a directory of checkpoint files, automatically converts them into `diffusers` models and imports them. Each time the script is launched, the directory will be scanned for new checkpoint files to be loaded. Alternatively, the `--ckpt_convert` argument will cause any checkpoint or safetensors model that is already registered with InvokeAI to be converted into a `diffusers` model on the fly, allowing you to take advantage of future diffusers-only features without explicitly converting the model and saving it to disk.
The `update.sh` (`update.bat`) script that came with the 2.2.3 source installer
does not know about the new directory layout and won't be fully functional.
Please see [INSTALLING MODELS](https://invoke-ai.github.io/InvokeAI/installation/050_INSTALLING_MODELS/) for more information on model management in both the command-line and Web interfaces.
#### To update to 2.2.5 (and beyond) there's now an update path.
#### Support for the `XFormers` Memory-Efficient Crossattention Package
As they become available, you can update to more recent versions of InvokeAI
using an `update.sh` (`update.bat`) script located in the `invokeai` directory.
Running it without any arguments will install the most recent version of
InvokeAI. Alternatively, you can get set releases by running the `update.sh`
script with an argument in the command shell. This syntax accepts the path to
the desired release's zip file, which you can find by clicking on the green
"Code" button on this repository's home page.
On CUDA (Nvidia) systems, version 2.3.0 supports the `XFormers` library. Once installed, the`xformers` package dramatically reduces the memory footprint of loaded Stable Diffusion models files and modestly increases image generation speed. `xformers` will be installed and activated automatically if you specify a CUDA system at install time.
#### Other 2.2.4 Improvements
The caveat with using `xformers` is that it introduces slightly non-deterministic behavior, and images generated using the same seed and other settings will be subtly different between invocations. Generally the changes are unnoticeable unless you rapidly shift back and forth between images, but to disable `xformers` and restore fully deterministic behavior, you may launch InvokeAI using the `--no-xformers` option. This is most conveniently done by opening the file `invokeai/invokeai.init` with a text editor, and adding the line `--no-xformers` at the bottom.
-Fix InvokeAI GUI initialization by @addianto in #1687
-fix link in documentation by @lstein in #1728
-Fix broken link by @ShawnZhong in #1736
-Remove reference to binary installer by @lstein in #1731
-documentation fixes for 2.2.3 by @lstein in #1740
-Modify installer links to point closer to the source installer by @ebr in
#1745
-add documentation warning about 1650/60 cards by @lstein in #1753
-Fix Linux source URL in installation docs by @andybearman in #1756
-Make install instructions discoverable in readme by @damian0815 in #1752
-typo fix by @ofirkris in #1755
-Non-interactive model download (support HUGGINGFACE_TOKEN) by @ebr in #1578
-fix(srcinstall): shell installer - cp scripts instead of linking by @tildebyte
in #1765
-stability and usage improvements to binary & source installers by @lstein in
#1760
-fix off-by-one bug in cross-attention-control by @damian0815 in #1774
-Eventually update APP_VERSION to 2.2.3 by @spezialspezial in #1768
-invoke script cds to its location before running by @lstein in #1805
-Make PaperCut and VoxelArt models load again by @lstein in #1730
-Fix --embedding_directory / --embedding_path not working by @blessedcoolant in
#1817
-Clean up readme by @hipsterusername in #1820
-Optimized Docker build with support for external working directory by @ebr in
#1544
-disable pushing the cloud container by @mauwii in #1831
-Fix docker push github action and expand with additional metadata by @ebr in
#1837
-Fix Broken Link To Notebook by @VedantMadane in #1821
-Account for flat models by @spezialspezial in #1766
-Update invoke.bat.in isolate environment variables by @lynnewu in #1833
-Arch Linux Specific PatchMatch Instructions & fixing conda install on linux by
@SammCheese in #1848
-Make force free GPU memory work in img2img by @addianto in #1844
-New installer by @lstein
#### A Negative Prompt Box in the WebUI
There is now a separate text input box for negative prompts in the WebUI. This is convenient for stashing frequently-used negative prompts ("mangled limbs, bad anatomy"). The `[negative prompt]` syntax continues to work in the main prompt box as well.
To see exactly how your prompts are being parsed, launch `invokeai` with the `--log_tokenization` option. The console window will then display the tokenization process for both positive and negative prompts.
#### Model Merging
Version 2.3.0 offers an intuitive user interface for merging up to three Stable Diffusion models using an intuitive user interface. Model merging allows you to mix the behavior of models to achieve very interesting effects. To use this, each of the models must already be imported into InvokeAI and saved in `diffusers` format, then launch the merger using a new menu item in the InvokeAI launcher script (`invoke.sh`, `invoke.bat`) or directly from the command line with `invokeai-merge --gui`. You will be prompted to select the models to merge, the proportions in which to mix them, and the mixing algorithm. The script will create a new merged `diffusers` model and import it into InvokeAI for your use.
See [MODEL MERGING](https://invoke-ai.github.io/InvokeAI/features/MODEL_MERGING/) for more details.
#### Textual Inversion Training
Textual Inversion (TI) is a technique for training a Stable Diffusion model to emit a particular subject or style when triggered by a keyword phrase. You can perform TI training by placing a small number of images of the subject or style in a directory, and choosing a distinctive trigger phrase, such as "pointillist-style". After successful training, The subject or style will be activated by including `<pointillist-style>` in your prompt.
Previous versions of InvokeAI were able to perform TI, but it required using a command-line script with dozens of obscure command-line arguments. Version 2.3.0 features an intuitive TI frontend that will build a TI model on top of any `diffusers` model. To access training you can launch from a new item in the launcher script or from the command line using `invokeai-ti --gui`.
See [TEXTUAL INVERSION](https://invoke-ai.github.io/InvokeAI/features/TEXTUAL_INVERSION/) for further details.
#### A New Installer Experience
The InvokeAI installer has been upgraded in order to provide a smoother and hopefully more glitch-free experience. In addition, InvokeAI is now packaged as a PyPi project, allowing developers and power-users to install InvokeAI with the command `pip install InvokeAI --use-pep517`. Please see [Installation](#installation) for details.
Developers should be aware that the `pip` installation procedure has been simplified and that the `conda` method is no longer supported at all. Accordingly, the `environments_and_requirements` directory has been deleted from the repository.
#### Command-line name changes
All of InvokeAI's functionality, including the WebUI, command-line interface, textual inversion training and model merging, can all be accessed from the `invoke.sh` and `invoke.bat` launcher scripts. The menu of options has been expanded to add the new functionality. For the convenience of developers and power users, we have normalized the names of the InvokeAI command-line scripts:
* `invokeai` -- Command-line client
* `invokeai --web` -- Web GUI
* `invokeai-merge --gui` -- Model merging script with graphical front end
* `invokeai-ti --gui` -- Textual inversion script with graphical front end
* `invokeai-configure` -- Configuration tool for initializing the `invokeai` directory and selecting popular starter models.
For backward compatibility, the old command names are also recognized, including `invoke.py` and `configure-invokeai.py`. However, these are deprecated and will eventually be removed.
Developers should be aware that the locations of the script's source code has been moved. The new locations are:
Developers are strongly encouraged to perform an "editable" install of InvokeAI using `pip install -e . --use-pep517` in the Git repository, and then to call the scripts using their 2.3.0 names, rather than executing the scripts directly. Developers should also be aware that the several important data files have been relocated into a new directory named `invokeai`. This includes the WebGUI's `frontend` and `backend` directories, and the `INITIAL_MODELS.yaml` files used by the installer to select starter models. Eventually all InvokeAI modules will be in subdirectories of `invokeai`.
Please see [2.3.0 Release Notes](https://github.com/invoke-ai/InvokeAI/releases/tag/v2.3.0) for further details.
For older changelogs, please visit the
**[CHANGELOG](CHANGELOG/#v223-2-december-2022)**.
## :material-target: Troubleshooting
Please check out our
**[:material-frequently-asked-questions: Q&A](help/TROUBLESHOOT.md)** to get
solutions for common installation problems and other issues.
Please check out our**[:material-frequently-asked-questions:
Troubleshooting
Guide](installation/010_INSTALL_AUTOMATED.md#troubleshooting)** to
get solutions for common installation problems and other issues.
## :octicons-repo-push-24: Contributing
@ -274,8 +265,8 @@ thank them for their time, hard work and effort.
For support, please use this repository's GitHub Issues tracking service. Feel
free to send me an email if you use and like the script.
Original portions of the software are Copyright (c) 2020
[Lincoln D. Stein](https://github.com/lstein)
Original portions of the software are Copyright (c) 2022-23
by [The InvokeAI Team](https://github.com/invoke-ai).
1.<aname="hardware_requirements">**Hardware Requirements**: </a>Make sure that your system meets the [hardware
requirements](../index.md#hardware-requirements) and has the
appropriate GPU drivers installed. For a system with an NVIDIA
card installed, you will need to install the CUDA driver, while
AMD-based cards require the ROCm driver. In most cases, if you've
already used the system for gaming or other graphics-intensive
tasks, the appropriate drivers will already be installed. If
unsure, check the [GPU Driver Guide](030_INSTALL_CUDA_AND_ROCM.md)
!!! info "Required Space"
Installation requires roughly 18G of free disk space to load the libraries and
recommended model weights files.
Installation requires roughly 18G of free disk space to load
the libraries and recommended model weights files.
Regardless of your destination disk, your *system drive* (`C:\` on Windows, `/` on macOS/Linux) requires at least 6GB of free disk space to download and cache python dependencies. NOTE for Linux users: if your temporary directory is mounted as a `tmpfs`, ensure it has sufficient space.
Regardless of your destination disk, your *system drive*
(`C:\` on Windows, `/` on macOS/Linux) requires at least 6GB
of free disk space to download and cache python
dependencies.
2. Check that your system has an up-to-date Python installed. To do this, open
up a command-line window ("Terminal" on Linux and Macintosh, "Command" or
"Powershell" on Windows) and type `python --version`. If Python is
installed, it will print out the version number. If it is version `3.9.1` or
higher, you meet requirements.
NOTE for Linux users: if your temporary directory is mounted
as a `tmpfs`, ensure it has sufficient space.
!!! warning "If you see an older version, or get a command not found error"
2.<aname="software_requirements">**Software Requirements**: </a>Check that your system has an up-to-date Python installed. To do
this, open up a command-line window ("Terminal" on Linux and
Macintosh, "Command" or "Powershell" on Windows) and type `python
--version`. If Python is installed, it will print out the version
number. If it is version `3.9.*` or `3.10.*`, you meet
requirements. We do not recommend using Python 3.11 or higher,
as not all the libraries that InvokeAI depends on work properly
with this version.
Go to [Python Downloads](https://www.python.org/downloads/) and
download the appropriate installer package for your platform. We recommend
- Installation requires an up to date version of the Microsoft Visual C libraries. Please install the 2015-2022 libraries available here: https://learn.microsoft.com/en-us/cpp/windows/deploying-native-desktop-applications-visual-cpp?view=msvc-170
Please double-click on the file `WinLongPathsEnabled.reg` and
accept the dialog box that asks you if you wish to modify your registry.
This activates long filename support on your system and will prevent
mysterious errors during installation.
=== "Mac users"
=== "Linux"
To install an appropriate version of Python on Ubuntu 22.04
and higher, run the following:
- After installing Python, you may need to run the
- You may need to install the Xcode command line tools. These
You may need to install the Xcode command line tools. These
are a set of tools that are needed to run certain applications in a
Terminal, including InvokeAI. This package is provided directly by Apple.
Terminal, including InvokeAI. This package is provided
directly by Apple. To install, open a terminal window and run `xcode-select --install`. You will get a macOS system popup guiding you through the
install. If you already have them installed, you will instead see some
output in the Terminal advising you that the tools are already installed. More information can be found at [FreeCode Camp](https://www.freecodecamp.org/news/install-xcode-command-line-tools/)
- To install, open a terminal window and run `xcode-select
--install`. You will get a macOS system popup guiding you through the
install. If you already have them installed, you will instead see some
output in the Terminal advising you that the tools are already installed.
3. **Download the Installer**: The InvokeAI installer is distributed as a ZIP files. Go to the
where "2.X.X" is the latest released version. The file is located
at the very bottom of the release page, under **Assets**.
For reasons that are not entirely clear, installing the correct version of Python can be a bit of a challenge on Ubuntu, Linux Mint, Pop!_OS, and other Debian-derived distributions.
4. **Unpack the installer**: Unpack the zip file into a convenient directory. This will create a new
directory named "InvokeAI-Installer". When unpacked, the directory
Both `python` and `python3` commands are now pointing at Python3.10. You can still access older versions of Python by calling `python2`, `python3.8`, etc.
Linux systems require a couple of additional graphics libraries to be installed for proper functioning of `python3-opencv`. Please run the following:
commands and the PIP package manager. The [second one](#Conda_method)
based on the Anaconda3 package manager (`conda`). Both methods require
you to enter commands on the terminal, also known as the "console".
!!! tip "Conda"
As of InvokeAI v2.3.0 installation using the `conda` package manager is no longer being supported. It will likely still work, but we are not testing this installationmethod.
Note that the conda install method is currently deprecated and will not
be supported at some point in the future.
On Windows systems you are encouraged to install and use the
If you choose the run the web interface, point your browser at
http://localhost:9090 in order to load the GUI.
!!! tip
You can permanently set the location of the runtime directory by setting the environment variable INVOKEAI_ROOT to the path of the directory.
9. Render away!
Browse the [features](../features/CLI.md) section to learn about all the things you
can do with InvokeAI.
Note that some GPUs are slow to warm up. In particular, when using an AMD
card with the ROCm driver, you may have to wait for over a minute the first
time you try to generate an image. Fortunately, after the warm up period
rendering will be fast.
10. Subsequently, to relaunch the script, be sure to run "conda activate
invokeai", enter the `InvokeAI` directory, and then launch the invoke
script. If you forget to activate the 'invokeai' environment, the script
will fail with multiple `ModuleNotFound` errors.
!!! tip
Do not move the source code repository after installation. The virtual environment directory has absolute paths in it that get confused if the directory is moved.
---
### Conda method
1. Check that your system meets the
[hardware requirements](index.md#Hardware_Requirements) and has the
appropriate GPU drivers installed. In particular, if you are a Linux user
with an AMD GPU installed, you may need to install the
Afterwards verify that the file `environment.yml` has been created, either via the
explorer or by using the command `dir` from the terminal
```cmd
dir
```
!!! warning "Do not try to run conda on directly on the subdirectory environments file. This won't work. Instead, copy or link it to the top-level directory as shown."
6. Create the conda environment:
```bash
conda env update
```
This will create a new environment named `invokeai` and install all InvokeAI
dependencies into it. If something goes wrong you should take a look at
[troubleshooting](#troubleshooting).
7. Activate the `invokeai` environment:
In order to use the newly created environment you will first need to
activate it
```bash
conda activate invokeai
```
Your command-line prompt should change to indicate that `invokeai` is active
by prepending `(invokeai)`.
```ps
deactivate
.venv\Scripts\activate
```
8. Set up the runtime directory
In this step you will initialize a runtime directory that will
contain the models, model config files, directory for textual
inversion embeddings, and your outputs. This keeps the runtime
directory separate from the source code and aids in updating.
In this step you will initialize your runtime directory with the downloaded
models, model config files, directory for textual inversion embeddings, and
your outputs.
You may pick any location for this directory using the `--root_dir`
option (abbreviated --root). If you don't pass this option, it will
| `HUGGING_FACE_HUB_TOKEN` | No default, but **required**! | This is the only **required** variable, without it you can't download the huggingface models |
| `REPOSITORY_NAME` | The Basename of the Repo folder | This name will used as the container repository/image name |
| `VOLUMENAME` | `${REPOSITORY_NAME,,}_data` | Name of the Docker Volume where model files will be stored |
| `ARCH` | arch of the build machine | Can be changed if you want to build the image for another arch |
| `CONTAINER_REGISTRY` | ghcr.io | Name of the Container Registry to use for the full tag |
| `CONTAINER_REPOSITORY` | `$(whoami)/${REPOSITORY_NAME}` | Name of the Container Repository |
| `CONTAINER_FLAVOR` | `cuda`| The flavor of the image to built, available options are `cuda`, `rocm` and `cpu`. If you choose `rocm` or `cpu`, the extra-index-url will be selected automatically, unless you set one yourself. |
| `CONTAINER_TAG` | `${INVOKEAI_BRANCH##*/}-${CONTAINER_FLAVOR}` | The Container Repository / Tag which will be used |
| `INVOKE_DOCKERFILE` | `Dockerfile` | The Dockerfile which should be built, handy for development |
| `PIP_EXTRA_INDEX_URL` | | If you want to use a custom pip-extra-index-url |
</figure>
#### Build the Image
I provided a build script, which is located in `docker-build/build.sh` but still
needs to be executed from the Repository root.
I provided a build script, which is located next to the Dockerfile in
`docker/build.sh`. It can be executed from repository root like this:
```bash
./docker-build/build.sh
./docker/build.sh
```
The build Script not only builds the container, but also creates the docker
volume if not existing yet, or if empty it will just download the models.
volume if not existing yet.
#### Run the Container
After the build process is done, you can run the container via the provided
`docker-build/run.sh` script
`docker/run.sh` script
```bash
./docker-build/run.sh
./docker/run.sh
```
When used without arguments, the container will start the webserver and provide
For example, use `GPU_FLAGS=device=GPU-3a23c669-1f69-c64e-cf85-44e9b07e7a2a` to choose a specific device identified by a UUID.
## Running InvokeAI in the cloud with Docker
We offer an optimized Ubuntu-based image that has been well-tested in cloud deployments. Note: it also works well locally on Linux x86_64 systems with an Nvidia GPU. It *may* also work on Windows under WSL2 and on Intel Mac (not tested).
An advantage of this method is that it does not need any local setup or additional dependencies.
See the `docker-build/Dockerfile.cloud` file to familizarize yourself with the image's content.
### Prerequisites
- a `docker` runtime
- `make` (optional but helps for convenience)
- Huggingface token to download models, or an existing InvokeAI runtime directory from a previous installation
Neither local Python nor any dependencies are required. If you don't have `make` (part of `build-essentials` on Ubuntu), or do not wish to install it, the commands from the `docker-build/Makefile` are readily adaptable to be executed directly.
### Building and running the image locally
1. Clone this repo and `cd docker-build`
1. `make build` - this will build the image. (This does *not* require a GPU-capable system).
1. _(skip this step if you already have a complete InvokeAI runtime directory)_
- `make configure` (This does *not* require a GPU-capable system)
- this will create a local cache of models and configs (a.k.a the _runtime dir_)
- enter your Huggingface token when prompted
1. `make web`
1. Open the `http://localhost:9090` URL in your browser, and enjoy the banana sushi!
To use InvokeAI on the cli, run `make cli`. To open a Bash shell in the container for arbitraty advanced use, `make shell`.
#### Building and running without `make`
(Feel free to adapt paths such as `${HOME}/invokeai` to your liking, and modify the CLI arguments as necessary).
!!! example "Build the image and configure the runtime directory"
This image works anywhere you can run a container with a mounted Docker volume. You may either build this image on a cloud instance, or build and push it to your Docker registry. To manually run this on a cloud instance (such as AWS EC2, GCP or Azure VM):
1. build this image either in the cloud (you'll need to pull the repo), or locally
1. `docker tag` it as `your-registry/invokeai` and push to your registry (i.e. Dockerhub)
1. `docker pull` it on your cloud instance
1. configure the runtime directory as per above example, using `docker run ... configure_invokeai.py` script
1. use either one of the `docker run` commands above, substituting the image name for your own image.
To run this on Runpod, please refer to the following Runpod template: https://www.runpod.io/console/gpu-secure-cloud?template=vm19ukkycf (you need a Runpod subscription). When launching the template, feel free to set the image to pull your own build.
The template's `README` provides ample detail, but at a high level, the process is as follows:
1. create a pod using this Docker image
1. ensure the pod has an `INVOKEAI_ROOT=<path_to_your_persistent_volume>` environment variable, and that it corresponds to the path to your pod's persistent volume mount
1. Run the pod with `sleep infinity` as the Docker command
1. Use Runpod basic SSH to connect to the pod, and run `python scripts/configure_invokeai.py` script
1. Stop the pod, and change the Docker command to `python scripts/invoke.py --web --host 0.0.0.0`
1. Run the pod again, connect to your pod on HTTP port 9090, and enjoy the banana sushi!
Running on other cloud providers such as Vast.ai will likely work in a similar fashion.
For example, use `GPU_FLAGS=device=GPU-3a23c669-1f69-c64e-cf85-44e9b07e7a2a` to
choose a specific device identified by a UUID.
---
@ -240,13 +164,12 @@ Running on other cloud providers such as Vast.ai will likely work in a similar f
If you're on a **Linux container** the `invoke` script is **automatically
started** and the output dir set to the Docker volume you created earlier.
If you're **directly on macOS follow these startup instructions**.
With the Conda environment activated (`conda activate ldm`), run the interactive
If you're **directly on macOS follow these startup instructions**. With the
Conda environment activated (`conda activate ldm`), run the interactive
interface that combines the functionality of the original scripts `txt2img` and
`img2img`:
Use the more accurate but VRAM-intensive full precision math because
half-precision requires autocast and won't work.
By default the images are saved in `outputs/img-samples/`.
`img2img`: Use the more accurate but VRAM-intensive full precision math because
half-precision requires autocast and won't work. By default the images are saved
in `outputs/img-samples/`.
```Shell
python3 scripts/invoke.py --full_precision
@ -262,9 +185,9 @@ invoke> q
### Text to Image
For quick (but bad) image results test with 5 steps (default 50) and 1 sample
image. This will let you know that everything is set up correctly.
Then increase steps to 100 or more for good (but slower) results.
The prompt can be in quotes or not.
image. This will let you know that everything is set up correctly. Then increase
steps to 100 or more for good (but slower) results. The prompt can be in quotes
or not.
```Shell
invoke> The hulk fighting with sheldon cooper -s5 -n1
@ -277,10 +200,9 @@ You'll need to experiment to see if face restoration is making it better or
worse for your specific prompt.
If you're on a container the output is set to the Docker volume. You can copy it
wherever you want.
You can download it from the Docker Desktop app, Volumes, my-vol, data.
Or you can copy it from your Mac terminal. Keep in mind `docker cp` can't expand
`*.png` so you'll need to specify the image file name.
wherever you want. You can download it from the Docker Desktop app, Volumes,
my-vol, data. Or you can copy it from your Mac terminal. Keep in mind
`docker cp` can't expand `*.png` so you'll need to specify the image file name.
On your host Mac (you can use the name of any container that mounted the
|stable-diffusion-1.5 | v1-5-pruned-emaonly.ckpt | Most recent version of base Stable Diffusion model | https://huggingface.co/runwayml/stable-diffusion-v1-5 |
| stable-diffusion-1.4 | sd-v1-4.ckpt | Previous version of base Stable Diffusion model | https://huggingface.co/CompVis/stable-diffusion-v-1-4-original |
| inpainting-1.5 | sd-v1-5-inpainting.ckpt | Stable Diffusion 1.5 model specialized for inpainting | https://huggingface.co/runwayml/stable-diffusion-inpainting |
| waifu-diffusion-1.3 | model-epoch09-float32.ckpt | Stable Diffusion 1.4 trained to produce anime images | https://huggingface.co/hakurei/waifu-diffusion-v1-3 |
|`<all models>` | vae-ft-mse-840000-ema-pruned.ckpt | A fine-tune file add-on file that improves face generation | https://huggingface.co/stabilityai/sd-vae-ft-mse-original/ |
|Model Name | HuggingFace Repo ID | Description | URL |
|---------- | ---------- | ----------- | --- |
|stable-diffusion-1.5|runwayml/stable-diffusion-v1-5|Stable Diffusion version 1.5 diffusers model (4.27 GB)|https://huggingface.co/runwayml/stable-diffusion-v1-5 |
|sd-inpainting-1.5|runwayml/stable-diffusion-inpainting|RunwayML SD 1.5 model optimized for inpainting, diffusers version (4.27 GB)|https://huggingface.co/runwayml/stable-diffusion-inpainting |
|stable-diffusion-2.1|stabilityai/stable-diffusion-2-1|Stable Diffusion version 2.1 diffusers model, trained on 768 pixel images (5.21 GB)|https://huggingface.co/stabilityai/stable-diffusion-2-1 |
|sd-inpainting-2.0|stabilityai/stable-diffusion-2-inpainting|Stable Diffusion version 2.0 inpainting model (5.21 GB)|https://huggingface.co/stabilityai/stable-diffusion-2-inpainting |
|analog-diffusion-1.0|wavymulder/Analog-Diffusion|An SD-1.5 model trained on diverse analog photographs (2.13 GB)|https://huggingface.co/wavymulder/Analog-Diffusion |
|deliberate-1.0|XpucT/Deliberate|Versatile model that produces detailed images up to 768px (4.27 GB)|https://huggingface.co/XpucT/Deliberate |
|dreamlike-photoreal-2.0|dreamlike-art/dreamlike-photoreal-2.0|A photorealistic model trained on 768 pixel images based on SD 1.5 (2.13 GB)|https://huggingface.co/dreamlike-art/dreamlike-photoreal-2.0 |
|inkpunk-1.0|Envvi/Inkpunk-Diffusion|Stylized illustrations inspired by Gorillaz, FLCL and Shinkawa; prompt with "nvinkpunk" (4.27 GB)|https://huggingface.co/Envvi/Inkpunk-Diffusion |
|openjourney-4.0|prompthero/openjourney|An SD 1.5 model fine tuned on Midjourney; prompt with "mdjrny-v4 style" (2.13 GB)|https://huggingface.co/prompthero/openjourney |
|portrait-plus-1.0|wavymulder/portraitplus|An SD-1.5 model trained on close range portraits of people; prompt with "portrait+" (2.13 GB)|https://huggingface.co/wavymulder/portraitplus |
|seek-art-mega-1.0|coreco/seek.art_MEGA|A general use SD-1.5 "anything" model that supports multiple styles (2.1 GB)|https://huggingface.co/coreco/seek.art_MEGA |
|trinart-2.0|naclbit/trinart_stable_diffusion_v2|An SD-1.5 model finetuned with ~40K assorted high resolution manga/anime-style images (2.13 GB)|https://huggingface.co/naclbit/trinart_stable_diffusion_v2 |
|waifu-diffusion-1.4|hakurei/waifu-diffusion|An SD-1.5 model trained on 680k anime/manga-style images (2.13 GB)|https://huggingface.co/hakurei/waifu-diffusion |
Note that these files are covered by an "Ethical AI" license which forbids
certain uses. You will need to create an account on the Hugging Face website and
accept the license terms before you can access the files.
The predefined configuration file for InvokeAI (located at
`configs/models.yaml`) provides entries for each of these weights files.
`stable-diffusion-1.5` is the default model used, and we strongly recommend that
you install this weights file if nothing else.
Note that these files are covered by an "Ethical AI" license which
forbids certain uses. When you initially download them, you are asked
to accept the license terms. In addition, some of these models carry
additional license terms that limit their use in commercial
applications or on public servers. Be sure to familiarize yourself
with the model terms by visiting the URLs in the table above.
## Community-Contributed Models
There are too many to list here and more are being contributed every day.
HuggingFace maintains a
[fast-growing repository](https://huggingface.co/sd-concepts-library) of
fine-tune (".bin") models that can be imported into InvokeAI by passing the
`--embedding_path` option to the `invoke.py` command.
There are too many to list here and more are being contributed every
| arabian-nights-1.0 | This is the name of the model that you will refer to from within the CLI and the WebGUI when you need to load and use the model. |
| description | Any description that you want to add to the model to remind you what it is. |
| weights | Relative path to the .ckpt weights file for this model. |
| config | This is the confusingly-named configuration file for the model itself. Use `./configs/stable-diffusion/v1-inference.yaml` unless the model happens to need a custom configuration, in which case the place you downloaded it from will tell you what to use instead. For example, the runwayML custom inpainting model requires the file `configs/stable-diffusion/v1-inpainting-inference.yaml`. This is already inclued in the InvokeAI distribution and is configured automatically for you by the `configure_invokeai.py` script. |
| vae | If you want to add a VAE file to the model, then enter its path here. |
| width, height | This is the width and height of the images used to train the model. Currently they are always 512 and 512. |
Note that `format` is `ckpt` for both `.ckpt` and `.safetensors` files.
Save the `models.yaml` and relaunch InvokeAI. The new model should now be
available for your use.
#### A diffusers model
A stanza for a `diffusers` model will look like this for a HuggingFace
model with a repository ID:
```yaml
arabian-nights-1.1:
description: An even better fine-tune of the Arabian Nights
repo_id: captahab/arabian-nights-1.1
format: diffusers
default: true
```
And for a downloaded directory:
```yaml
arabian-nights-1.1:
description: An even better fine-tune of the Arabian Nights
path: /path/to/captahab-arabian-nights-1.1
format: diffusers
default: true
```
There is additional syntax for indicating an external VAE to use with
this model. See `INITIAL_MODELS.yaml` and `models.yaml` for examples.
After you save the modified `models.yaml` file relaunch
`invokeai`. The new model will now be available for your use.
### Installation via the WebUI
To access the WebUI Model Manager, click on the button that looks like
a cube in the upper right side of the browser screen. This will bring
up a dialogue that lists the models you have already installed, and
* `--model <modelname>` -- Start up with the indicated model loaded
* `--ckpt_convert` -- When a checkpoint/safetensors model is loaded, convert it into a `diffusers` model in memory. This does not permanently save the converted model to disk.
* `--autoconvert <path/to/directory>` -- Scan the indicated directory path for new checkpoint/safetensors files, convert them into `diffusers` models, and import them into InvokeAI.
Here is an example of providing an argument on the command line using
Afterwards verify that the file `environment.yml` has been created, either via the
explorer or by using the command `dir` from the terminal
```cmd
dir
```
!!! warning "Do not try to run conda on directly on the subdirectory environments file. This won't work. Instead, copy or link it to the top-level directory as shown."
6. Create the conda environment:
```bash
conda env update
```
This will create a new environment named `invokeai` and install all InvokeAI
dependencies into it. If something goes wrong you should take a look at
[troubleshooting](#troubleshooting).
7. Activate the `invokeai` environment:
In order to use the newly created environment you will first need to
activate it
```bash
conda activate invokeai
```
Your command-line prompt should change to indicate that `invokeai` is active
by prepending `(invokeai)`.
8. Pre-Load the model weights files:
!!! tip
If you have already downloaded the weights file(s) for another Stable
Diffusion distribution, you may skip this step (by selecting "skip" when
prompted) and configure InvokeAI to use the previously-downloaded files. The
process for this is described in [here](INSTALLING_MODELS.md).
```bash
python scripts/configure_invokeai.py
```
The script `configure_invokeai.py` will interactively guide you through the
process of downloading and installing the weights files needed for InvokeAI.
Note that the main Stable Diffusion weights file is protected by a license
agreement that you have to agree to. The script will list the steps you need
to take to create an account on the site that hosts the weights files,
accept the agreement, and provide an access token that allows InvokeAI to
legally download and install the weights files.
If you get an error message about a module not being installed, check that
the `invokeai` environment is active and if not, repeat step 5.
9. Run the command-line- or the web- interface:
!!! example ""
!!! warning "Make sure that the conda environment is activated, which should create `(invokeai)` in front of your prompt!"
=== "CLI"
```bash
python scripts/invoke.py
```
=== "local Webserver"
```bash
python scripts/invoke.py --web
```
=== "Public Webserver"
```bash
python scripts/invoke.py --web --host 0.0.0.0
```
If you choose the run the web interface, point your browser at
http://localhost:9090 in order to load the GUI.
10. Render away!
Browse the [features](../features/CLI.md) section to learn about all the things you
can do with InvokeAI.
Note that some GPUs are slow to warm up. In particular, when using an AMD
card with the ROCm driver, you may have to wait for over a minute the first
time you try to generate an image. Fortunately, after the warm up period
rendering will be fast.
11. Subsequently, to relaunch the script, be sure to run "conda activate
invokeai", enter the `InvokeAI` directory, and then launch the invoke
script. If you forget to activate the 'invokeai' environment, the script
will fail with multiple `ModuleNotFound` errors.
## Updating to newer versions of the script
This distribution is changing rapidly. If you used the `git clone` method
(step 5) to download the InvokeAI directory, then to update to the latest and
greatest version, launch the Anaconda window, enter `InvokeAI` and type:
InvokeAI uses [Weblate](https://weblate.org) for translation. Weblate is a FOSS project providing a scalable translation service. Weblate automates the tedious parts of managing translation of a growing project, and the service is generously provided at no cost to FOSS projects like InvokeAI.
## Contributing
If you'd like to contribute by adding or updating a translation, please visit our [Weblate project](https://hosted.weblate.org/engage/invokeai/). You'll need to sign in with your GitHub account (a number of other accounts are supported, including Google).
Once signed in, select a language and then the Web UI component. From here you can Browse and Translate strings from English to your chosen language. Zen mode offers a simpler translation experience.
Your changes will be attributed to you in the automated PR process; you don't need to do anything else.
## Help & Questions
Please check Weblate's [documentation](https://docs.weblate.org/en/latest/index.html) or ping @psychedelicious or @blessedcoolant on Discord if you have any questions.
## Thanks
Thanks to the InvokeAI community for their efforts to translate the project!
File diff suppressed because one or more lines are too long
Some files were not shown because too many files have changed in this diff
Show More
Reference in New Issue
Block a user
Blocking a user prevents them from interacting with repositories, such as opening or commenting on pull requests or issues. Learn more about blocking a user.